Asynchronous Messaging
What you'll build
Store and forward messaging is used for serving traffic to back-end services that can accept request messages only at a given rate. This is also used to ensure guaranteed delivery of messages. Messages never get lost since they are stored in the message store and available for future reference.
In this tutorial, instead of sending the request directly to the back-end service, you store the request message in the Message Broker profile of WSO2 EI 6.6.0. You will then use a Message Processor to retrieve the message from the store before delivering it to the back-end service.
Let's get started!
Step 1: Set up the workspace
Set up WSO2 Integration Studio as follows:
- Download the relevant WSO2 Integration Studio based on your operating system. The path to the extracted/installed folder is referred to as
MI_TOOLING_HOMEthroughout this tutorial. - If you did not try the Exposing Several Services as a Single Service tutorial yet:
- Download the pre-packaged project.
- Open WSO2 Integration Studio and go to File -> Import.
- Select Existing WSO2 Projects into workspace under the WSO2 category, click Next, and then upload the pre-packaged project.
Optionally, you can set up the CLI tool for artifact monitoring. This will later help you get details of the artifacts that you deploy in your Micro Integrator.
- Go to the WSO2 Micro Integrator website.
- Click Download -> Other Resources and click CLI Tooling to download the tool.
- Extract the downloaded ZIP file. This will be your
MI_CLI_HOMEdirectory. - Export the
MI_CLI_HOME/bindirectory path as an environment variable. This allows you to run the tool from any location on your computer using themicommand. Read more about the CLI tool.
Step 2: Develop the integration artifacts
Create the Message Store
Now, let's create a Message Store artifact to represent the broker.
- Right-click SampleServices in the Project Explorer and navigate to New->Message Store.
-
Select Create a new message-store artifact and specify the following details:
Property Value Description Message Store Name PaymentRequestMessageStoreThe name of the message store. Message Store Type WSO2 MB Message Store An instance of WSO2 Message Broker will be used as the broker. Queue Connection Factory amqp://admin:admin@clientID/carbon?brokerlist='tcp://localhost:5675'The connection factory URL for the WSO2 MB broker. Be sure to change the port to 5675. JNDI Queue Name PaymentRequestJMSMessageStore The name of the queue that will be created in WSO2 MB. 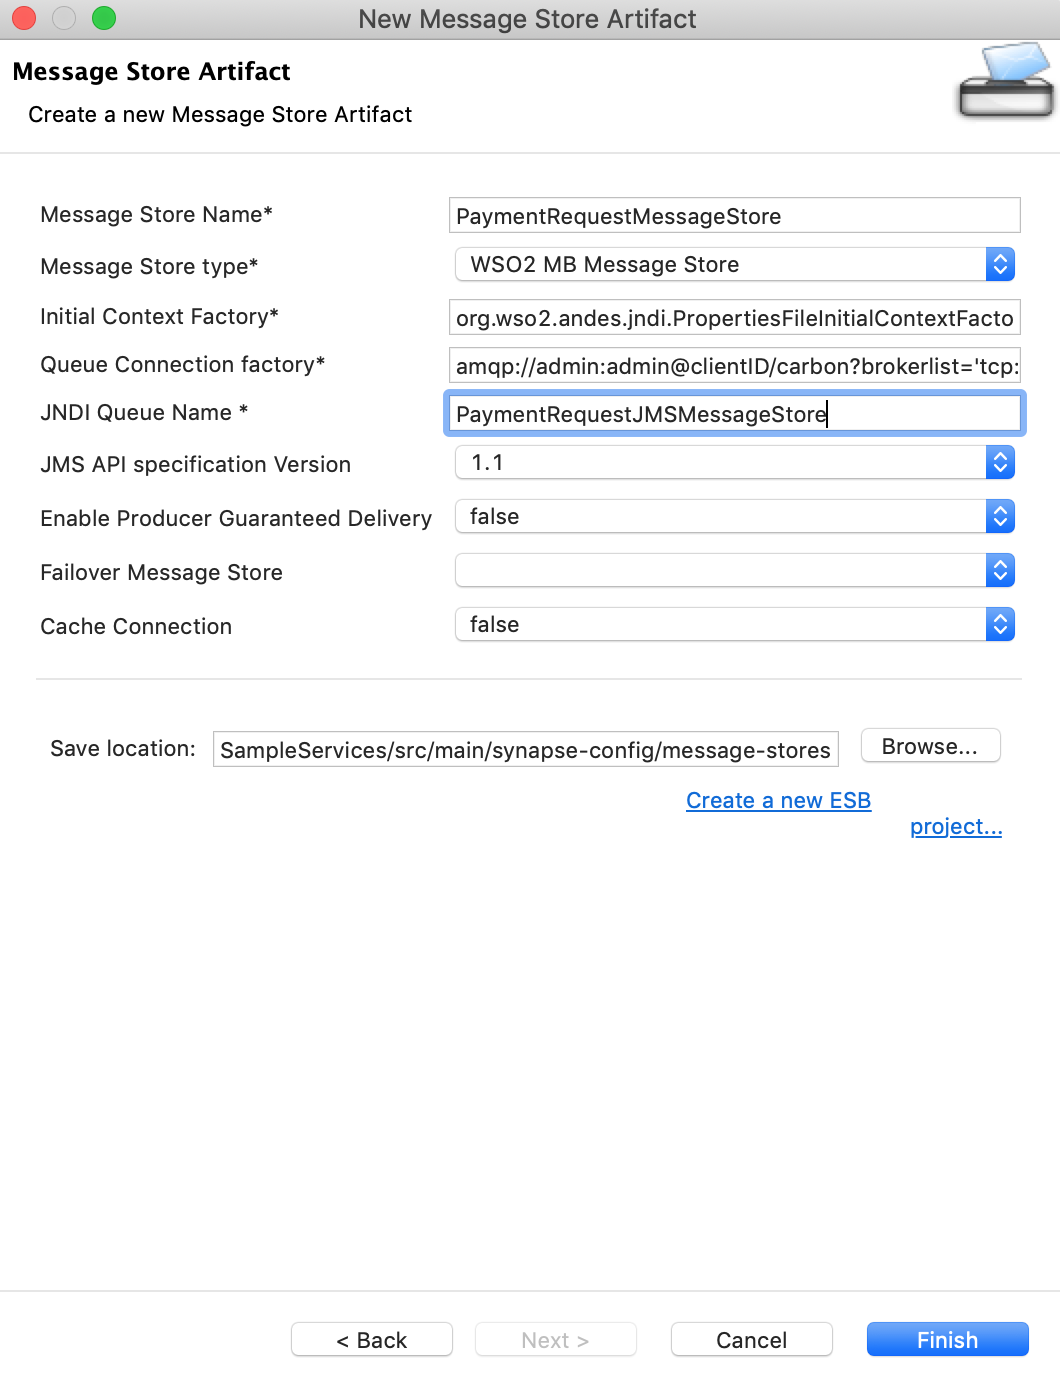
-
Click Finish.
Create the Response sequence
Let's create a Sequence that uses the message in the message store to send the request to SettlePaymentEP.
- Right click the SampleServices project in the Project Explorer and navigate to New -> Sequence.
-
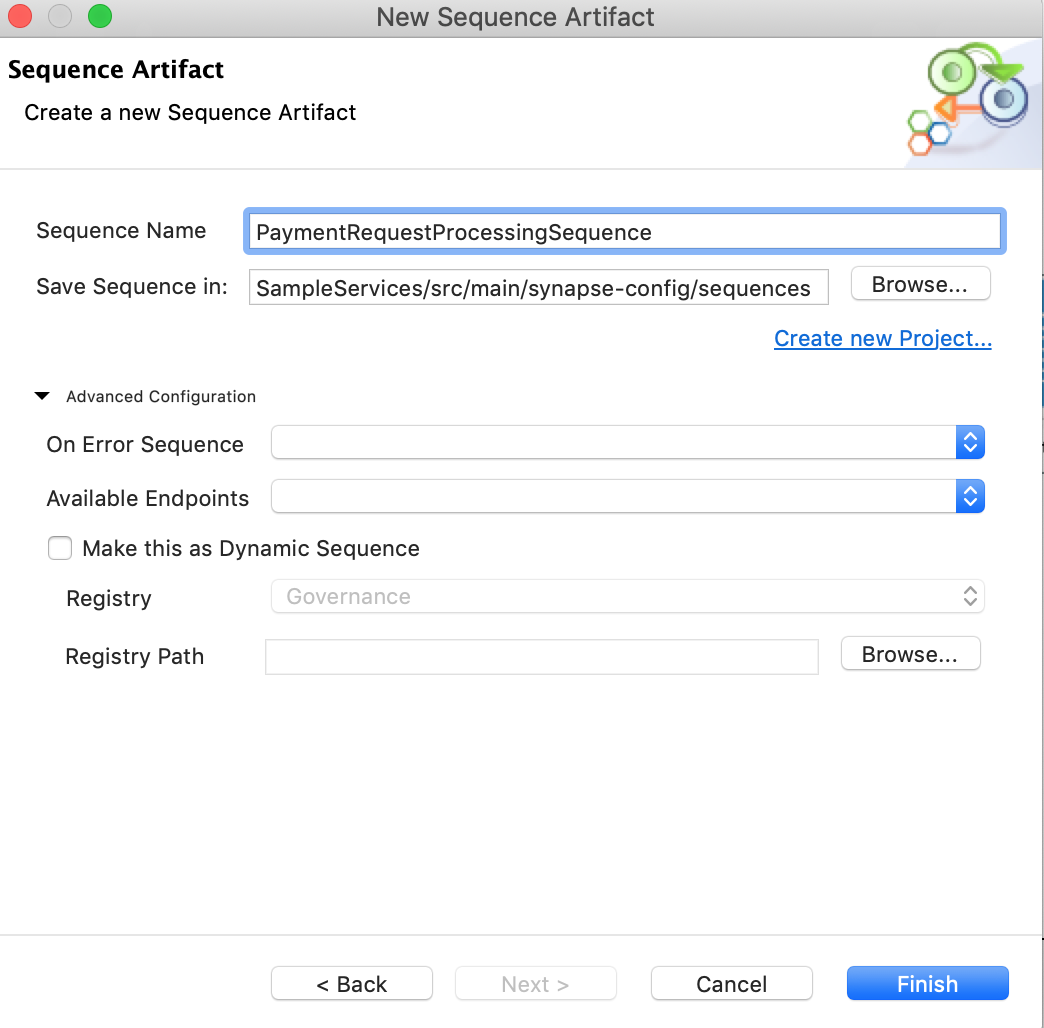
Select Create New Sequence and give PaymentRequestProcessingSequence as the name.
-
Click Finish.
-
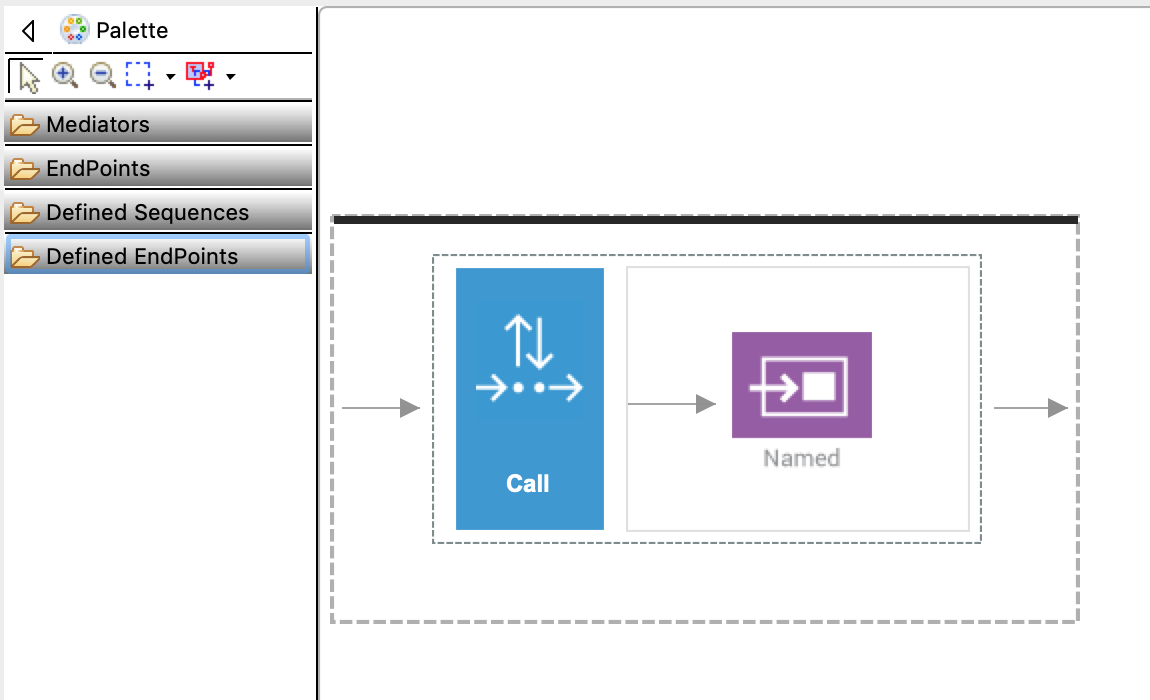
In the sequence you have created (in the previous step), drag and drop a Call mediator from the Mediators palette and add SettlePaymentEP from the Defined Endpoints palette to the empty box adjoining the Call mediator. This sends the request message from the store to SettlePaymentEP.
-
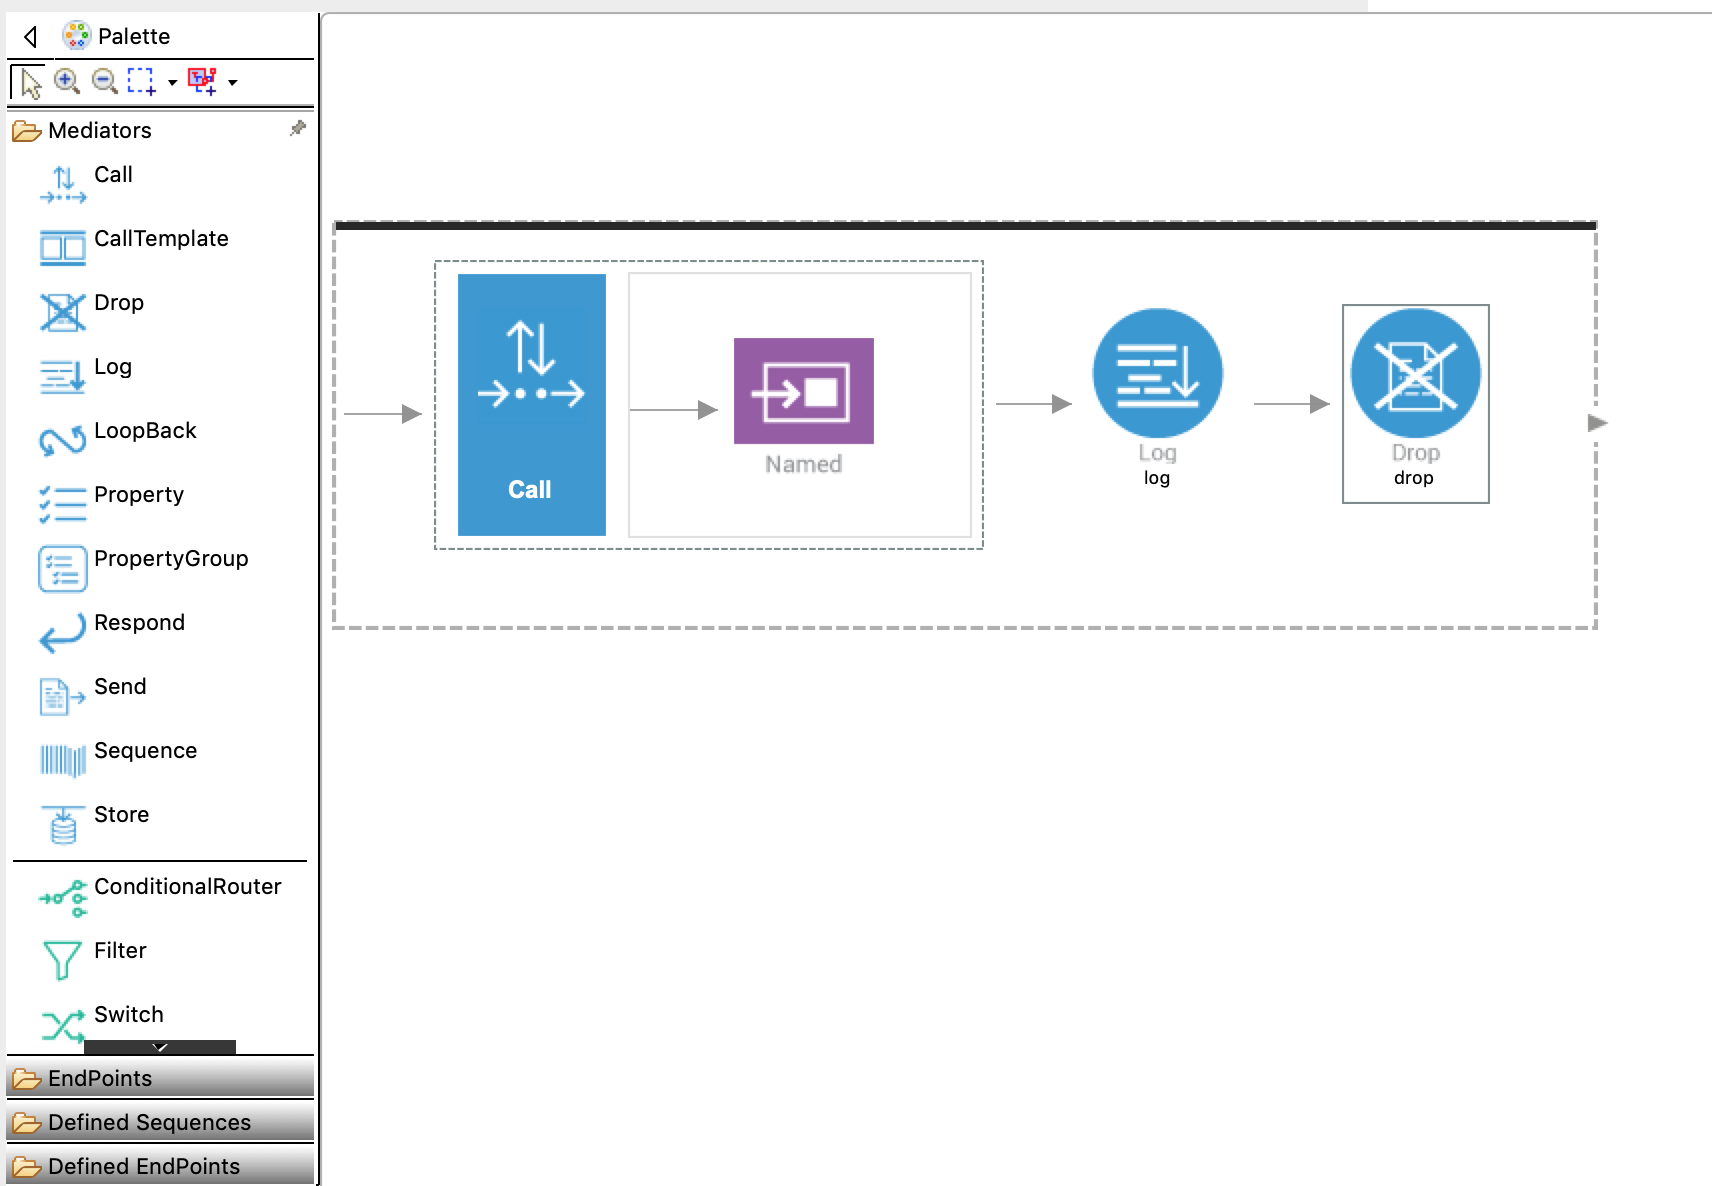
Drag and drop a Log mediator from the Mediators palette to log the response from SettlePaymentEP. Access the Property tab and specify the following details:
Field Value Log Category INFO Log Level FULL -
Add a Drop mediator from the Mediators palette. You should now have a completed sequence configuration that looks like this:
-
Save the updated sequence configuration.
Create the Message Processor
Let's create a Message Sampling Processor to dispatch the request message from the Message Store to the PaymentRequestProcessingSequence.
Info
You can also use the Scheduled Message Forwarding Processor here and define the endpoint within the processor. The Message Sampling Processor is used because you need to perform mediation on the request message in the next tutorial.
-
Right-click the SampleServices project in the Project Explorer and navigate to New -> Message Processor. Select create a new message-processor artifact and specify the details shown below:
Property Value Description Message Processor Type Message Sampling Processor This processor takes the message from the store and puts it into a sequence.
Message Processor Name PaymentRequestProcessor The name of the scheduled message forwarding processor. Message Store PaymentRequestMessageStore The message store from which the scheduled message forwarding processor consumes messages. Processor State Activate Whether the processor needs to be activated or deactivated. Sequence Follow the steps given below:
- Click Browse.
- Click the workspace link.
- Click Carbon Application Sequences > SampleServices .
- Select PaymentRequestProcessingSequence and click OK.
The name of the sequence to which the message from the store needs to be sent. 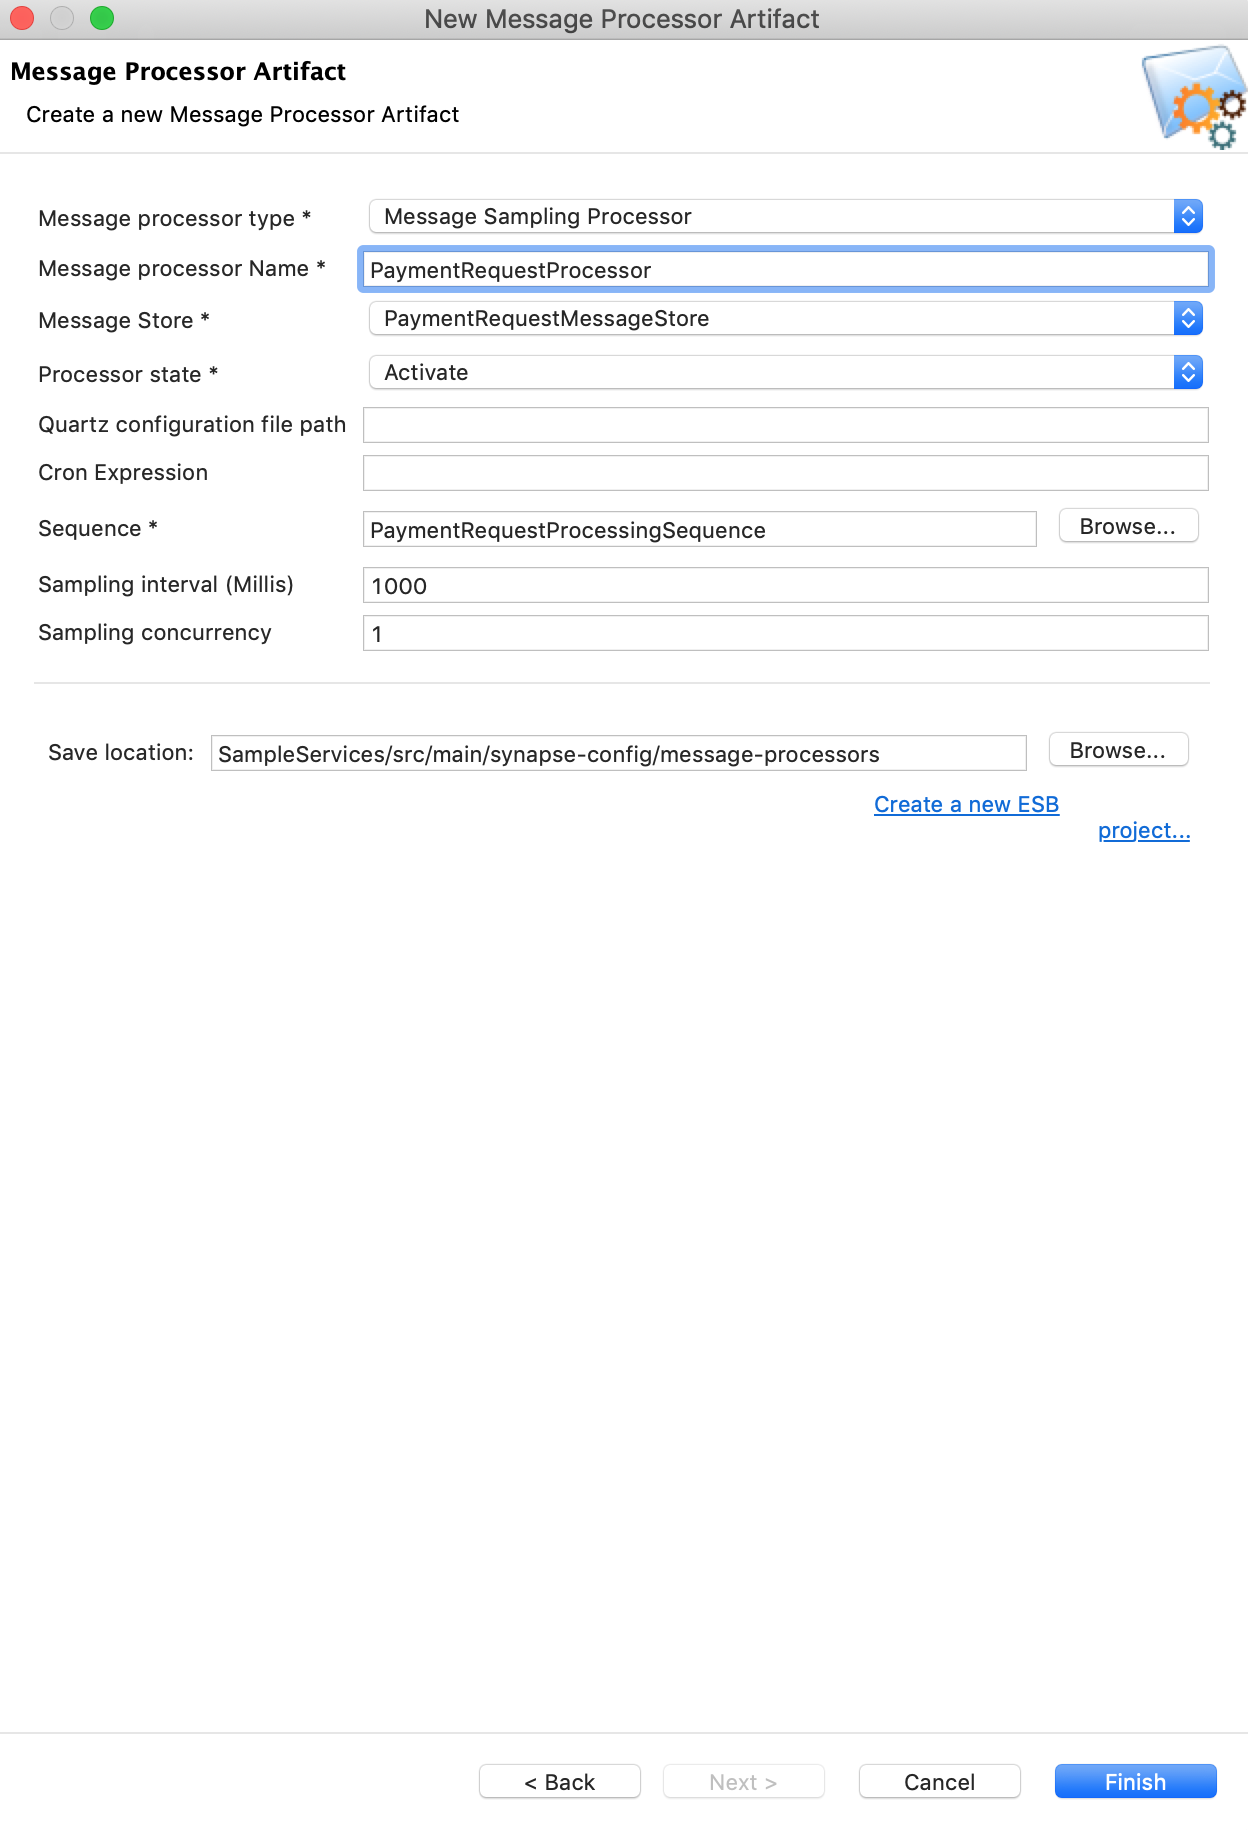
-
Click Finish.
Update the mediation flow
Let's update the REST API so that the messages sent to SettlePaymentEP is forwarded to the message store we created above.
-
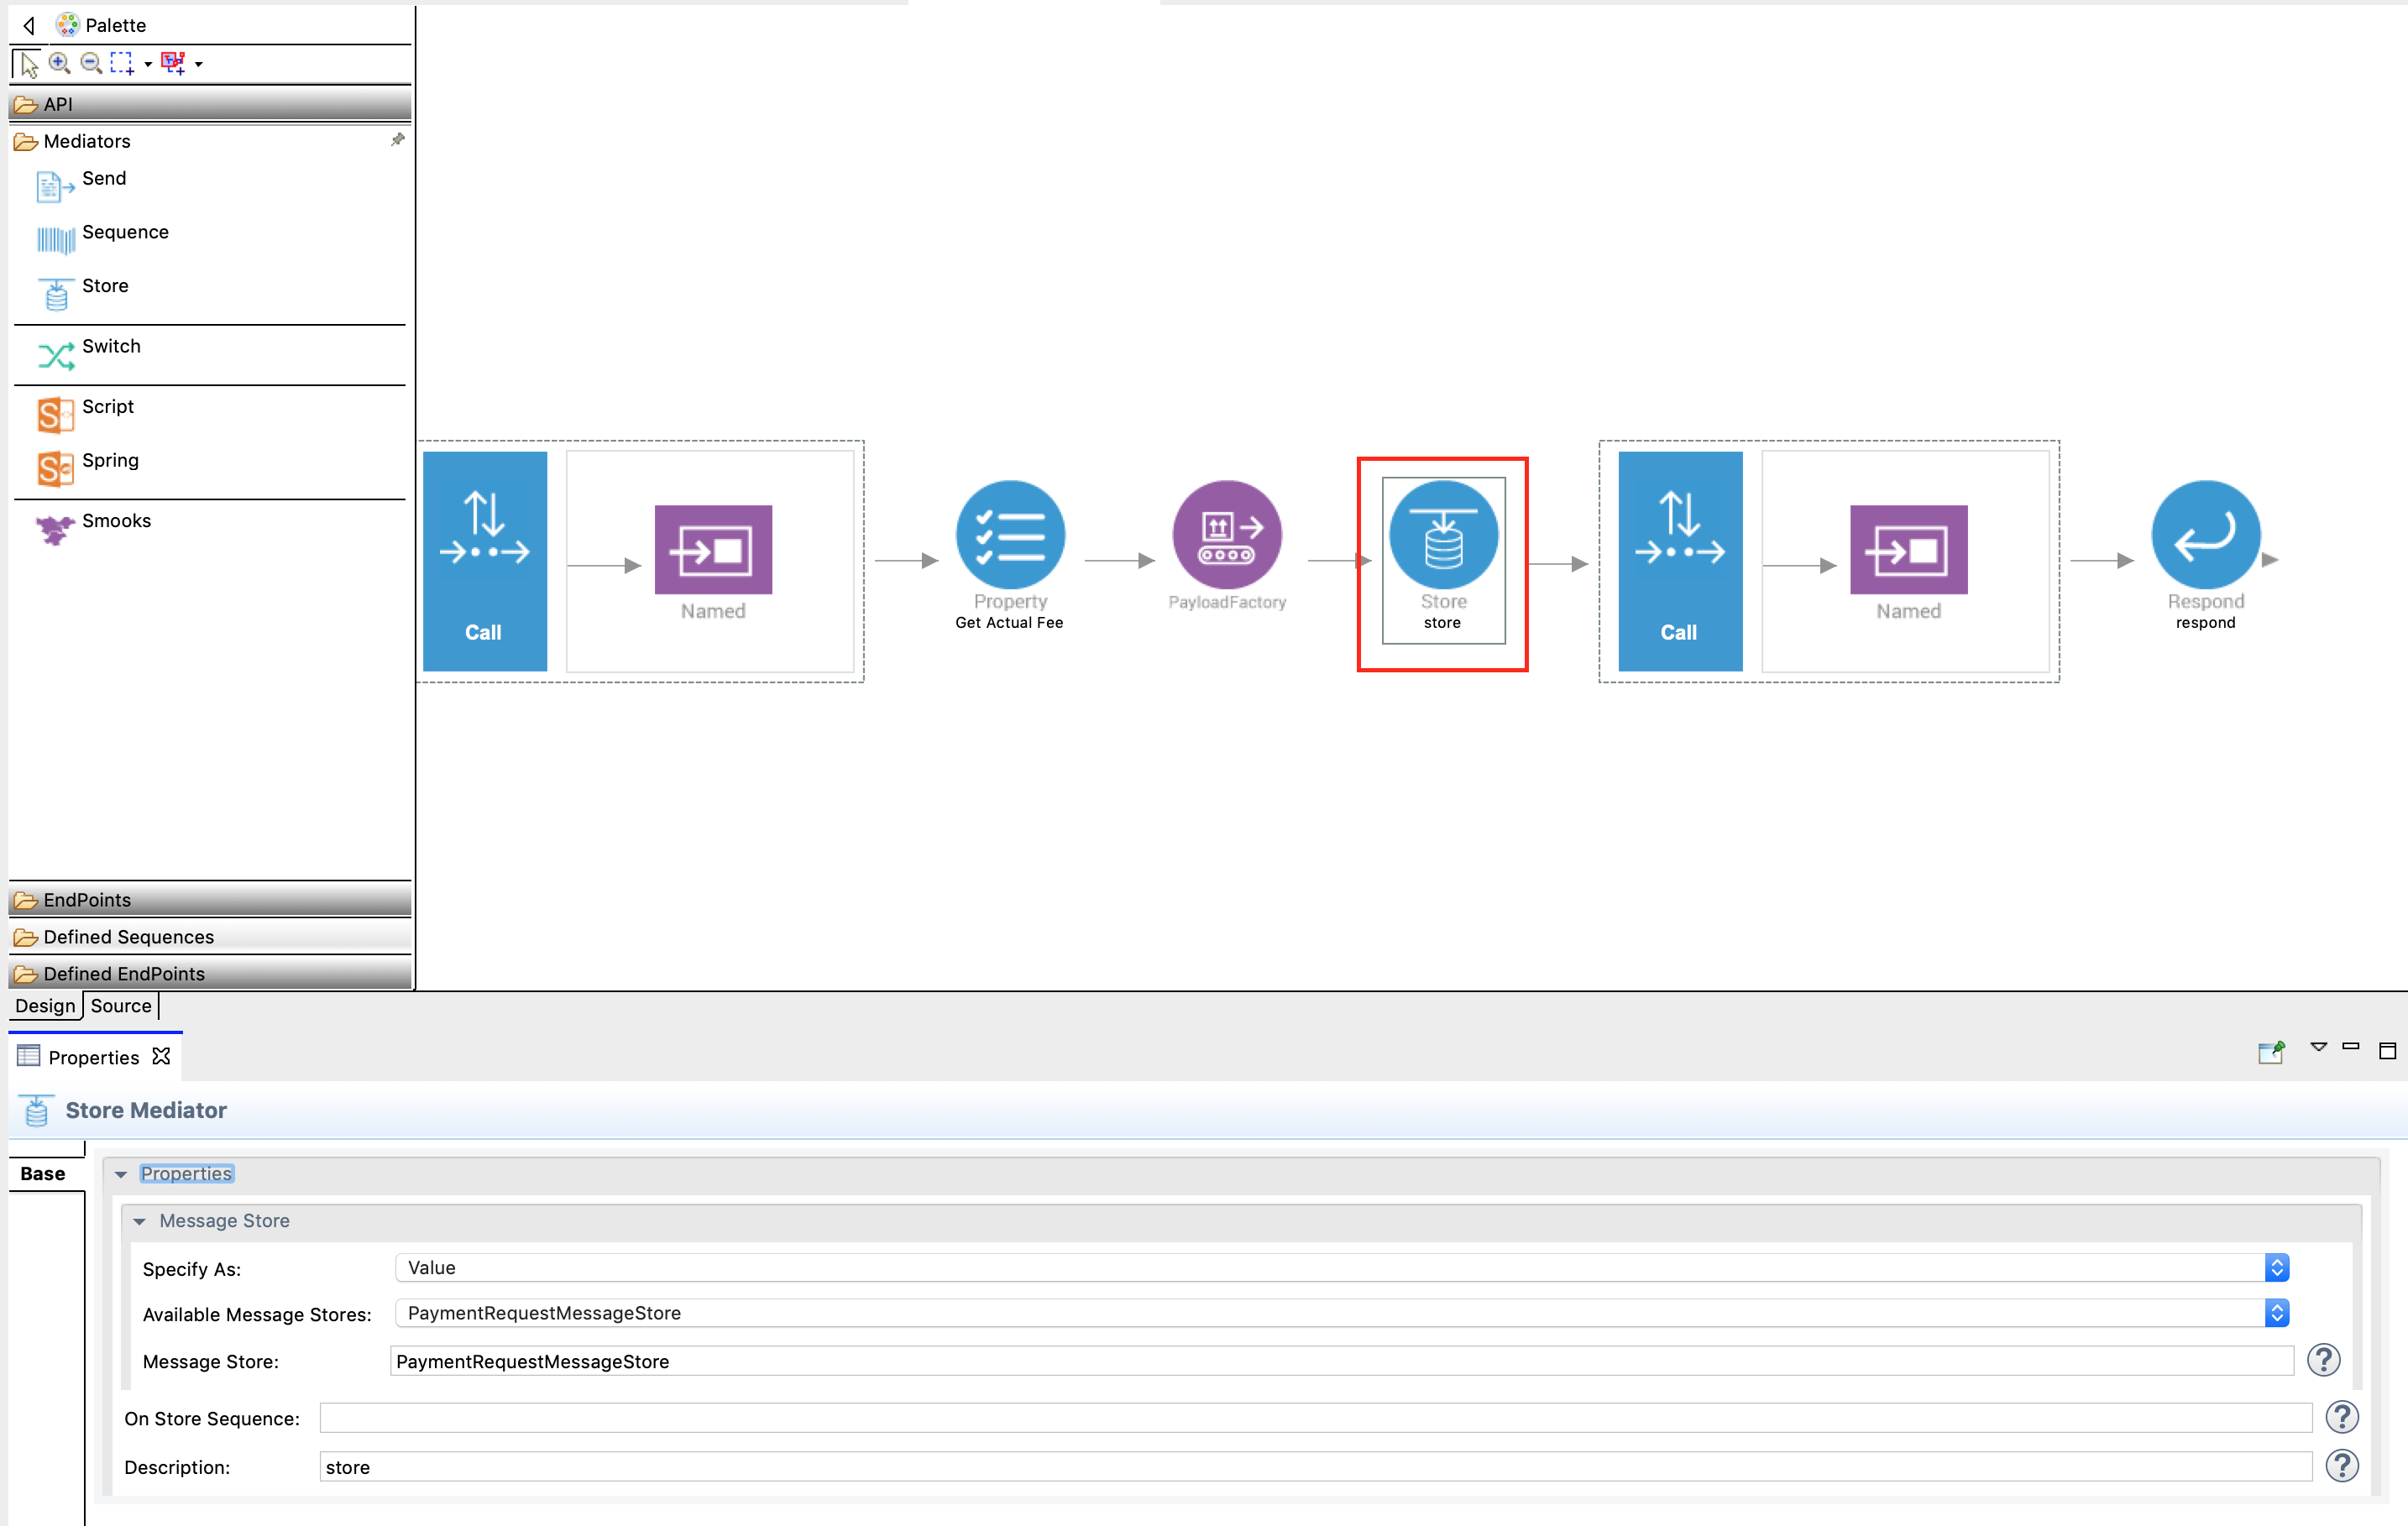
Drag and add a Store mediator from the mediators palette just after the PayloadFactory mediator.
-
With the Store mediator selected, access the Property tab and specify the following details:
Field Description Available Message Store Select PaymentRequestMessageStore Message Store Double click to populate the value PaymentRequestMessageStore Description Payment Store -
Let's use a PayloadFactory mediator to send a customized response message to the client.
Delete the Call mediator by right-clicking on the mediator and selecting Delete from Model. Replace this with a PayloadFactory mediator from the Mediators palette to configure the response to be sent to the client.
-
With the PayloadFactory mediator selected, access the Property tab and fill in the information in the following table to define a customized message to be returned to the client.
Tip
To avoid getting an error message, first select Media Type before selecting Payload.
Field Value Media Type json Payload Format Inline Payload {"message":" Payment request successfully submitted. Payment confirmation will be sent via email ."}
You should now have a completed configuration that looks like this:
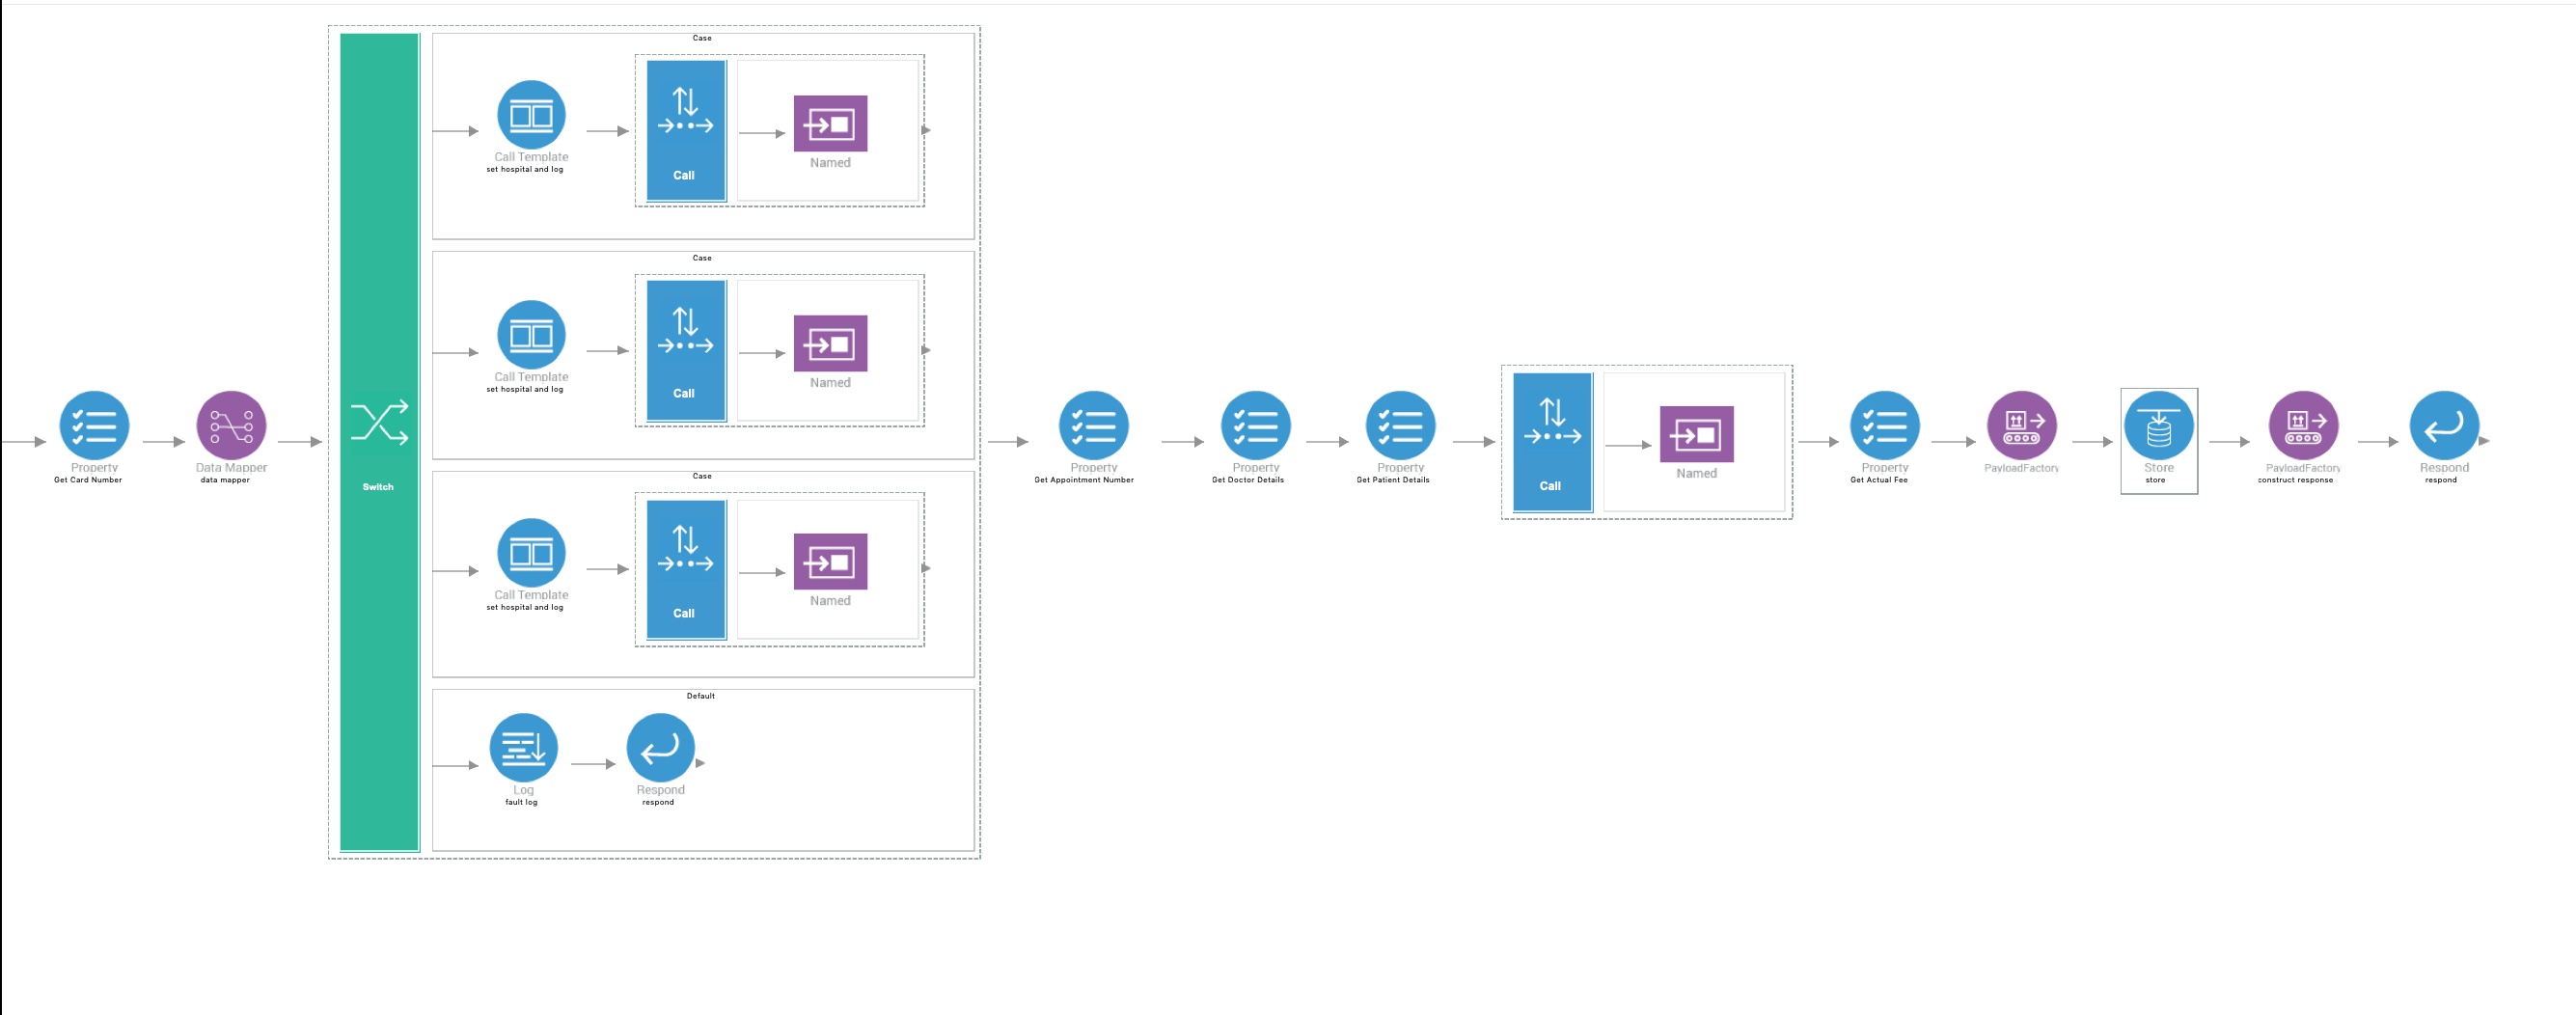
We have now finished creating all the required artifacts.
Step 3: Package the artifacts
Package the artifacts in your composite application project (SampleServicesCompositeApplication project) and the registry resource project (SampleRegistryResource project) to be able to deploy the artifacts in the server.
- Open the
pom.xmlfile in the composite application project POM editor. -
Ensure that the following projects and artifacts are selected in the POM file.
- SampleServicesCompositeApplicationProject
HealthcareAPIClemencyEPGrandOakEPPineValleyEPChannelingFeeEPSettlePaymentEPPaymentRequestMessageStorePaymentRequestProcessingSequencePaymentRequestProcessor
- SampleServicesRegistryProject
- SampleServicesCompositeApplicationProject
-
Save the project.
Step 4: Build and run the artifacts
To test the artifacts, deploy the packaged artifacts in the embedded Micro Integrator:
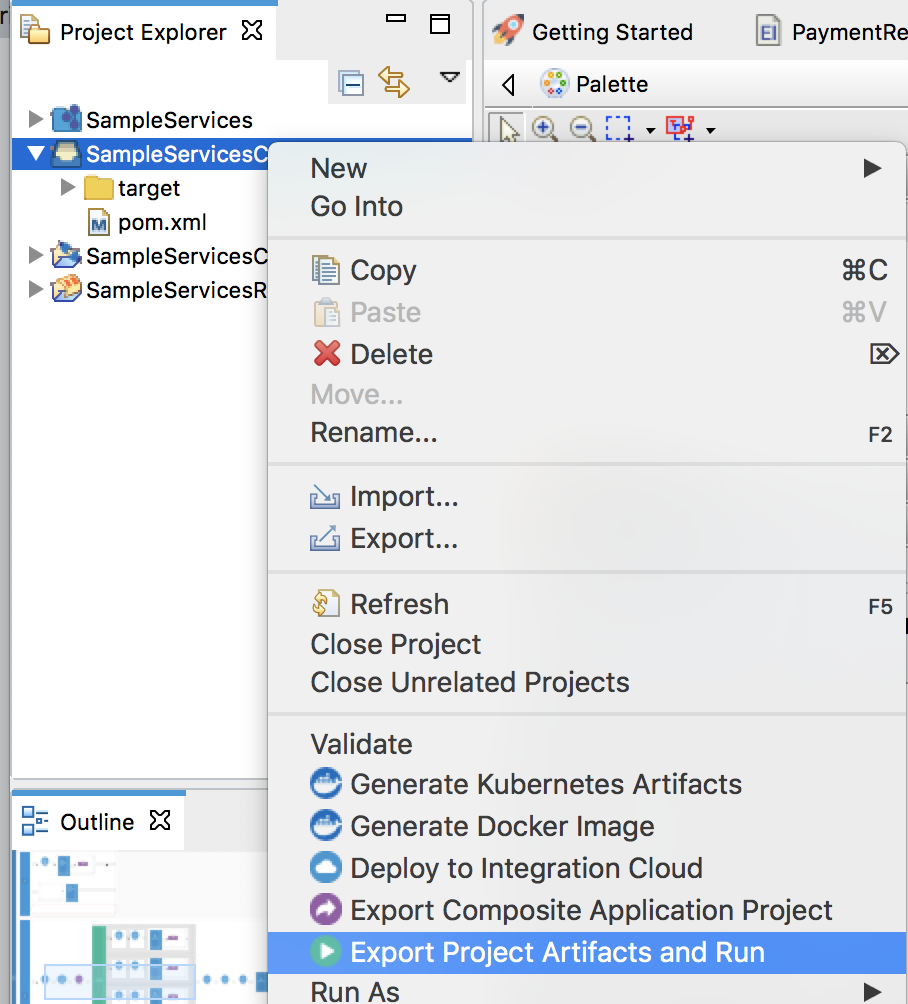
- Right-click the composite application project and click Export Project Artifacts and Run.
- In the dialog that opens, select the artifacts that you want to deploy.
- Click Finish. The artifacts will be deployed in the embedded Micro Integrator and the server will start. See the startup log in the Console tab.
Warning
Stop the Micro Integrator before proceeding to test. This is because you need to start the broker profile before starting the Micro Integrator.
Step 5: Test the use case
Let's test the use case by sending a simple client request that invokes the service.
Start the backend service
- Download the JAR file of the back-end service from here.
- Open a terminal, navigate to the location where your saved the back-end service.
-
Execute the following command to start the service:
java -jar Hospital-Service-2.0.0-EI7.jar
Start the Message Broker runtime
To set up Message Broker profile of WSO2 EI 6.6.0:
-
Download WSO2 EI 6.6.0, which includes the Message Broker profile. The path to this folder is referred to as
EI_6.6.0_HOMEthroughout this tutorial. -
Add the following JAR files from the
EI_6.6.0_HOME/wso2/broker/client-lib/directory to theMI_TOOLING_HOME/Contents/Eclipse/runtime/microesb/lib/(in MacOS) orMI_TOOLING_HOME/runtime/microesb/lib(in Windows/Linux) directory.- andes-client-*.jar
- geronimo-jms_1.1_spec-*.jar
- org.wso2.securevault-*.jar
-
Open the
deployment.tomlfile from theMI_TOOLING_HOME/Contents/Eclipse/runtime/microesb/conf/(in MacOS) orMI_TOOLING_HOME/runtime/microesb/conf/(in Windows/Linux) directory and add the configurations given below. This is required for enabling the broker to store messages.[[transport.jms.listener]] name = "myQueueListener" parameter.initial_naming_factory = "org.wso2.andes.jndi.PropertiesFileInitialContextFactory" parameter.broker_name = "wso2mb" parameter.provider_url = "conf/jndi.properties" parameter.connection_factory_name = "QueueConnectionFactory" parameter.connection_factory_type = "queue" parameter.cache_level = "consumer" [[transport.jms.sender]] name = "myQueueSender" parameter.initial_naming_factory = "org.wso2.andes.jndi.PropertiesFileInitialContextFactory" parameter.broker_name = "wso2mb" parameter.provider_url = "conf/jndi.properties" parameter.connection_factory_name = "QueueConnectionFactory" parameter.connection_factory_type = "queue" parameter.cache_level = "producer" [transport.jndi.connection_factories] 'connectionfactory.QueueConnectionFactory' = "amqp://admin:admin@clientID/carbon?brokerlist='tcp://localhost:5675'" [transport.jndi.queue] PaymentRequestJMSMessageStore="PaymentRequestJMSMessageStore"
To start the Message Broker:
- Open a terminal and navigate to the
EI_6.6.0_HOME/wso2/broker/bindirectory. -
Execute the following command to run the message broker.
-
On MacOS/Linux/CentOS:
sh wso2server.sh -
On Windows:
wso2server.bat
See the WSO2 EI 6.6.0 documentation for more information on how to run the Message Broker profile.
-
Restart the Micro Integrator
Let's restart the Micro Integrator with the deployed artifacts:
Right-click the composite application project and click Export Project Artifacts and Run as shown below.
Get details of deployed artifacts (Optional)
Let's use the CLI Tool to find the URL of the REST API (that is deployed in the Micro integrator) to which you will send a request.
Tip
Be sure to set up the CLI tool for your work environment as explained in the first step of this tutorial.
-
Open a terminal and execute the following command to start the tool:
mi -
Log in to the CLI tool. Let's use the server administrator user name and password:
mi remote login admin adminYou will receive the following message: Login successful for remote: default!
-
Execute the following command to find the APIs deployed in the server:
mi api showYou will receive the following information:
NAME : HealthcareAPI
URL : http://localhost:8290/healthcare
Similarly, you can get details of message stores, message processors, and other artifacts deployed in the server. Read more about using the CLI tool.
Send the client request
Let's send a request to the API resource. You can use the embedded HTTP Client of WSO2 Integration Studio as follows:
-
Open the HTTP Client of WSO2 Integration Studio.
Tip
If you don't see the HTTP Client tab, go to Window -> Show View - Other and select HTTP Client to enable the client.
-
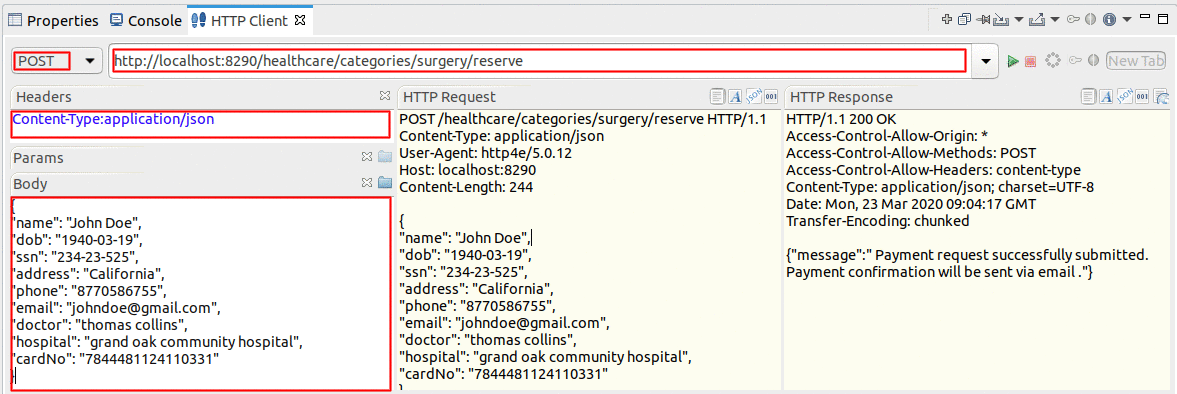
Enter the request information as given below and click the Send icon (
 ).
).Method POSTHeaders Content-Type=application/jsonURL http://localhost:8290/healthcare/categories/surgery/reserve-
The URI-Template format that is used in this URL was defined when creating the API resource QueryDoctorAPI:
http://.: /categories/{category}/reserve
Body { "name": "John Doe", "dob": "1940-03-19", "ssn": "234-23-525", "address": "California", "phone": "8770586755", "email": "[email protected]", "doctor": "thomas collins", "hospital": "grand oak community hospital", "cardNo": "7844481124110331", "appointment_date": "2025-04-02" }- This JSON payload contains details of the appointment reservation, which includes patient details, doctor, hospital, and data of appointment.
-
The URI-Template format that is used in this URL was defined when creating the API resource QueryDoctorAPI:
If you want to send the client request from your terminal:
-
Install and set up cURL as your REST client.
-
Create a JSON file names
request.jsonwith the following request payload.{ "name": "John Doe", "dob": "1940-03-19", "ssn": "234-23-525", "address": "California", "phone": "8770586755", "email": "[email protected]", "doctor": "thomas collins", "hospital": "grand oak community hospital", "cardNo": "7844481124110331" } -
Open a command line terminal and execute the following command from the location where the
request.jsonfile you created is saved:curl -v -X POST --data @request.json http://localhost:8290/healthcare/categories/surgery/reserve --header "Content-Type:application/json"
Analyze the response
You will see the response as follows:
{"message":"Payment request successfully submitted. Payment confirmation will be sent via email."}Check the WSO2 Integration Studio's Console tab and you will see that the response from SettlePaymentEP is logged as follows:
[2017-04-30 14:33:48,578] [EI-Core]  INFO - LogMediator message = Routing to grand oak community hospital

[2017-04-30 14:33:48,598] [EI-Core]  INFO - TimeoutHandler This engine will expire all callbacks after GLOBAL_TIMEOUT: 120 seconds, irrespective of the timeout action, after the specified or optional timeout

2017-04-30 14:33:53,464] [EI-Core]  INFO - LogMediator To: http://www.w3.org/2005/08/addressing/anonymous, WSAction: , SOAPAction: , MessageID: urn:uuid:a2cf1fd2-7a89-44b6-9571-990bbdfbd289, Direction: request, Payload: {"appointmentNo":1,"doctorName":"thomas collins","patient":"John Doe","actualFee":7000.0,"discount":20,"discounted":5600.0,"paymentID":"a77038e9-3e42-46f7-ac97-11e1b3a50018","status":"Settled"}
You have now explored how the Micro Integratorr can be used to implement store and forward messaging using a Message Store, Message Processors, and the Store Mediator.
Top