File Connector Example
File Connector can be used to perform operations in the local file system as well as in a remote server such as FTP and SFTP.
What you'll build
This example explains how to use File Connector to create a file in the local file system and read the particular file. The user sends a payload specifying which content is to be written to the file. Based on that content, a file is created in the specified location. Then the content of the file can be read as an HTTP response by invoking the other API resource upon the existence of the file.
It will have two HTTP API resources, which are create and read.
-
/create: The user sends the request payload which includes the location where the file needs to be saved and the content needs to be added to the file. This request is sent to WSO2 EI by invoking the FileConnector API. It saves the file in the specified location with the relevant content.
-
/read: The user sends the request payload, which includes the location of the file that needs to be read. This request is sent to WSO2 EI where the FileConnector API resides. Once the API is invoked, it first checks if the file exists in the specified location. If it exists, the content is read and response is sent to the user. If the file does not exist, it sends an error response to the user.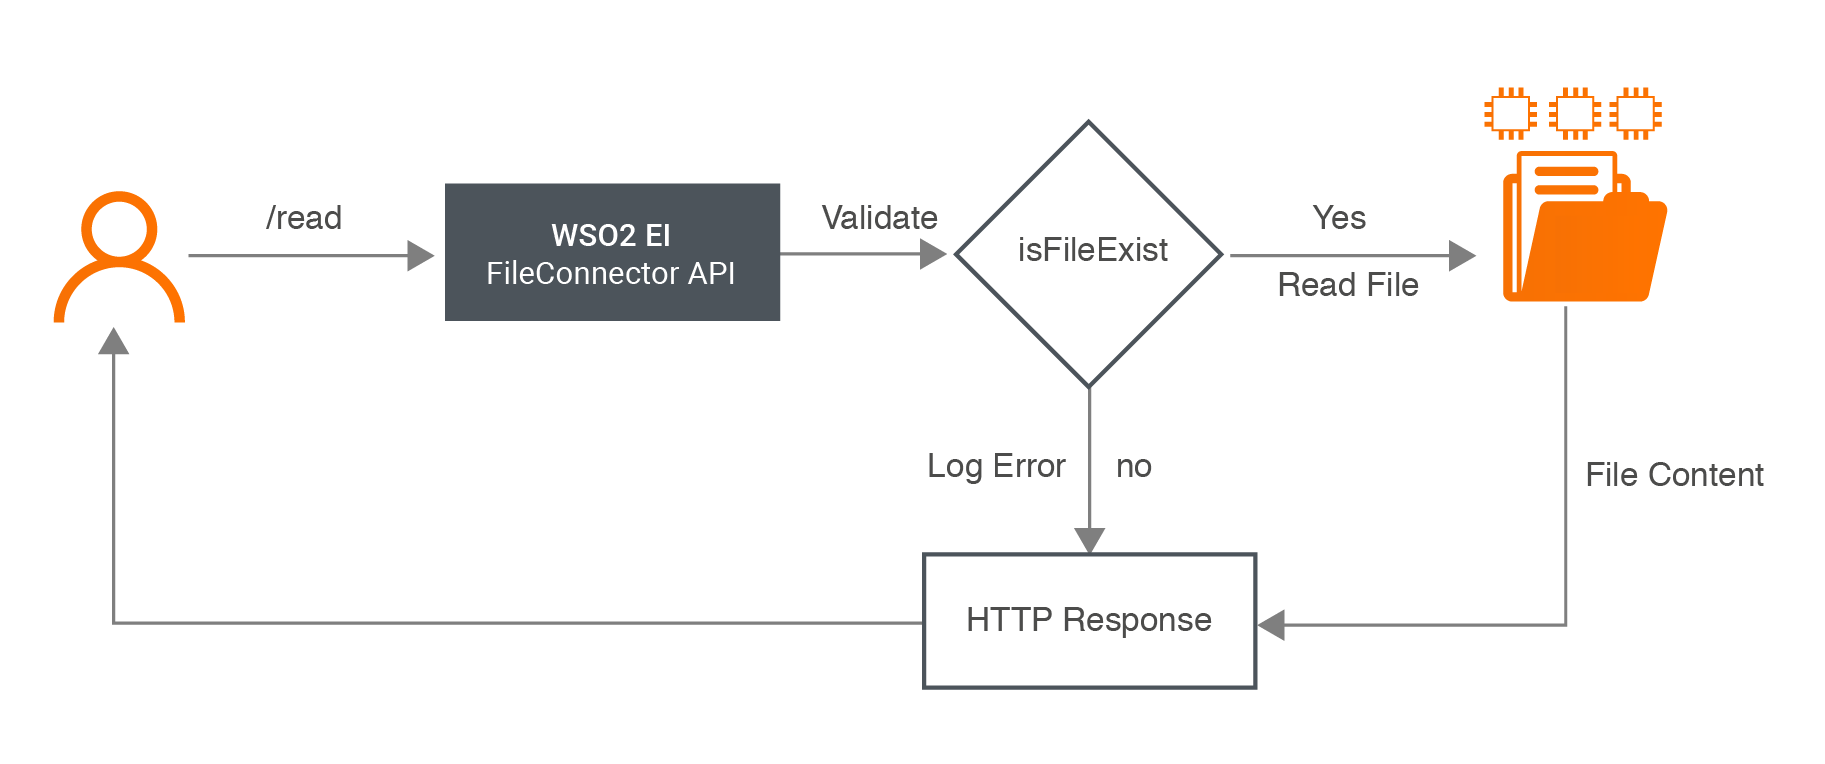
If you do not want to configure this yourself, you can simply get the project and run it.
Configure the connector in WSO2 Integration Studio
Follow these steps to set up the Integration Project and the Connector Exporter Project.
-
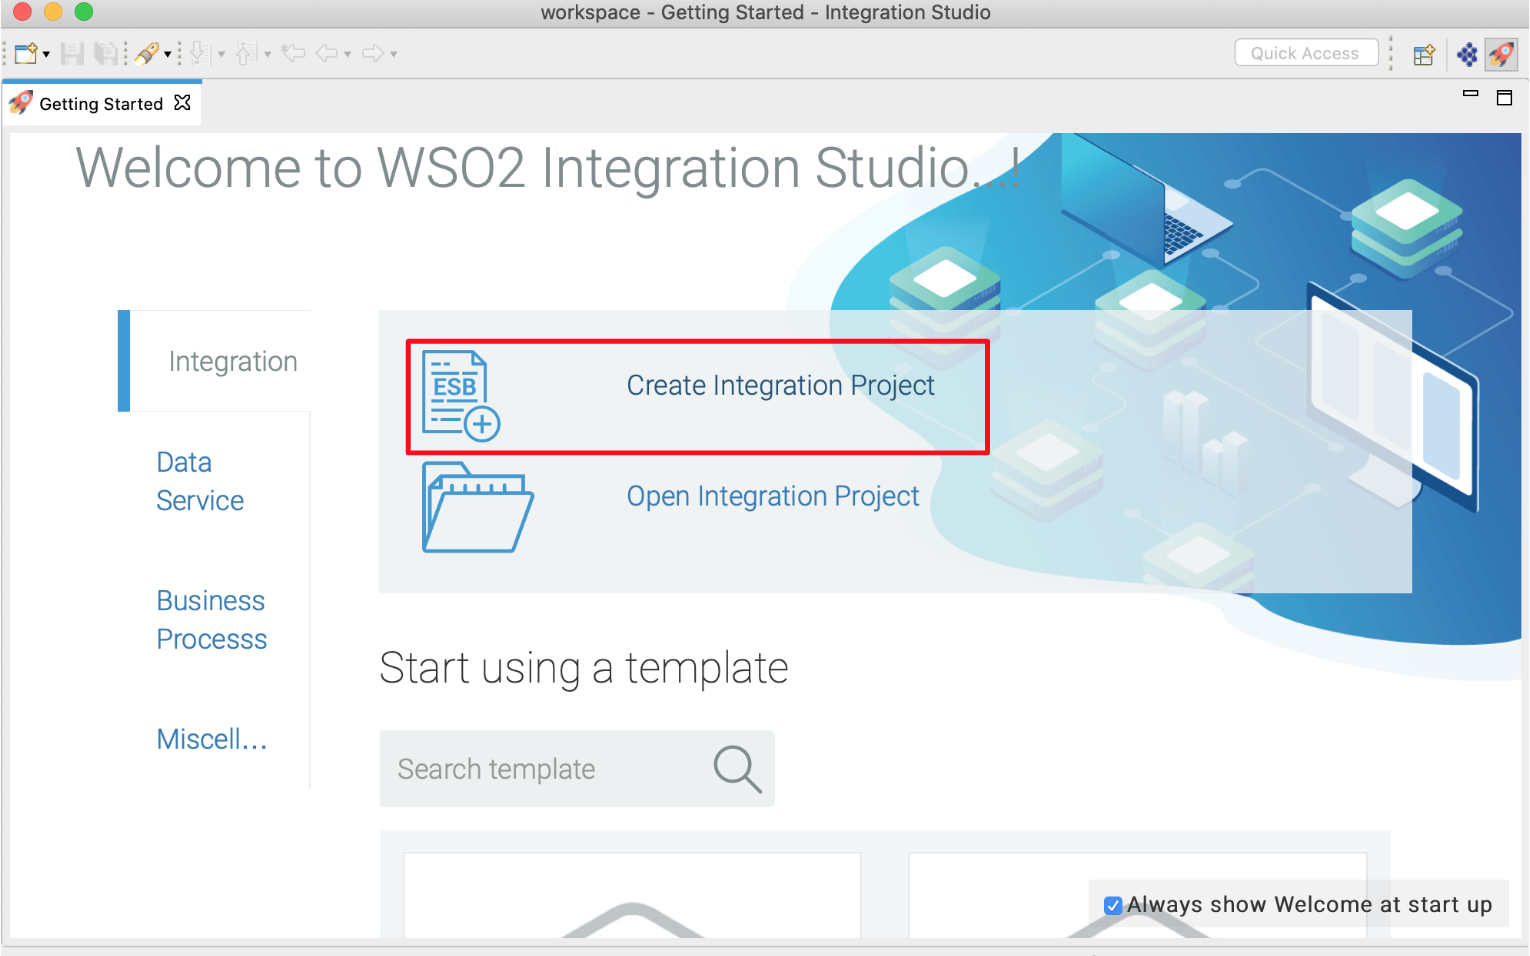
Open WSO2 Integration Studio and create an Integration Project.
-
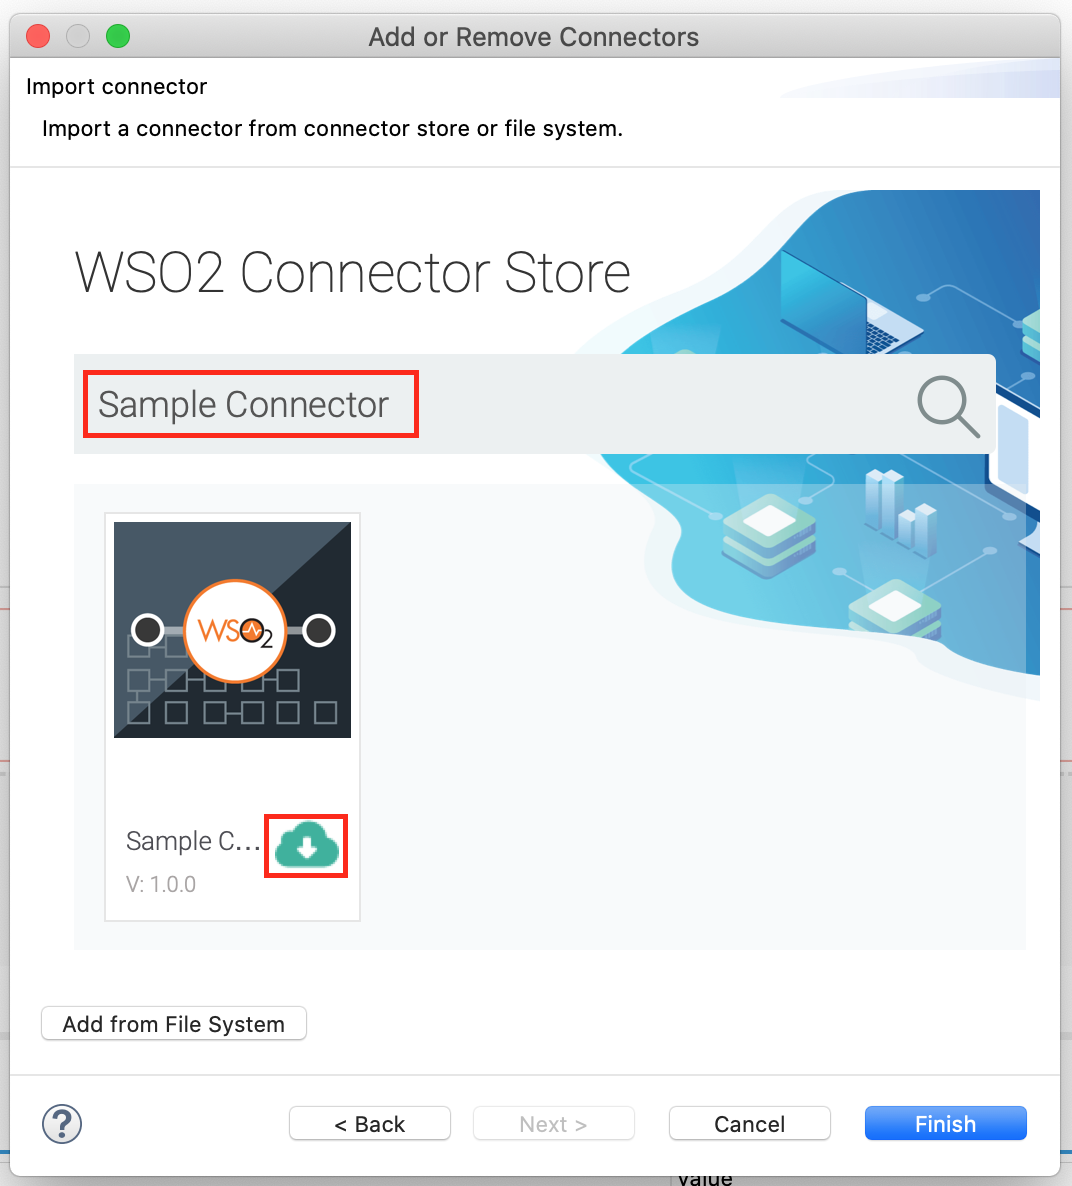
Right click on the project that you created and click on Add or Remove Connector -> Add Connector. You will get directed to the WSO2 Connector Store.
-
Search for the specific connector required for your integration scenario and download it to the workspace.
-
Click Finish, and your Integration Project is ready. The downloaded connector is displayed on the side palette with its operations.
-
You can drag and drop the operations to the design canvas and build your integration logic.

Creating the Integration Logic
-
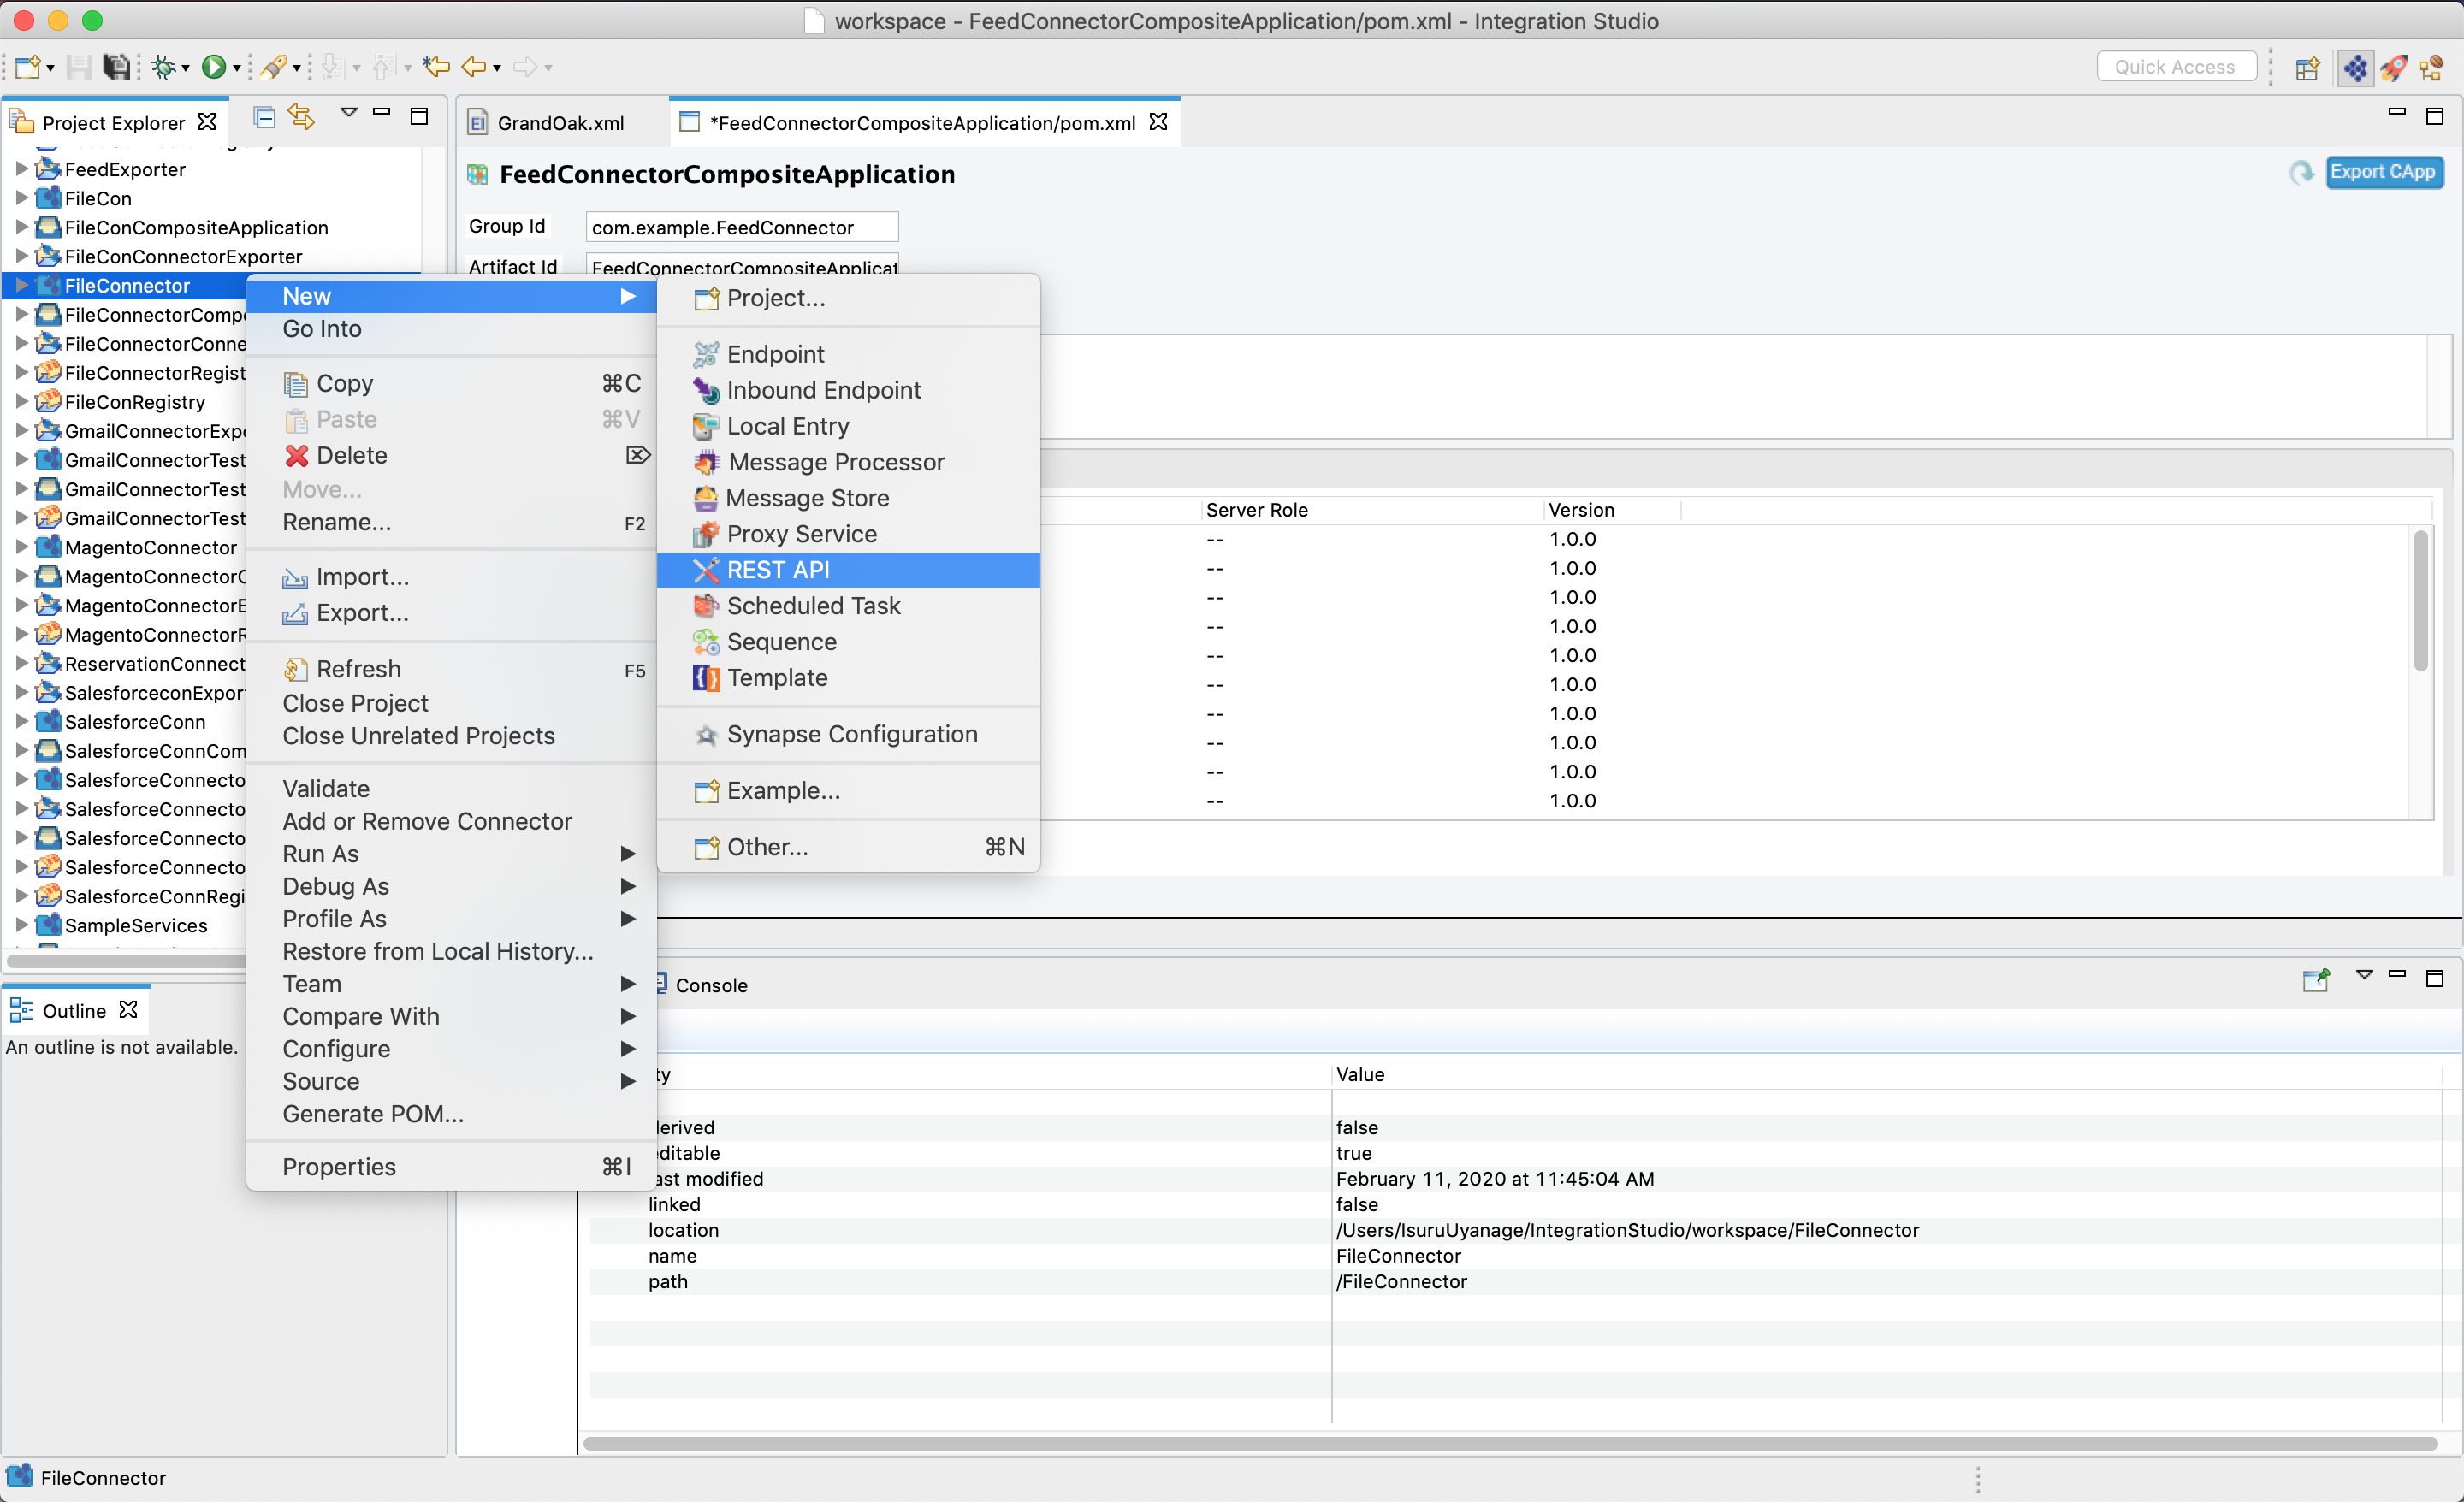
Right click on the created Integration Project and select, -> New -> Rest API to create the REST API.
-
Provide the API name as File Connector and the API context as
/fileconnector. -
First we will create the
/createresource. Right click on the API Resource and go to Properties view. We use a URL template called/createas we have two API resources inside single API. The method will bePost.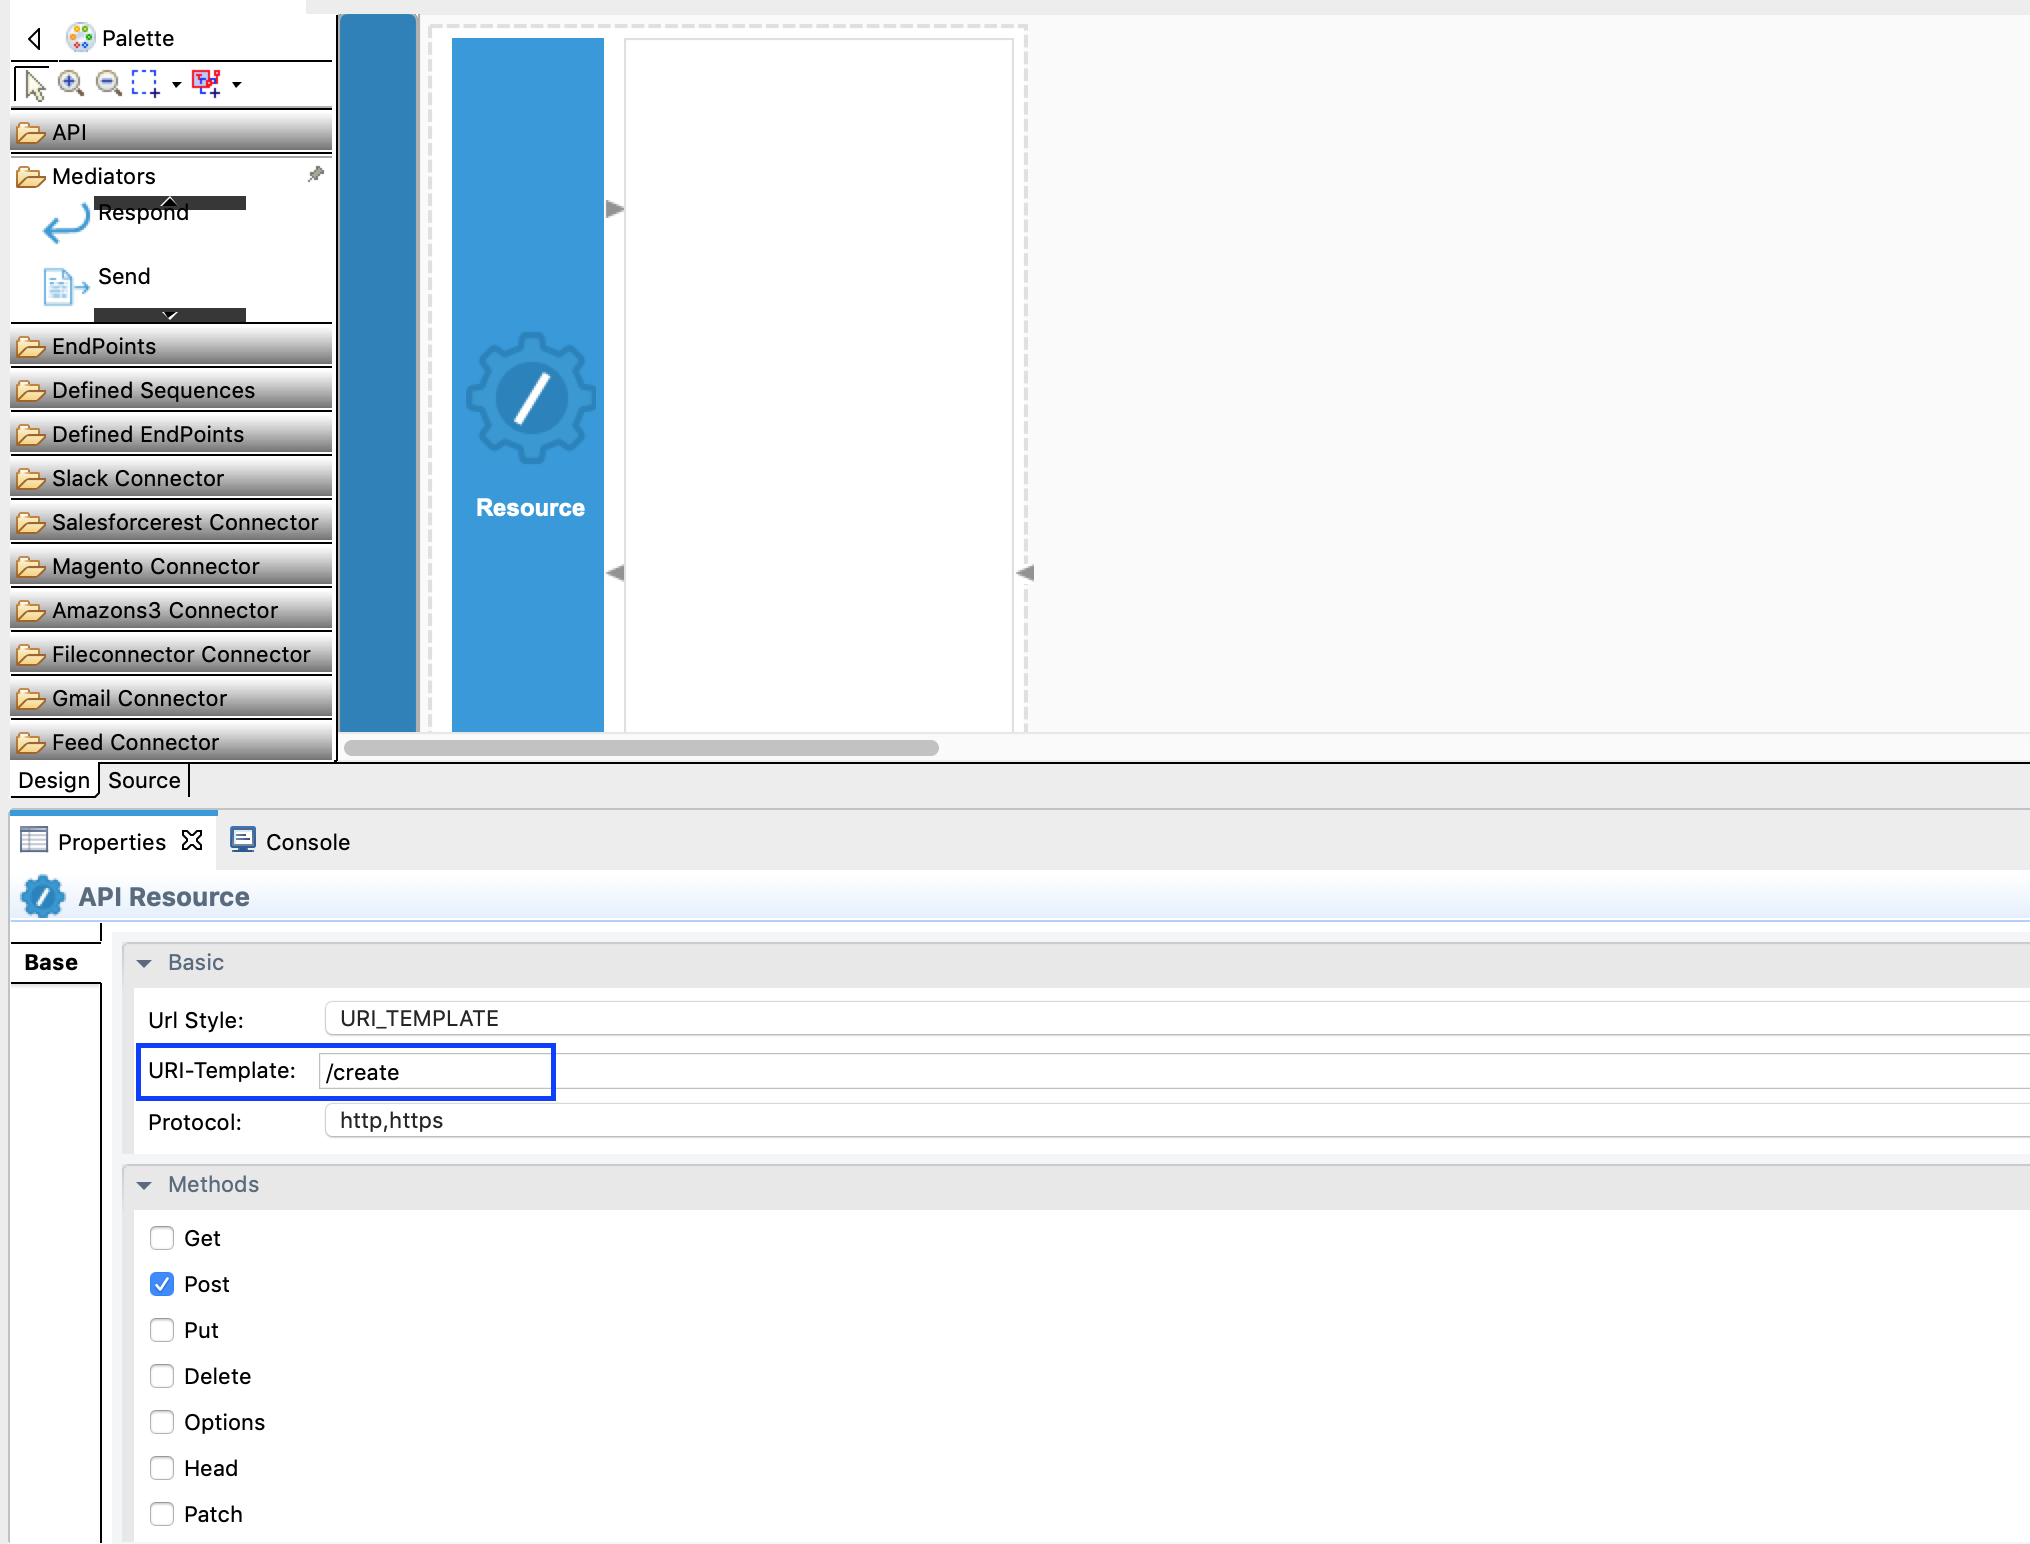
-
In this operation we are going to receive input from the user which is
sourceandinputContent.- source - location that the file is going to be created.
- inputContent - what needs to be written to the file.
-
The above two parameters are saved to properties. Drag and drop the Property Mediator onto the canvas in the design view and do as shown below. For further reference, you can read about the Property mediator.

-
Add the another Property Mediator to get the InputContent value copied. Do the same as in the above step.
- property name: InputContent
- Value Type: EXPRESSION
- Value Expression: json-eval($.inputContent)
-
Drag and drop the create operation of the File Connector to the Design View as shown below. Set the parameter values as below. We use the property values that we added in step 4 and 5 in this step as
$ctx:sourceand$ctx:inputContent.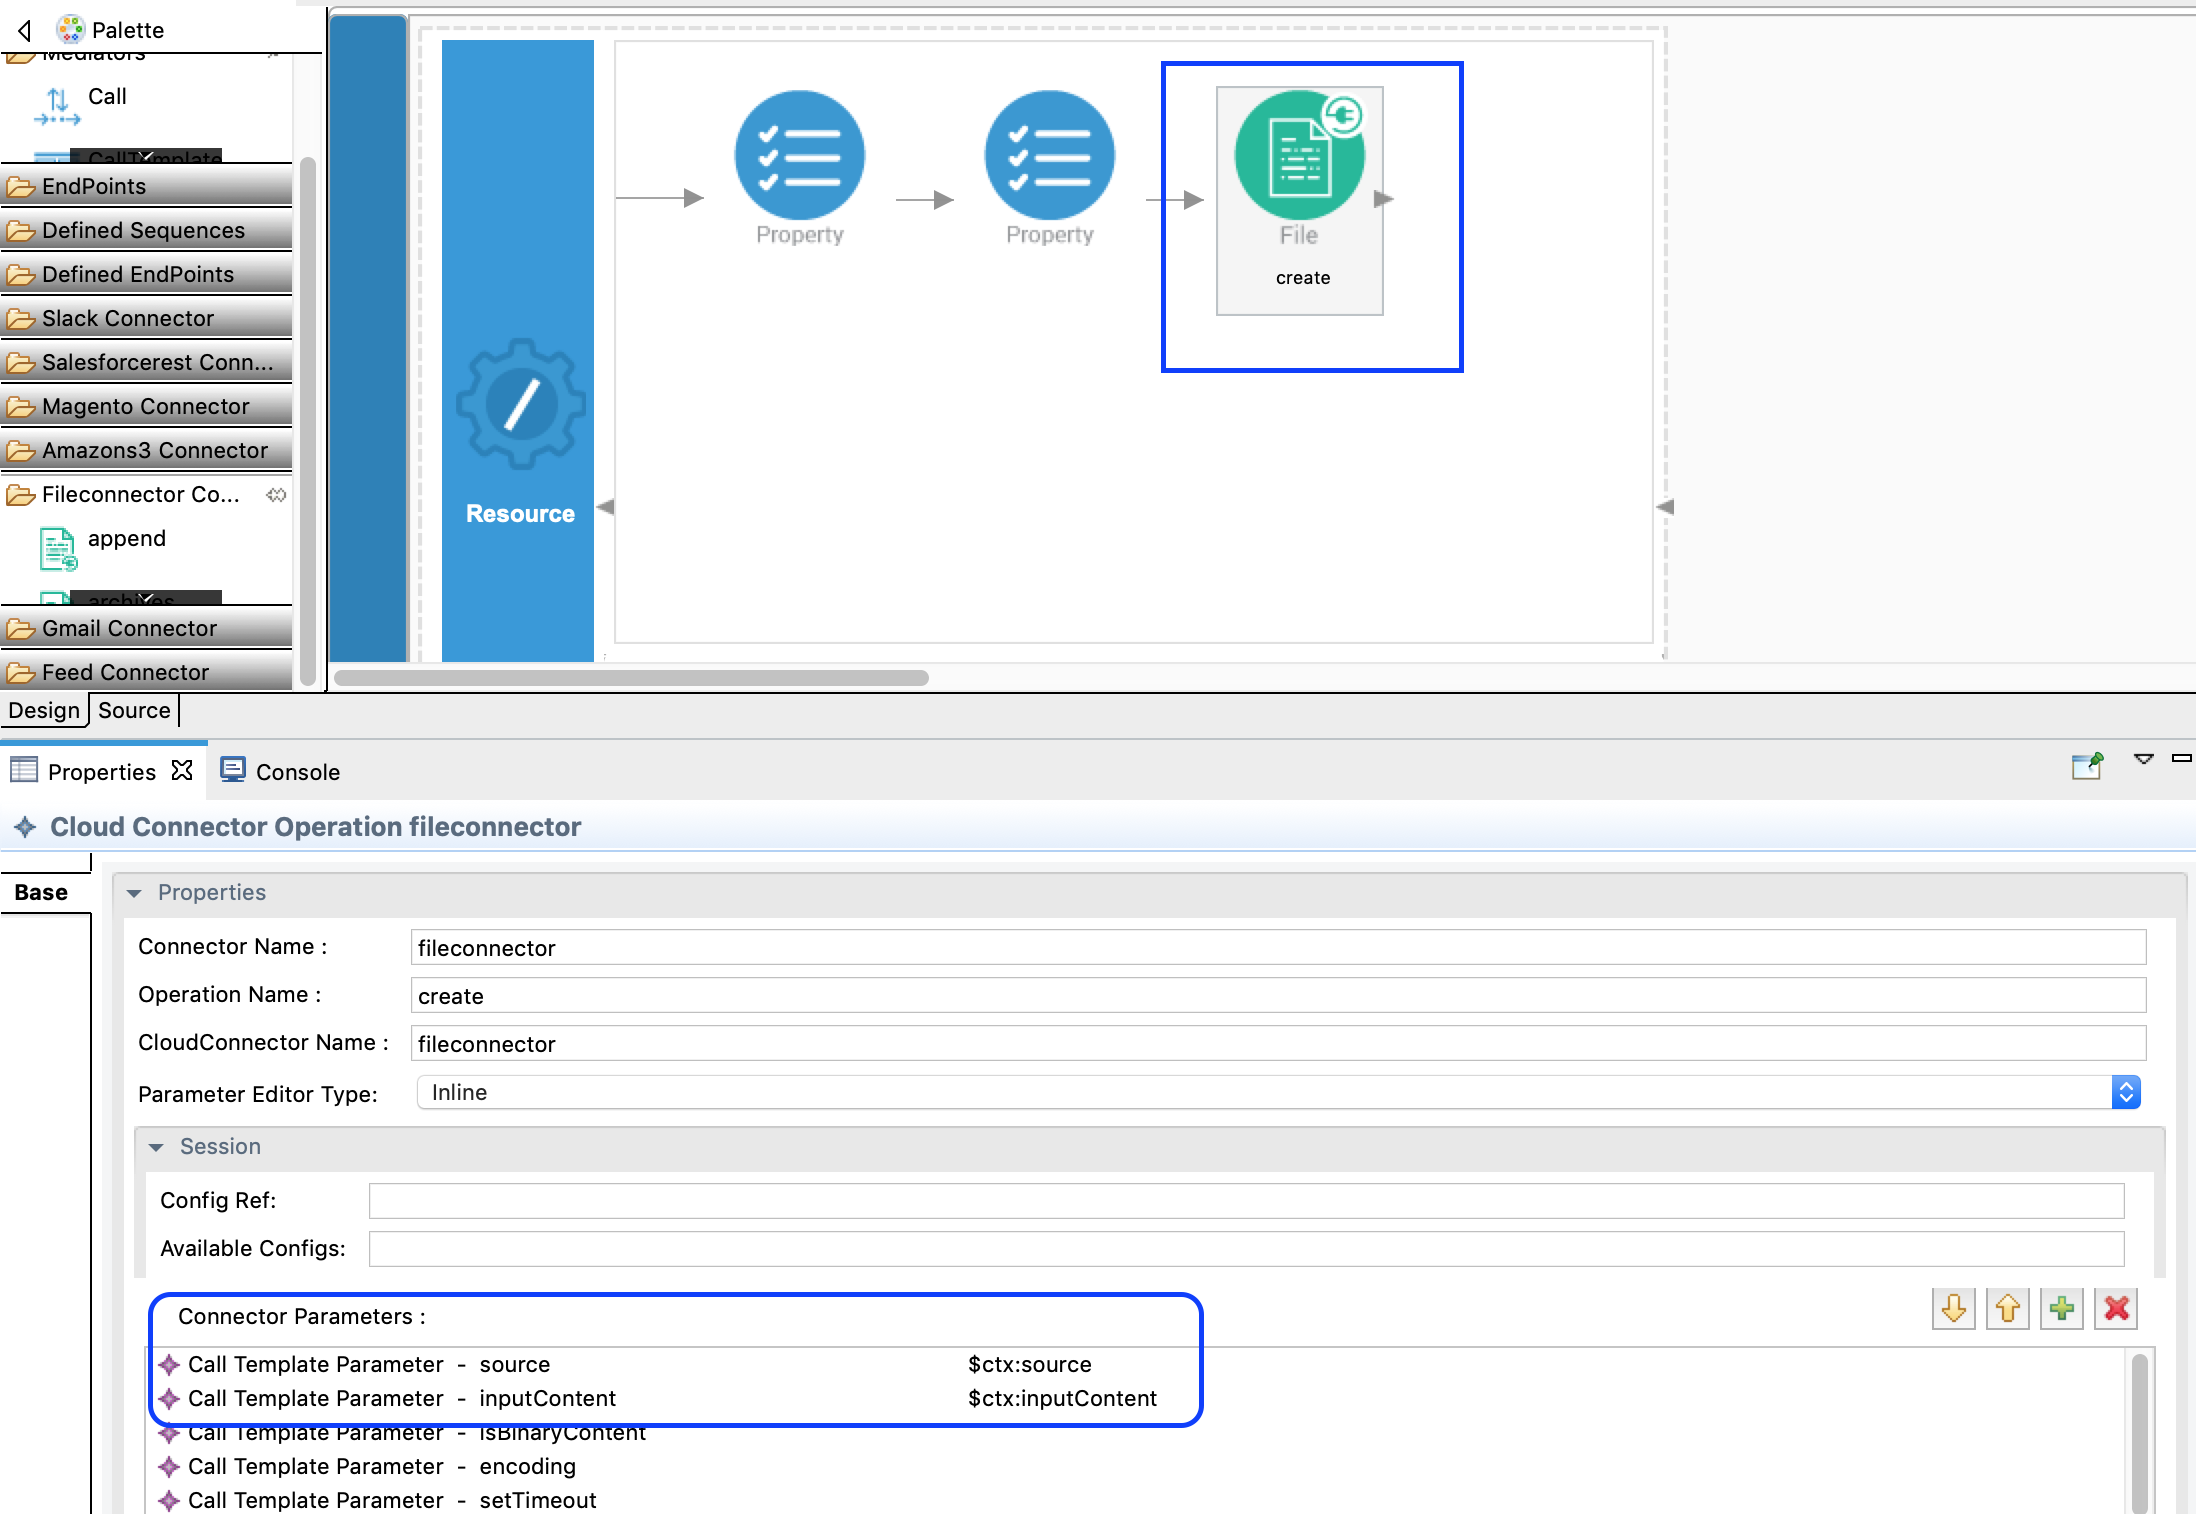
-
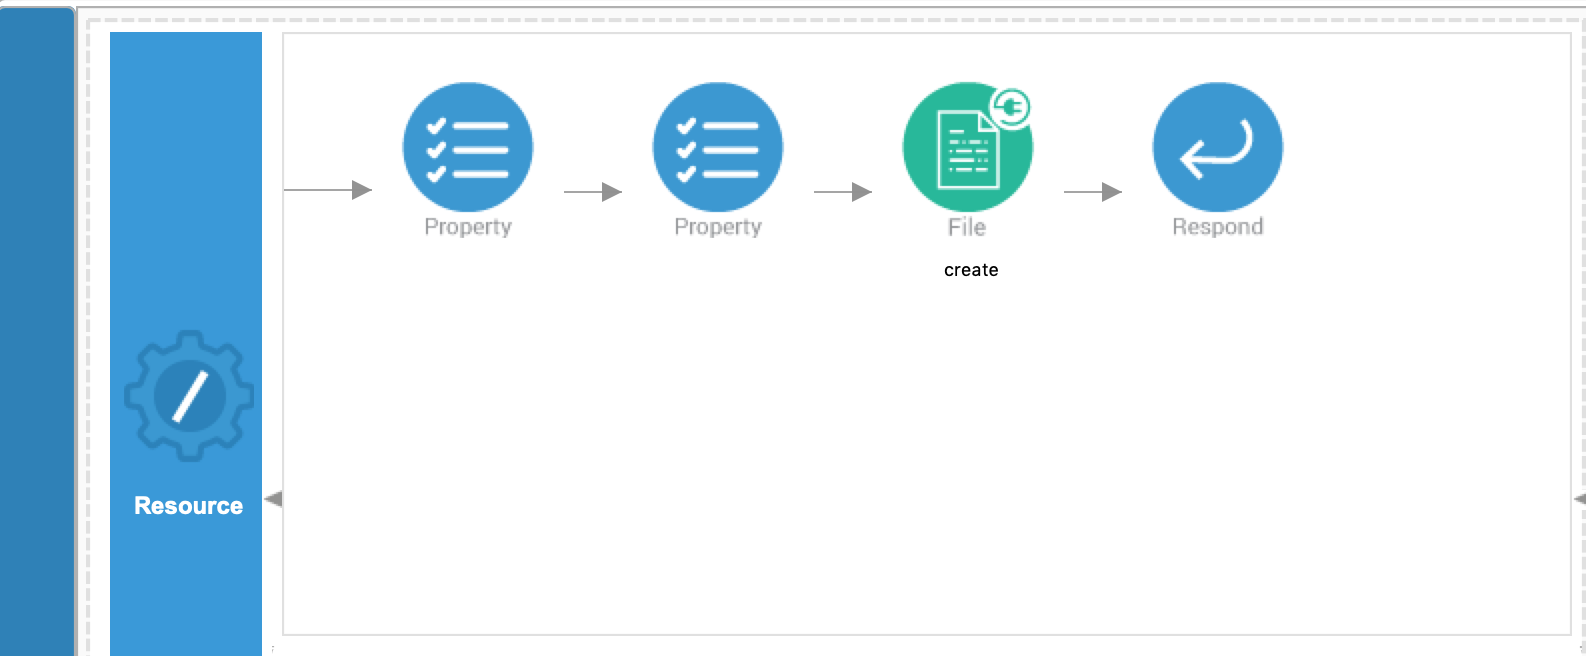
Add a Respond Mediator as the user needs to see the response. Now we are done with creating the first API resource, and it is displayed as shown below.
-
Create the next API resource, which is
/read. From this we are going to read the file content from a user specified location. -
As described in step 3, drag and drop another API resource to the design view. Use the URL template as
/read. The method will be POST.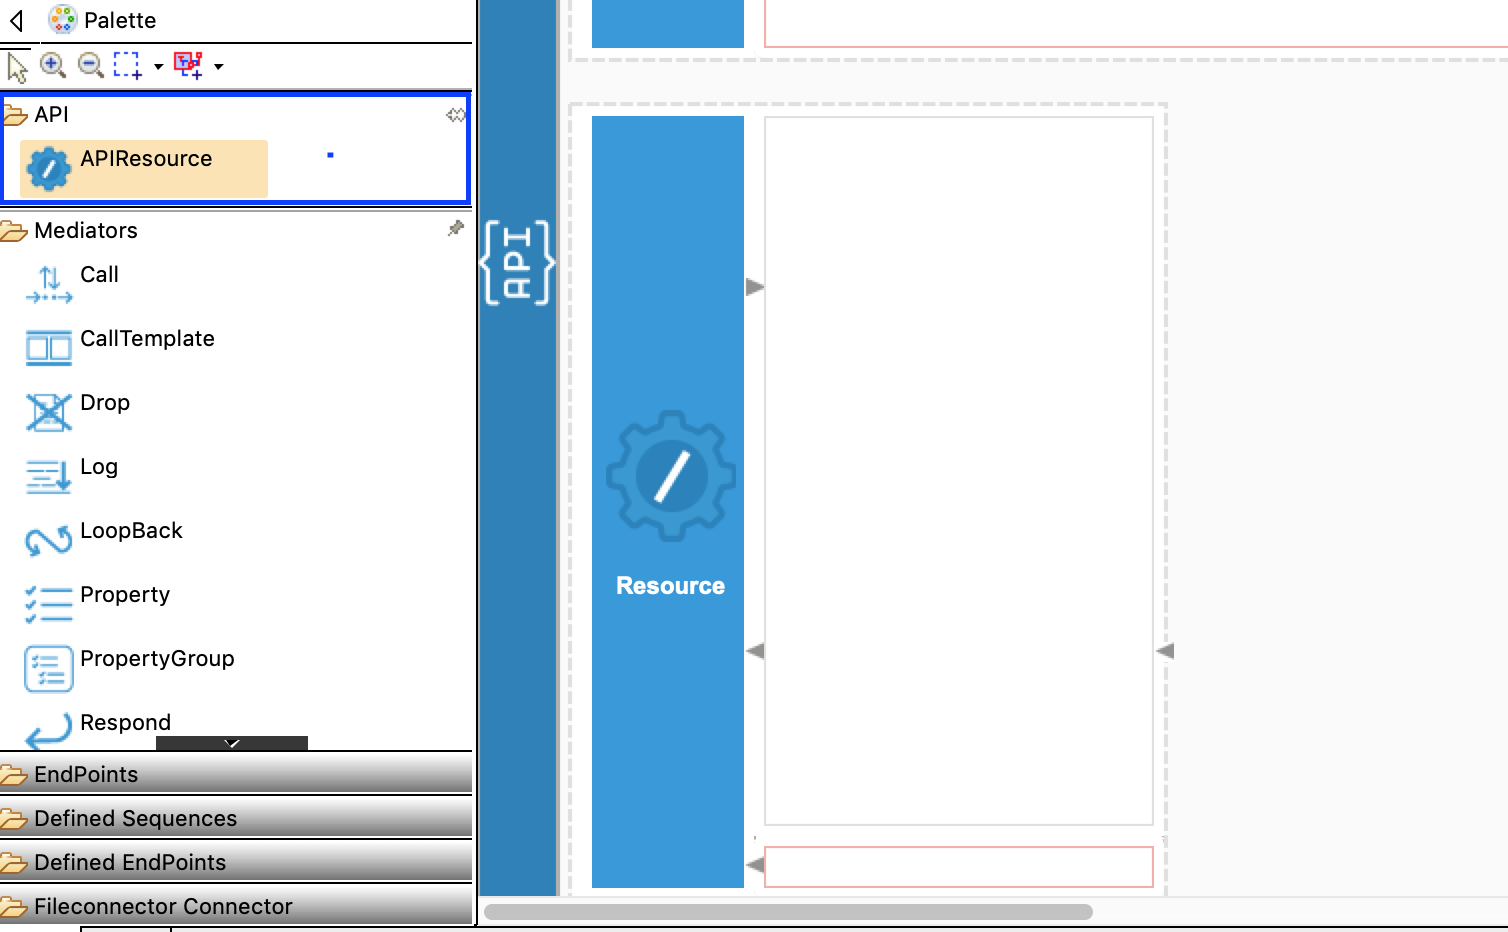
-
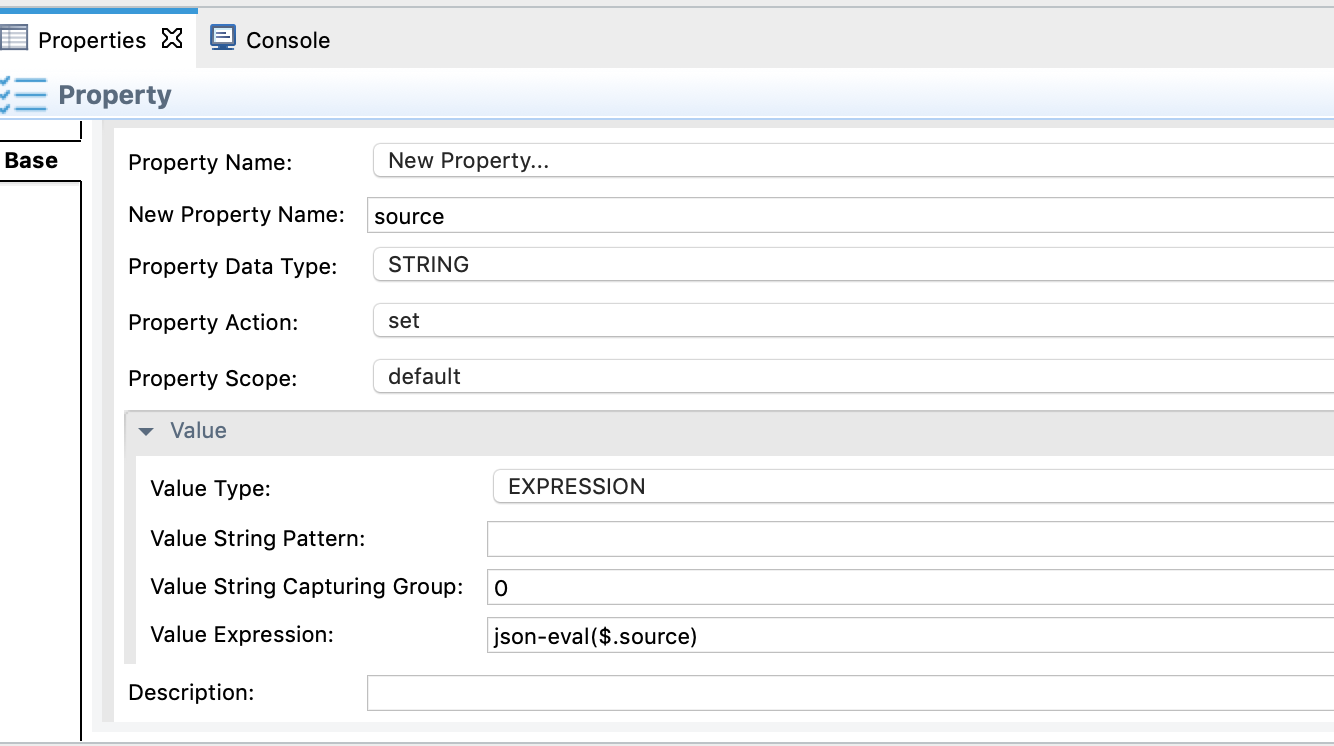
In this operation, the user sends the file location as the request payload. It will be written to the property as we did in step 10.
-
Then we are going to check if the file actually exists in the specified location. We can use
isFileExistsoperation of the File Connector.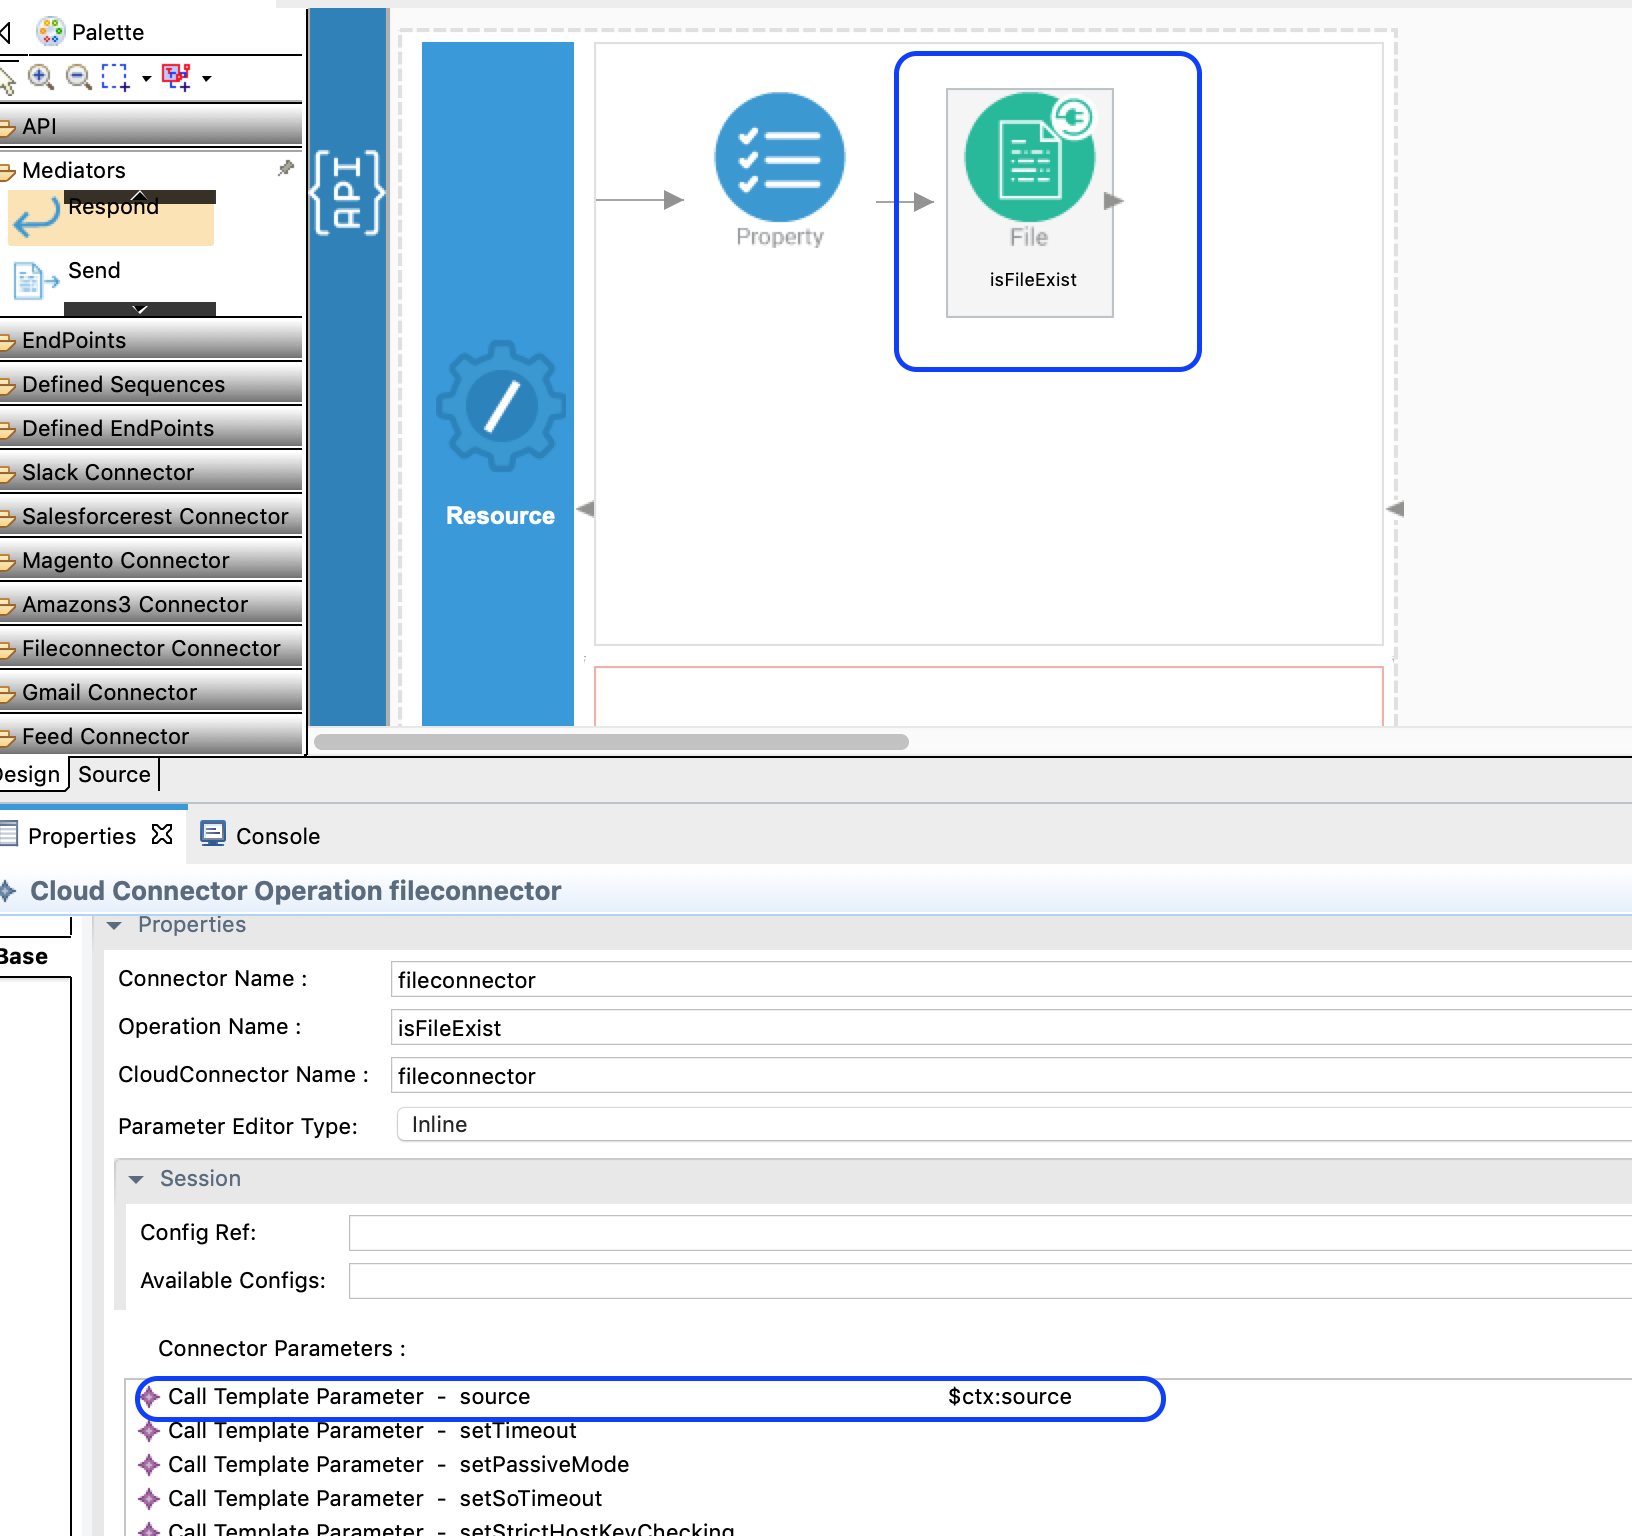
-
Then we copy the
isFileExistsresponse to a property mediator. Add another property mediator and add values as shown below.
-
Based on its response, we decide if we read the file or print an error to the user. In this case, we use a Switch Mediator.
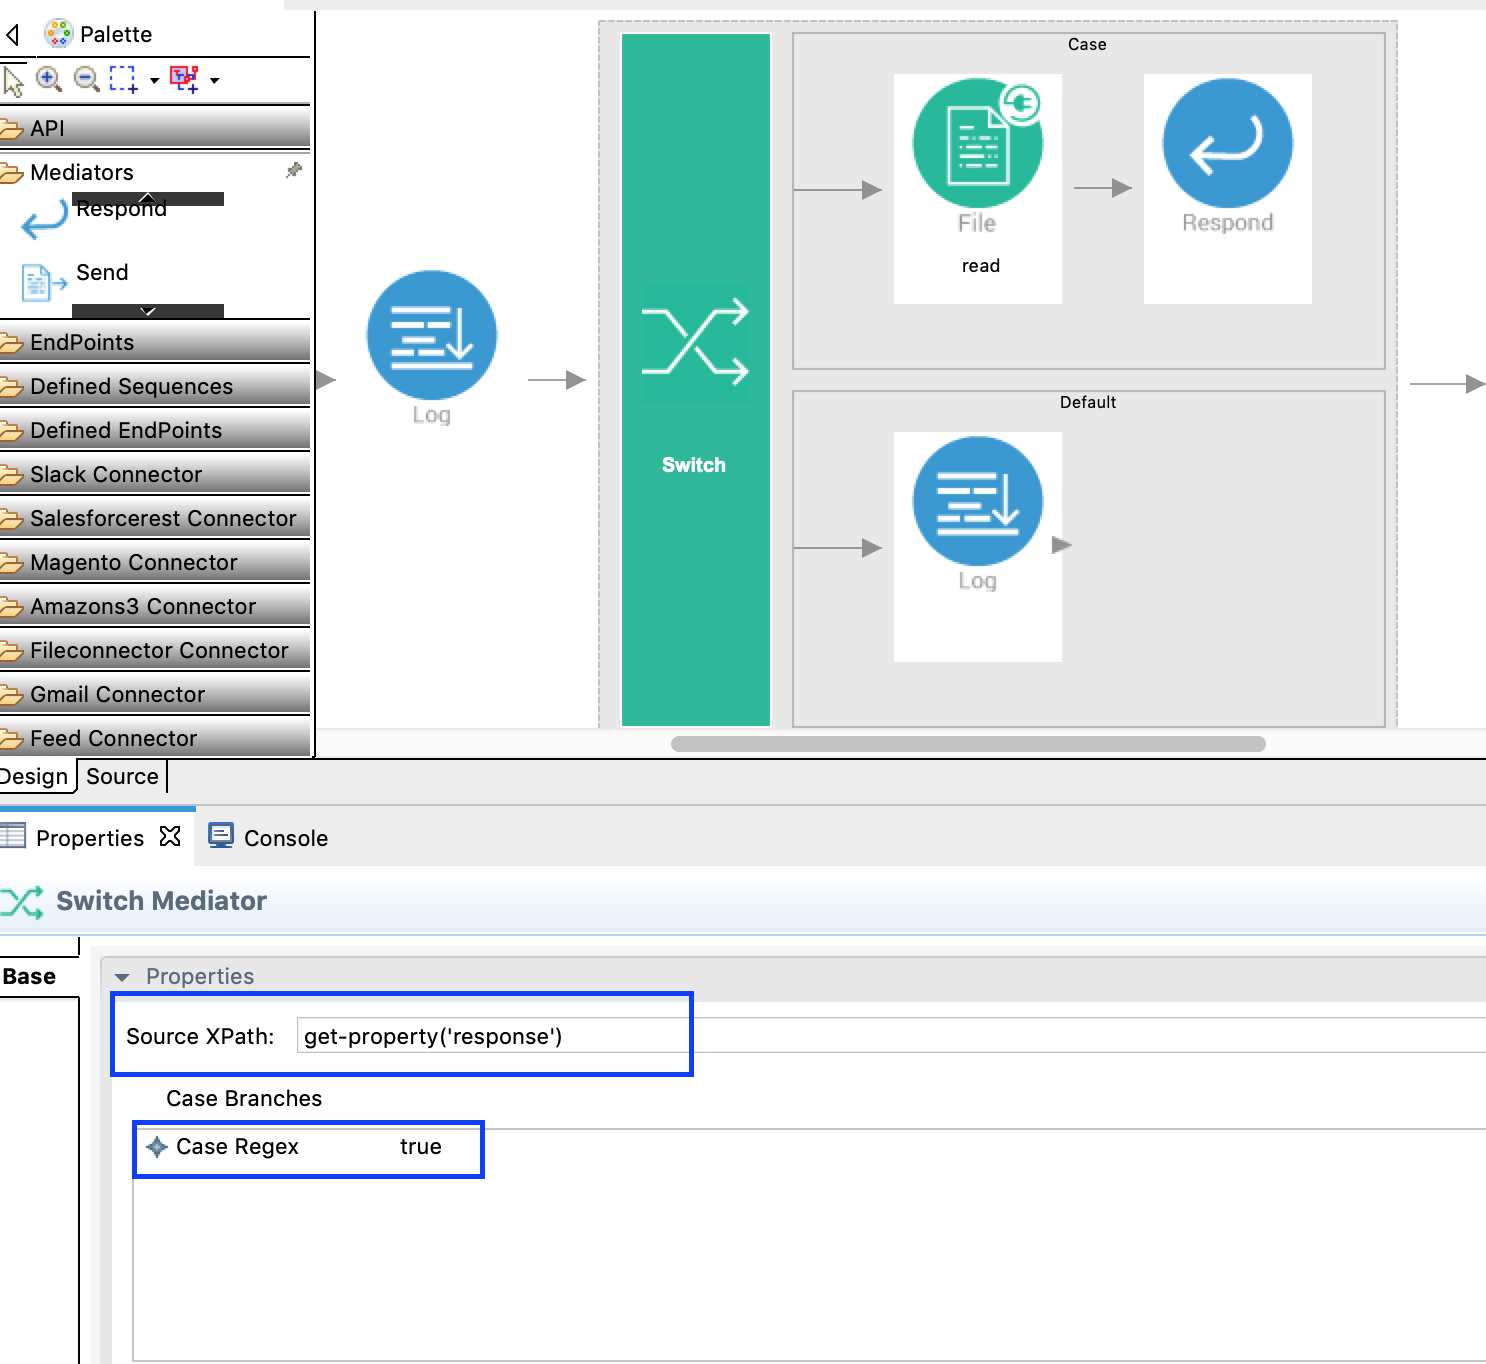
-
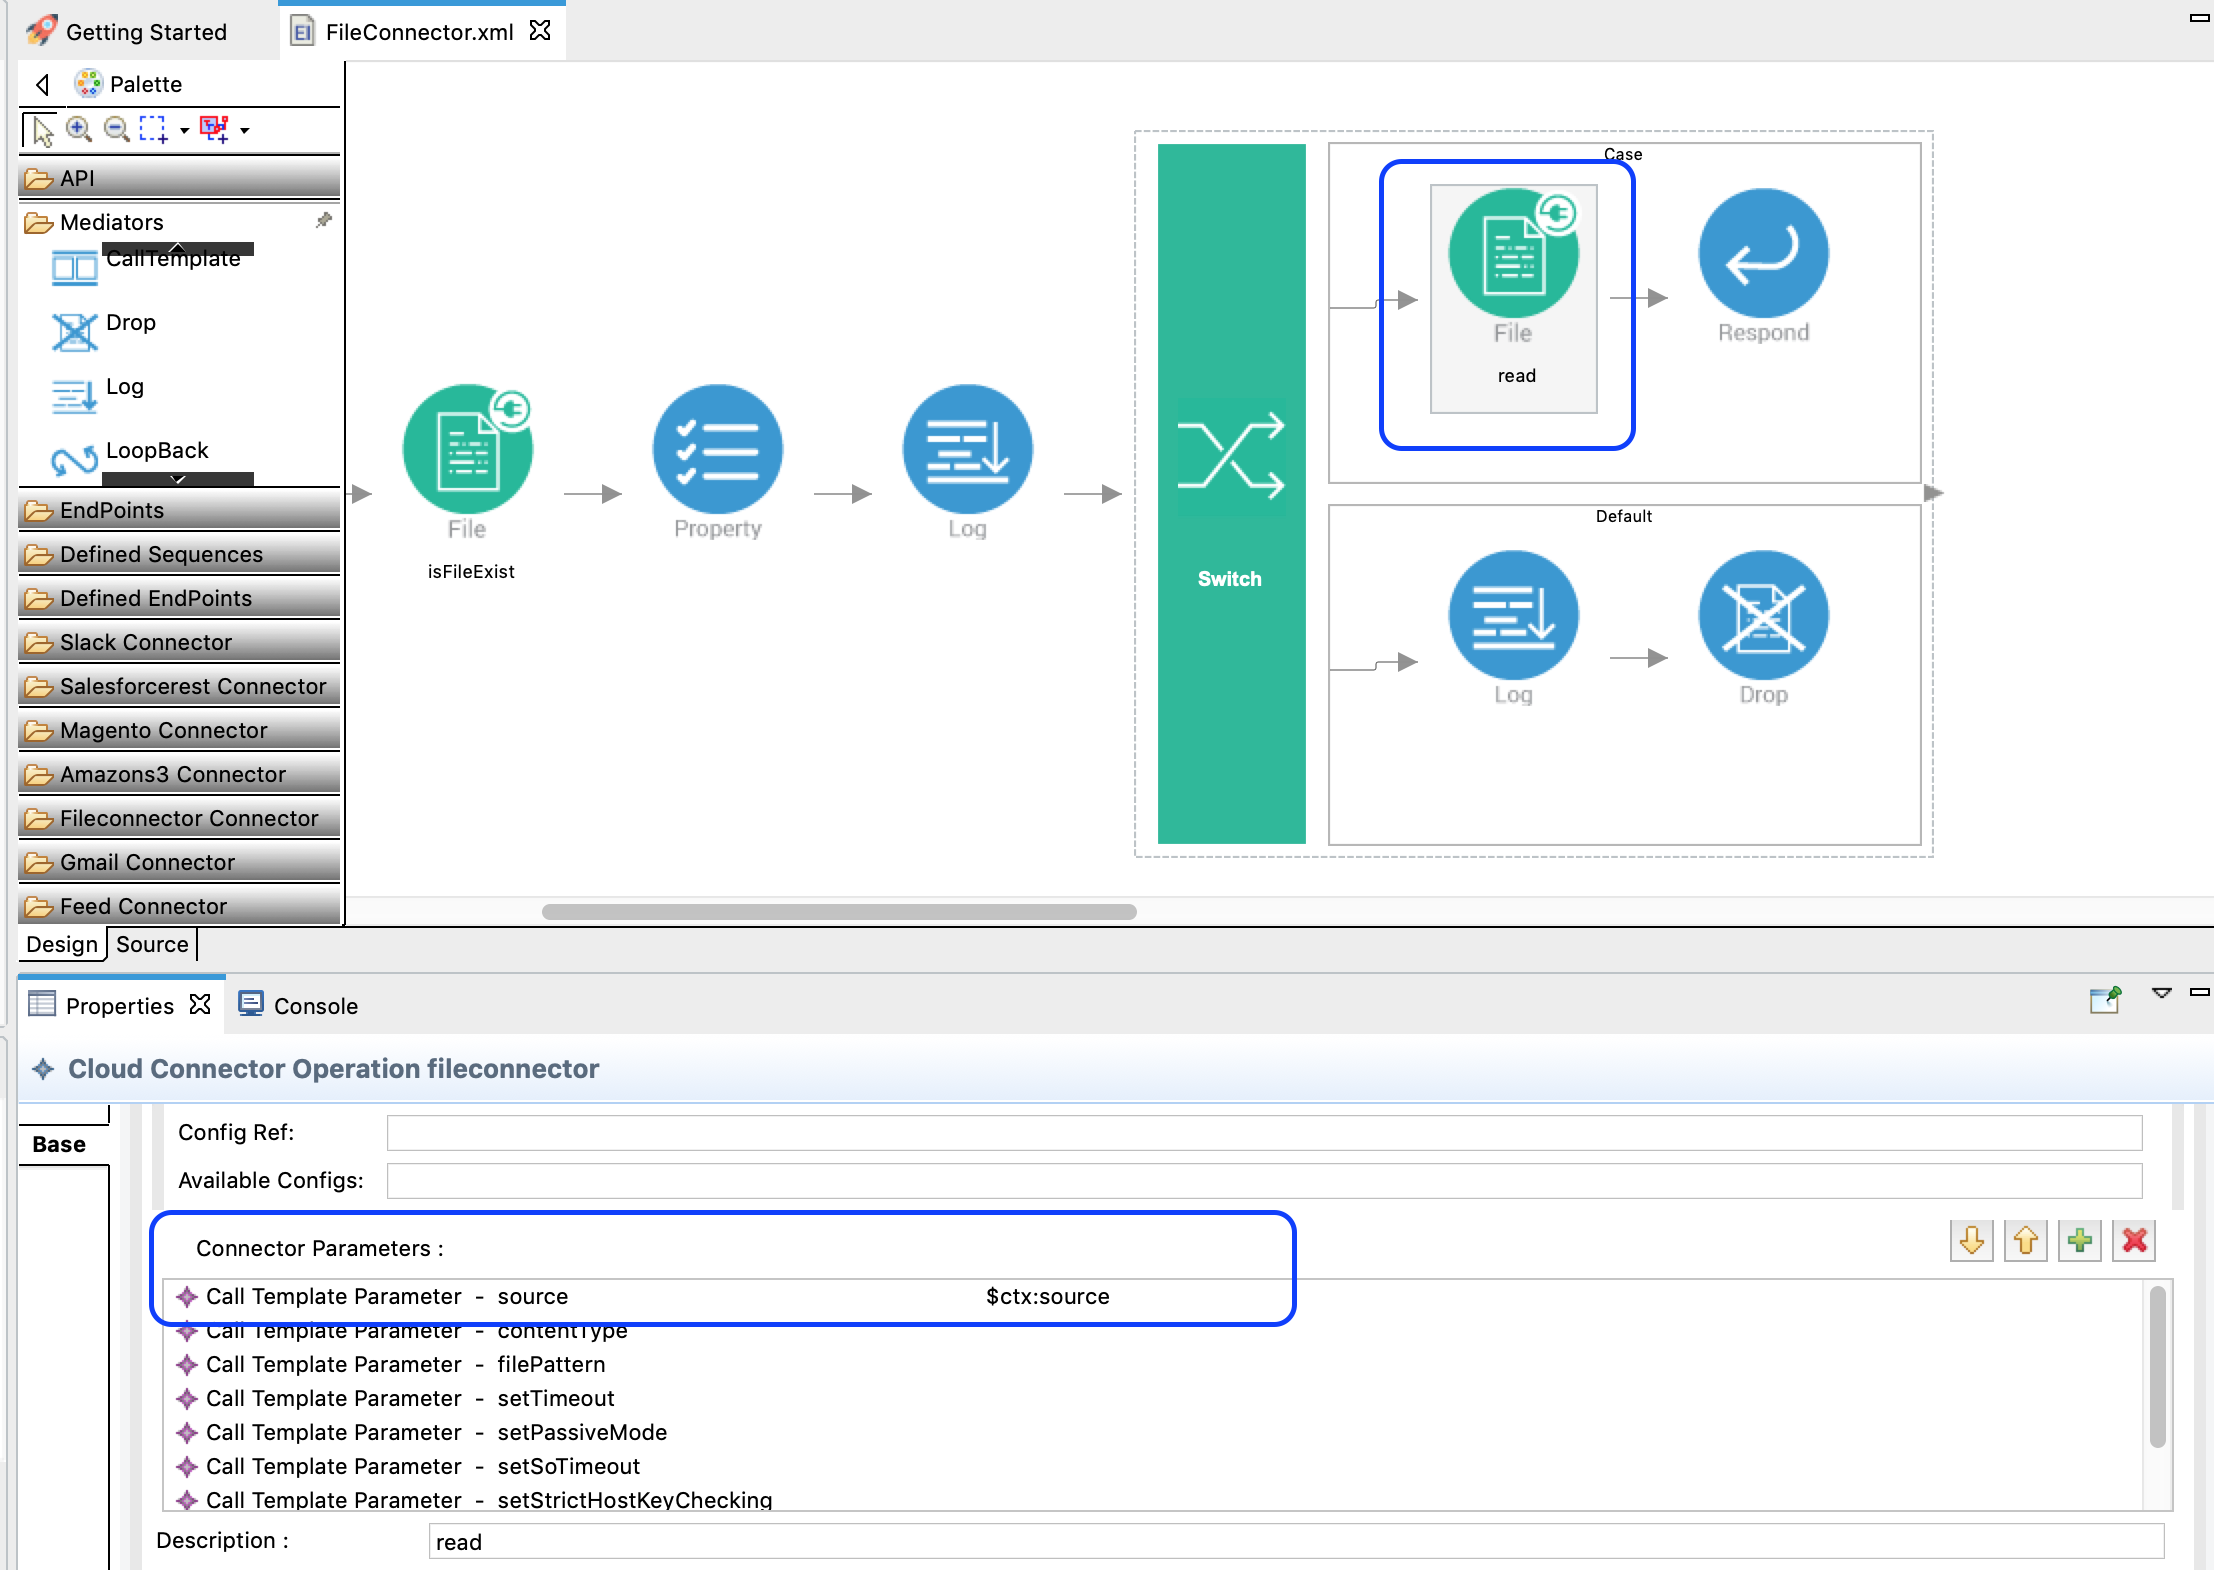
Drag and drop the read operation to the case in the Switch mediator. In the default case log an error and drops the message.
-
You can find the complete API XML configuration below. You can go to the source view and copy paste the following config.
<?xml version="1.0" encoding="UTF-8"?> <api context="/fileconnector" name="FileConnector" xmlns="http://ws.apache.org/ns/synapse"> <resource methods="POST" uri-template="/create"> <inSequence> <property expression="json-eval($.source)" name="source" scope="default" type="STRING"/> <property expression="json-eval($.inputContent)" name="inputContent" scope="default" type="STRING"/> <fileconnector.create> <source>{$ctx:source}</source> <inputContent>{$ctx:inputContent}</inputContent> </fileconnector.create> <respond/> </inSequence> <outSequence/> <faultSequence/> </resource> <resource methods="POST" uri-template="/read"> <inSequence> <property expression="json-eval($.source)" name="source" scope="default" type="STRING"/> <fileconnector.isFileExist> <source>{$ctx:source}</source> </fileconnector.isFileExist> <property expression="json-eval($.fileExist)" name="response" scope="default" type="STRING"/> <log level="custom"> <property expression="get-property('response')" name="responselog"/> </log> <switch source="get-property('response')"> <case regex="true"> <fileconnector.read> <source>{$ctx:source}</source> </fileconnector.read> <respond/> </case> <default> <log> <property name="notext" value=""File does not exist""/> </log> <drop/> </default> </switch> </inSequence> <outSequence/> <faultSequence/> </resource> </api>
Exporting Integration Logic as a CApp
CApp (Carbon Application) is the deployable artifact on the Enterprise Integrator runtime. Let us see how we can export integration logic we developed into a CApp along with the connector.
Creating Connector Exporter Project
In order to bundle Connector into a CApp a Connector Exporter Project is needed.
-
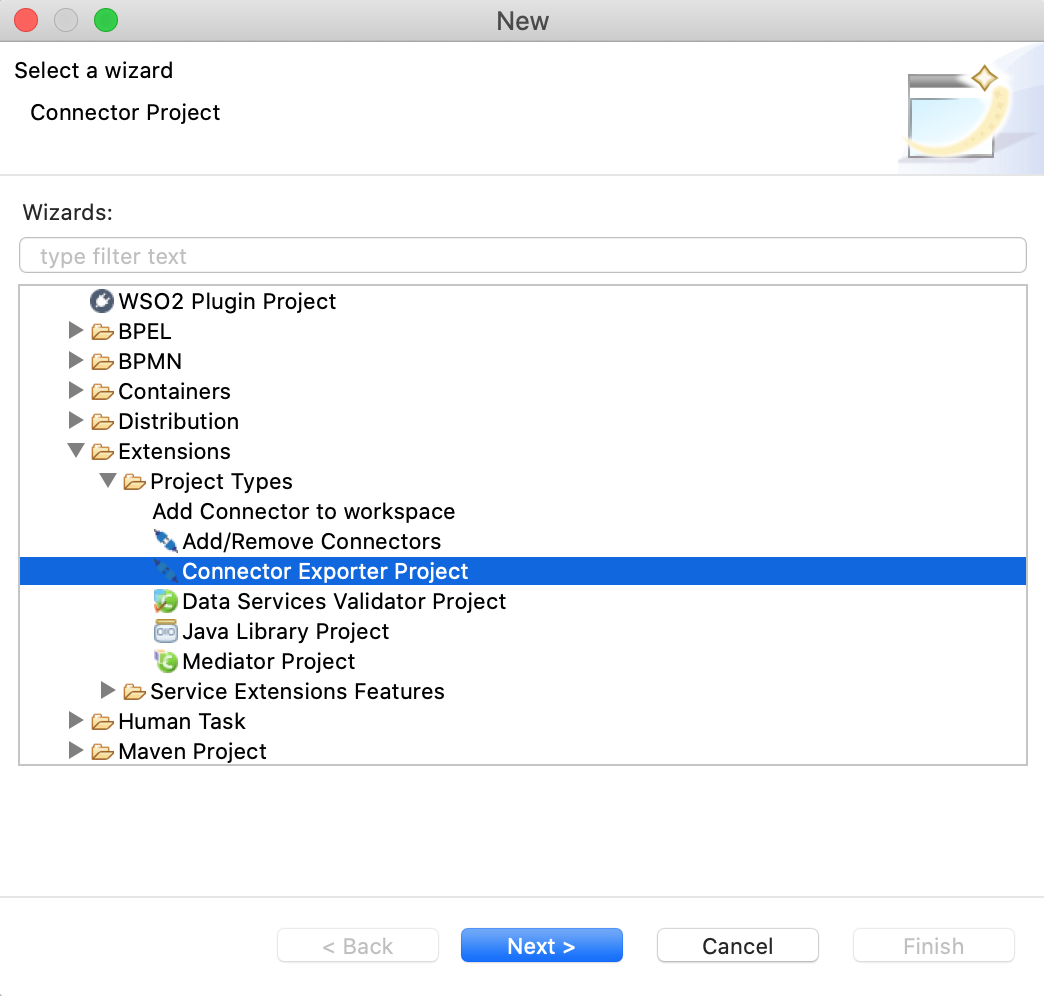
Navigate to File -> New -> Other -> WSO2 -> Extensions -> Project Types -> Connector Exporter Project.
-
Enter a name for the Connector Exporter Project.
-
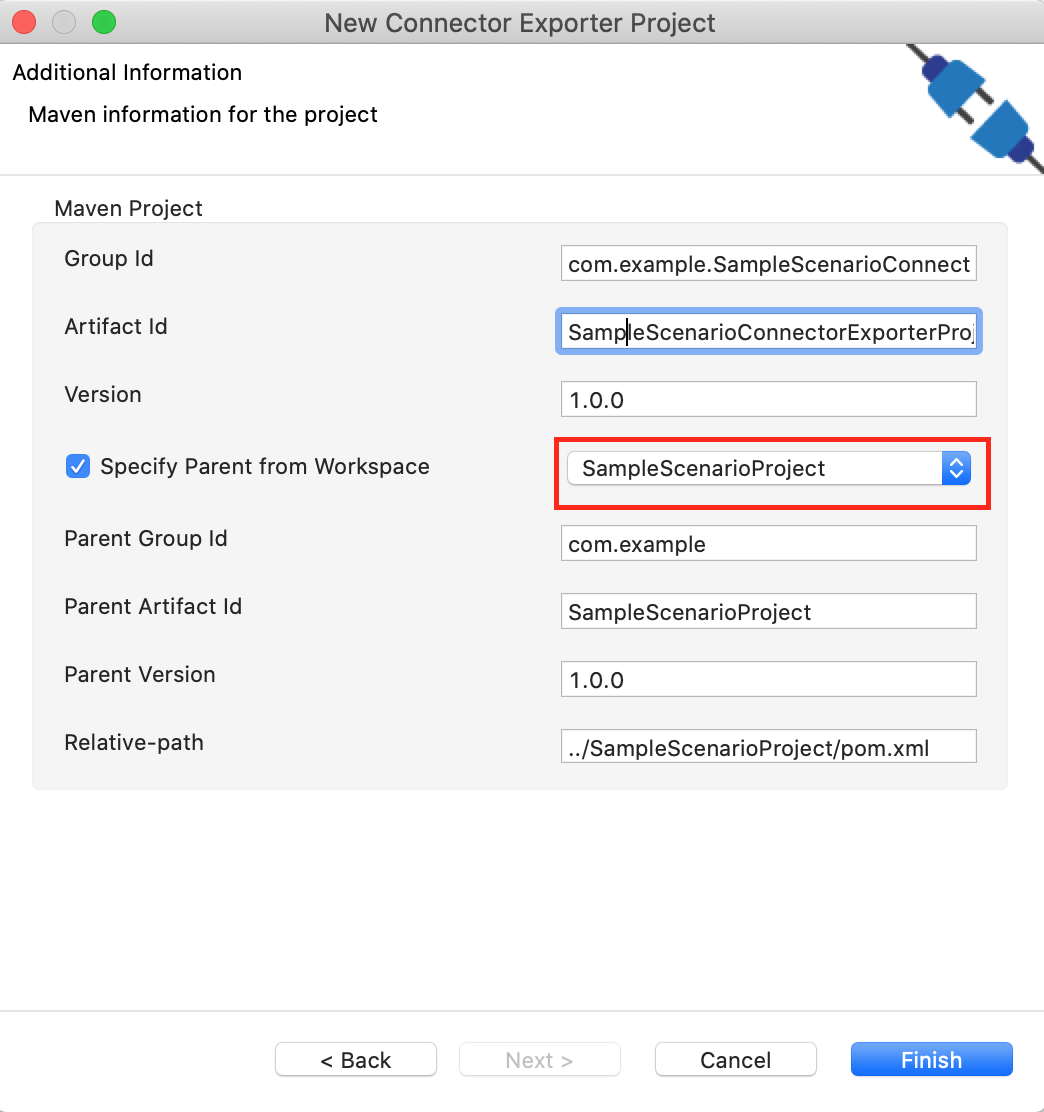
In the next screen select, Specify the parent from workspace and select the specific Integration Project you created from the dropdown.
-
Now you need to add the Connector to Connector Exporter Project that you just created. Right click on the Connector Exporter Project and select, New -> Add Remove Connectors -> Add Connector -> Add from Workspace -> Connector
-
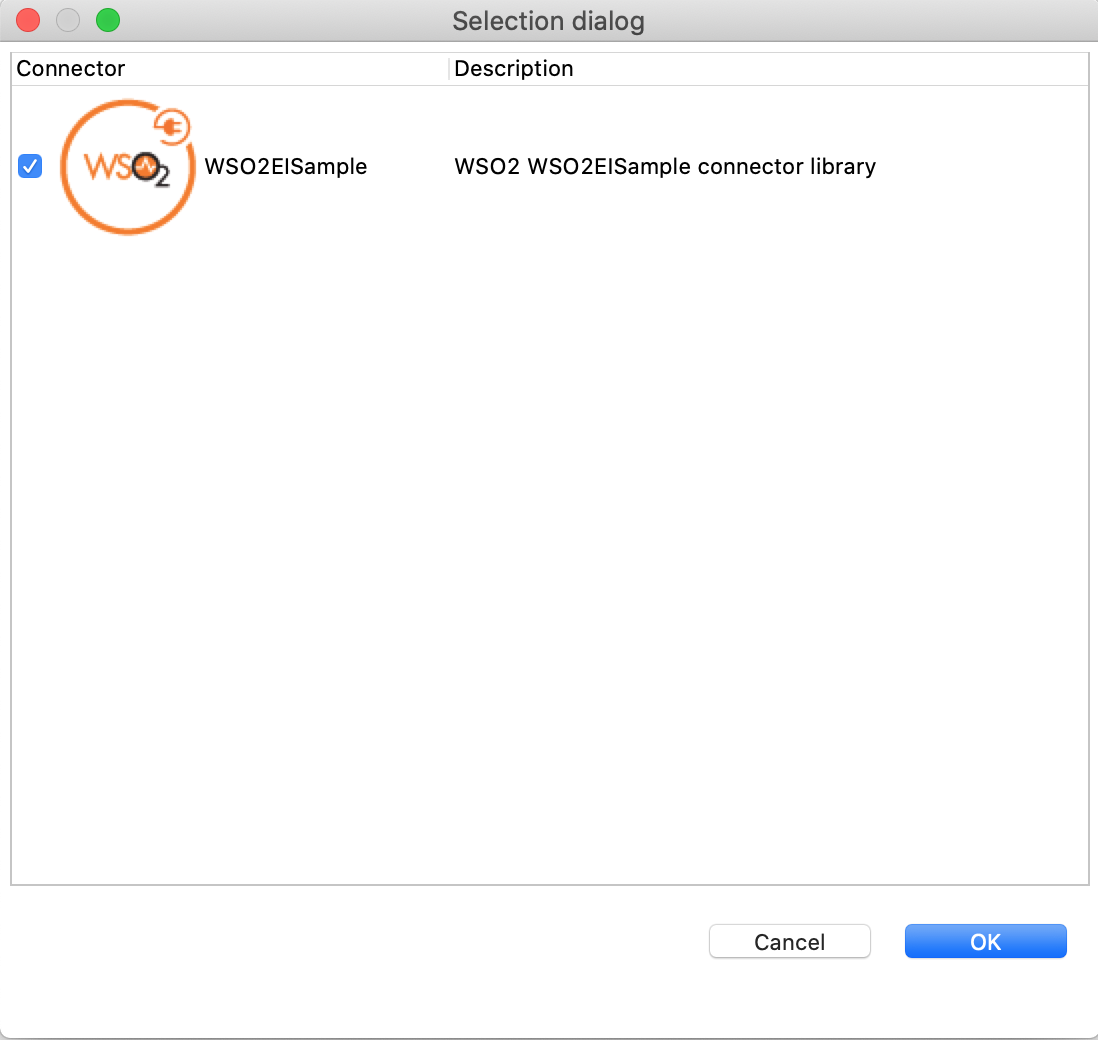
Once you are directed to the workspace, it displays all the connectors that exist in the workspace. You can select the relevant connector and click Ok.
Creating a Composite Application Project
To export the Solution Project as a CApp, a Composite Application Project needs to be created. Usually, when a solution project is created, this project is automatically created by Integration Studio. If not, you can specifically create it by navigating to File -> New -> Other -> WSO2 -> Distribution -> Composite Application Project.
Exporting the Composite Application Project
-
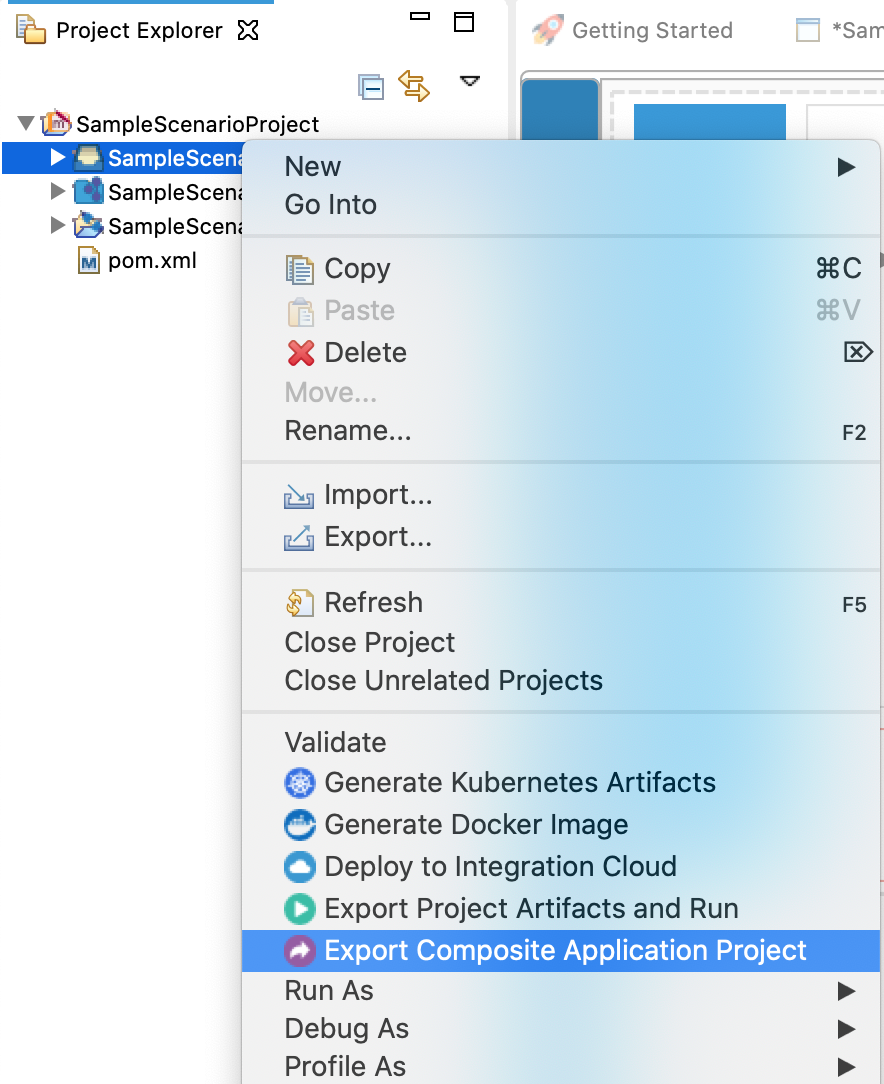
Right click on Composite Application Project and click on Export Composite Application Project.
-
Select an Export Destination where you want to save the .car file.
-
In the next Create a deployable CAR file screen, select both the created Integration Project and the Connector Exporter Project to save and click Finish. The CApp will get created at the specified location provided at the previous step.

Get the project
You can download the ZIP file and extract the contents to get the project code.
Deployment
Follow these steps to deploy the exported CApp in the Enterprise Integrator Runtime.
Deploying on WSO2 Enterprise Integrator 7
You can copy the composite application to the Other Resources section. Make sure you first export the PATH as below.
$ export PATH=/path/to/mi/cli/directory/bin:$PATH-
Log in to Micro Integrator using the following command.
./mi remote login -
Provide default credentials admin for both username and password.
-
In order to view the APIs deployed, execute the following command.
./mi api show
Click here for instructions on deploying on WSO2 Enterprise Integrator 6
-
You can copy the composite application to the
/repository/deployment/server/carbonapps folder and start the server. -
WSO2 EI server starts and you can login to the Management Console https://localhost:9443/carbon/ URL. Provide login credentials. The default credentials will be admin/admin.
-
You can see that the API is deployed under the API section.
Testing
File Create Operation
- Create a file called data.json with the following payload.
{ "source":"/Users/IsuruUyanage/Desktop/RnD/2020/Q1/ConnectorVerification/create.txt", "inputContent": "This is a test file" } - Invoke the API as shown below using the curl command. Curl Application can be downloaded from [here] (https://curl.haxx.se/download.html).
Expected Response: You should get a 'Success' response, and the file should be created in the specified location in the above payload.curl -H "Content-Type: application/json" --request POST --data @data.json http://10.100.5.136:8290/fileconnector/create
File Read Operation
- Create a file called data.json with the following payload.
{ "source":"/Users/IsuruUyanage/Desktop/RnD/2020/Q1/ConnectorVerification/create.txt" } - Invoke the API as shown below using the curl command. Curl Application can be downloaded from [here] (https://curl.haxx.se/download.html).
curl -H "Content-Type: application/json" --request POST --data @data.json http://10.100.5.136:8290/fileconnector/read
Expected Response: You should get the following text returned.
This is a test file.
What's Next
- You can deploy and run your project on Docker or Kubernetes.
- To customize this example for your own scenario, see File Connector Configuration documentation for all operation details of the connector.
