Click New and open a new Siddhi file, or click Open and open an existing Siddhi file.
Click Design View to open the Design View.
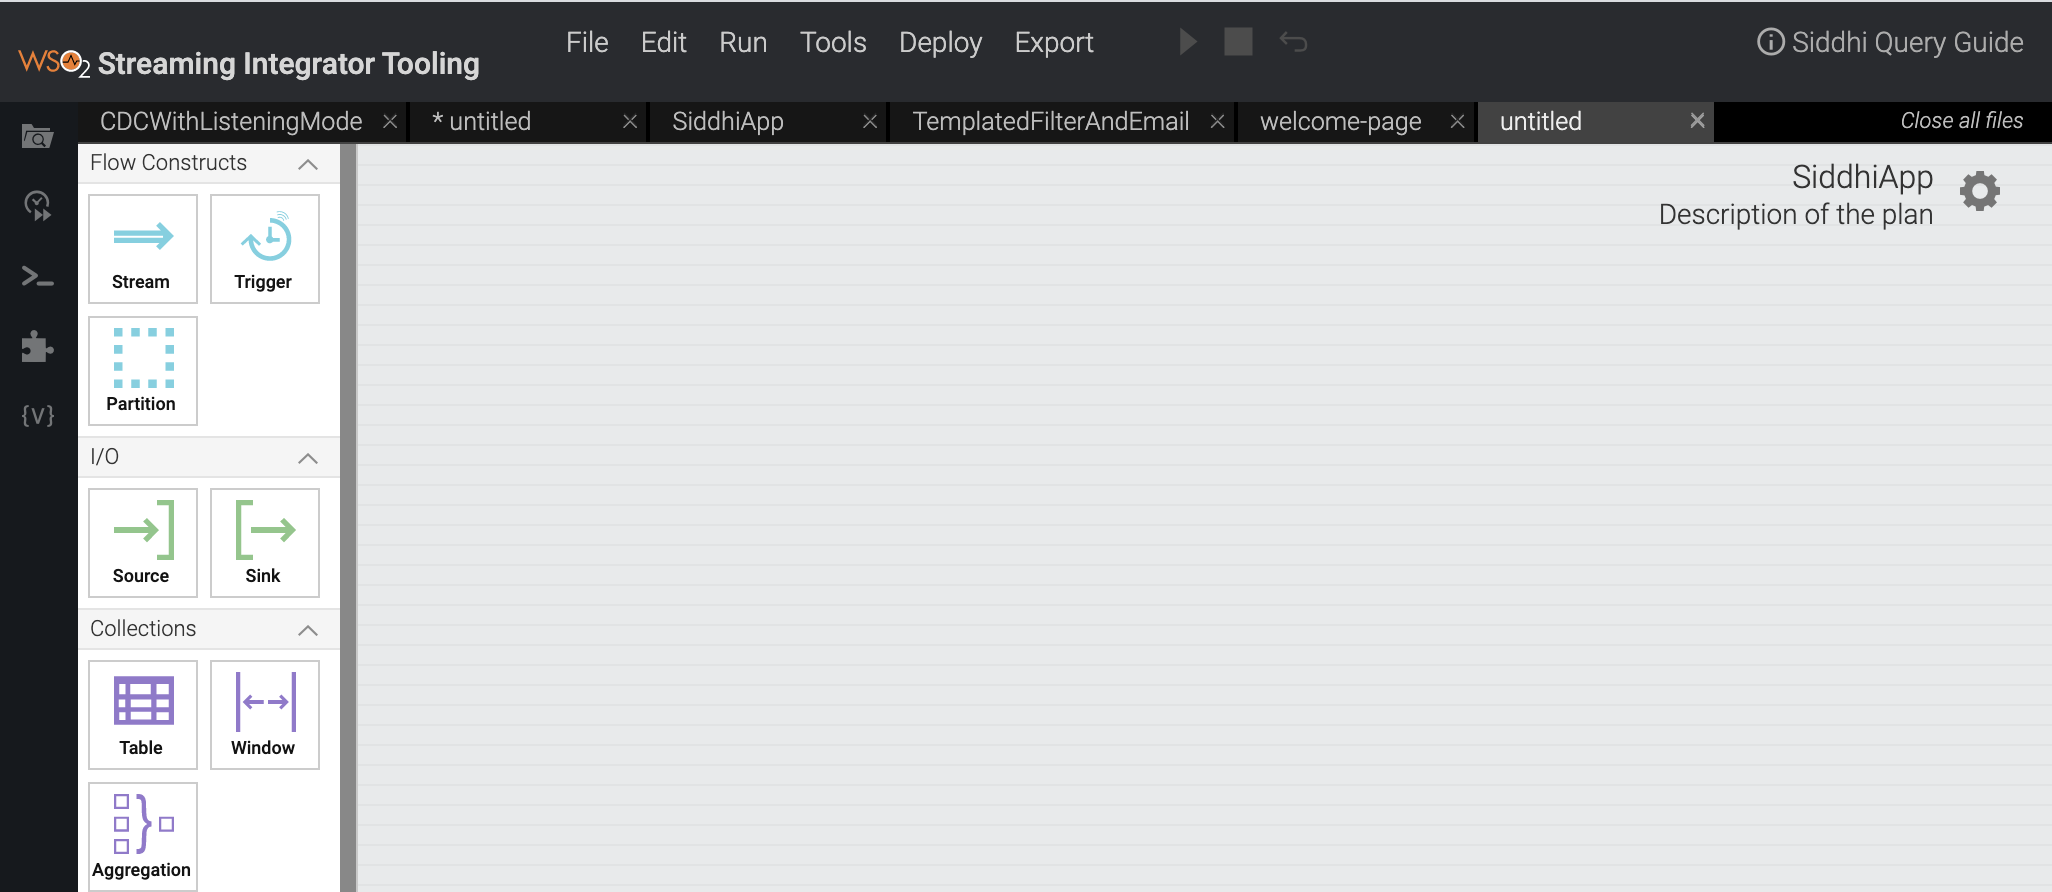
The design view opens as shown in the example below. It consists of
a grid to which you can drag and drop the Siddhi components
represented by icons displayed in the left panel to design a Siddhi
application.
To add a Siddhi component to the Siddhi application that you are creating/editing in the design view, click on the
relevant icon in the left pane, and then drag and drop it to the grid as demonstrated in the example below.
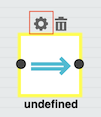
Once you add a Siddhi component, you can configure it as required. To
configure a Siddhi component, click the settings icon on the component.
This opens a form with parameters related to the relevant component.
The following is the complete list of Siddhi components that you can add
to the grid of the design view when you create a Siddhi application.
A stream represents a logical series of events ordered in time. For a detailed description of streams, see Siddhi Query Guide - Stream.
Form
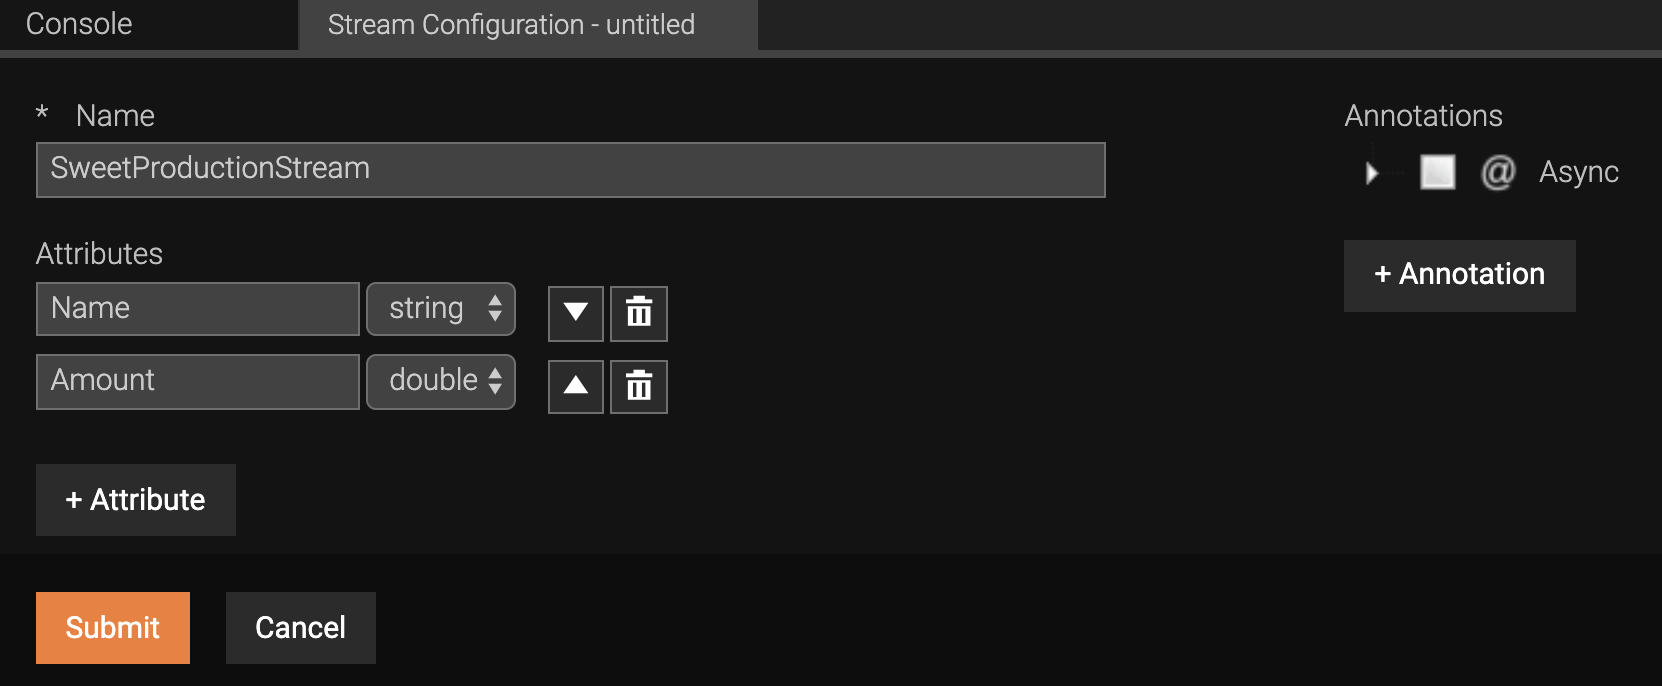
To configure the stream, click the settings icon on the stream component you added to the grid. Then enter values as follows:
Stream Name: A unique name for the stream. This should be specified in title caps, and without spaces (e.g., ProductionDataStream ).
Attributes : Attributes of streams are specified as name and type pairs in the Attributes table.
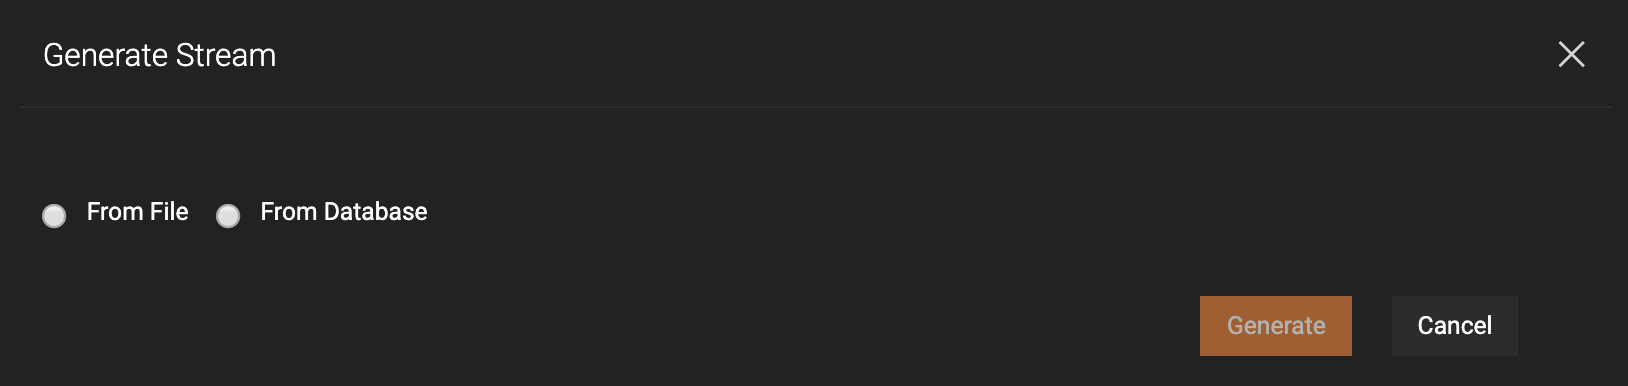
If you want to generate the the stream from a file or a database, click Generate Stream. However, note that you need to create the relevant file or set up the database and the tables beforehand.
The Generate Stream form opens as follows
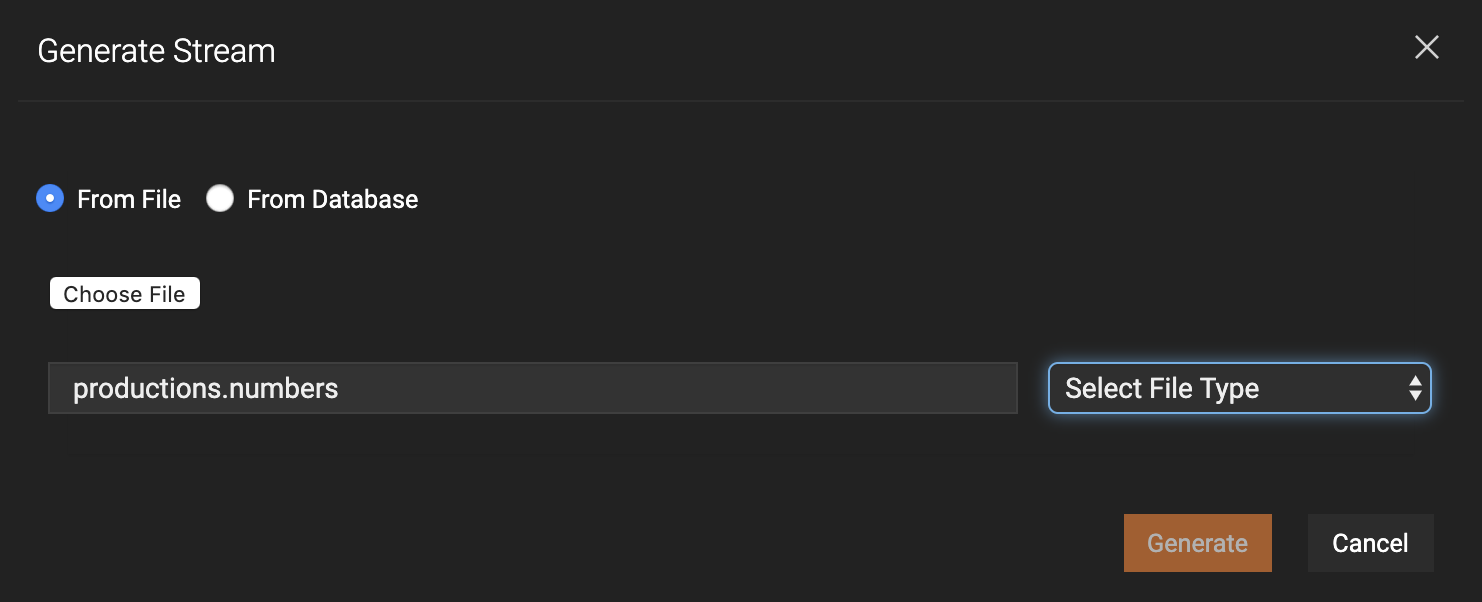
To generate the stream from a file:
In the Generate Stream form, select From File.
Then click Choose File and browse for the file from which you want to generate the stream. the supported file types are CSV, JSON, and XML. If you select a file that is not of one of these types, the Select File Type field is enabled as shown in the example below.
You are required to select the appropriate file type in this field in order to proceed to generate the stream from the selected file.
The rest of the fields that appear in the dialog box differ based on the file type as explained below. If required, change the default values that appear in them as required
If the file type is CSV:
Stream Name: A name for the stream that you are generating.
Delimiter: A blank space, comma, or any other character/symbol that indicates the beginning or the end of a character string, word, or a data item.
Is Header Exists: If this is set to true, a header exists for the purpose of identifying the attribute names and the data types of the data values in the file.
If the file type is JSON:
Stream Name: A name for the stream that you are generating.
Enclosing Element: The symbol/element used to enclose the JSON object.
If the file type is XML:
Stream Name: A name for the stream that you are generating.
Namespace: This is an optional field to enter an XML namespace.
Enclosing Element: The symbol/element used to enclose the XML object.
Click Generate. The Stream Configuration form is populated with the values in the file you selected.
To generate the stream from a database:
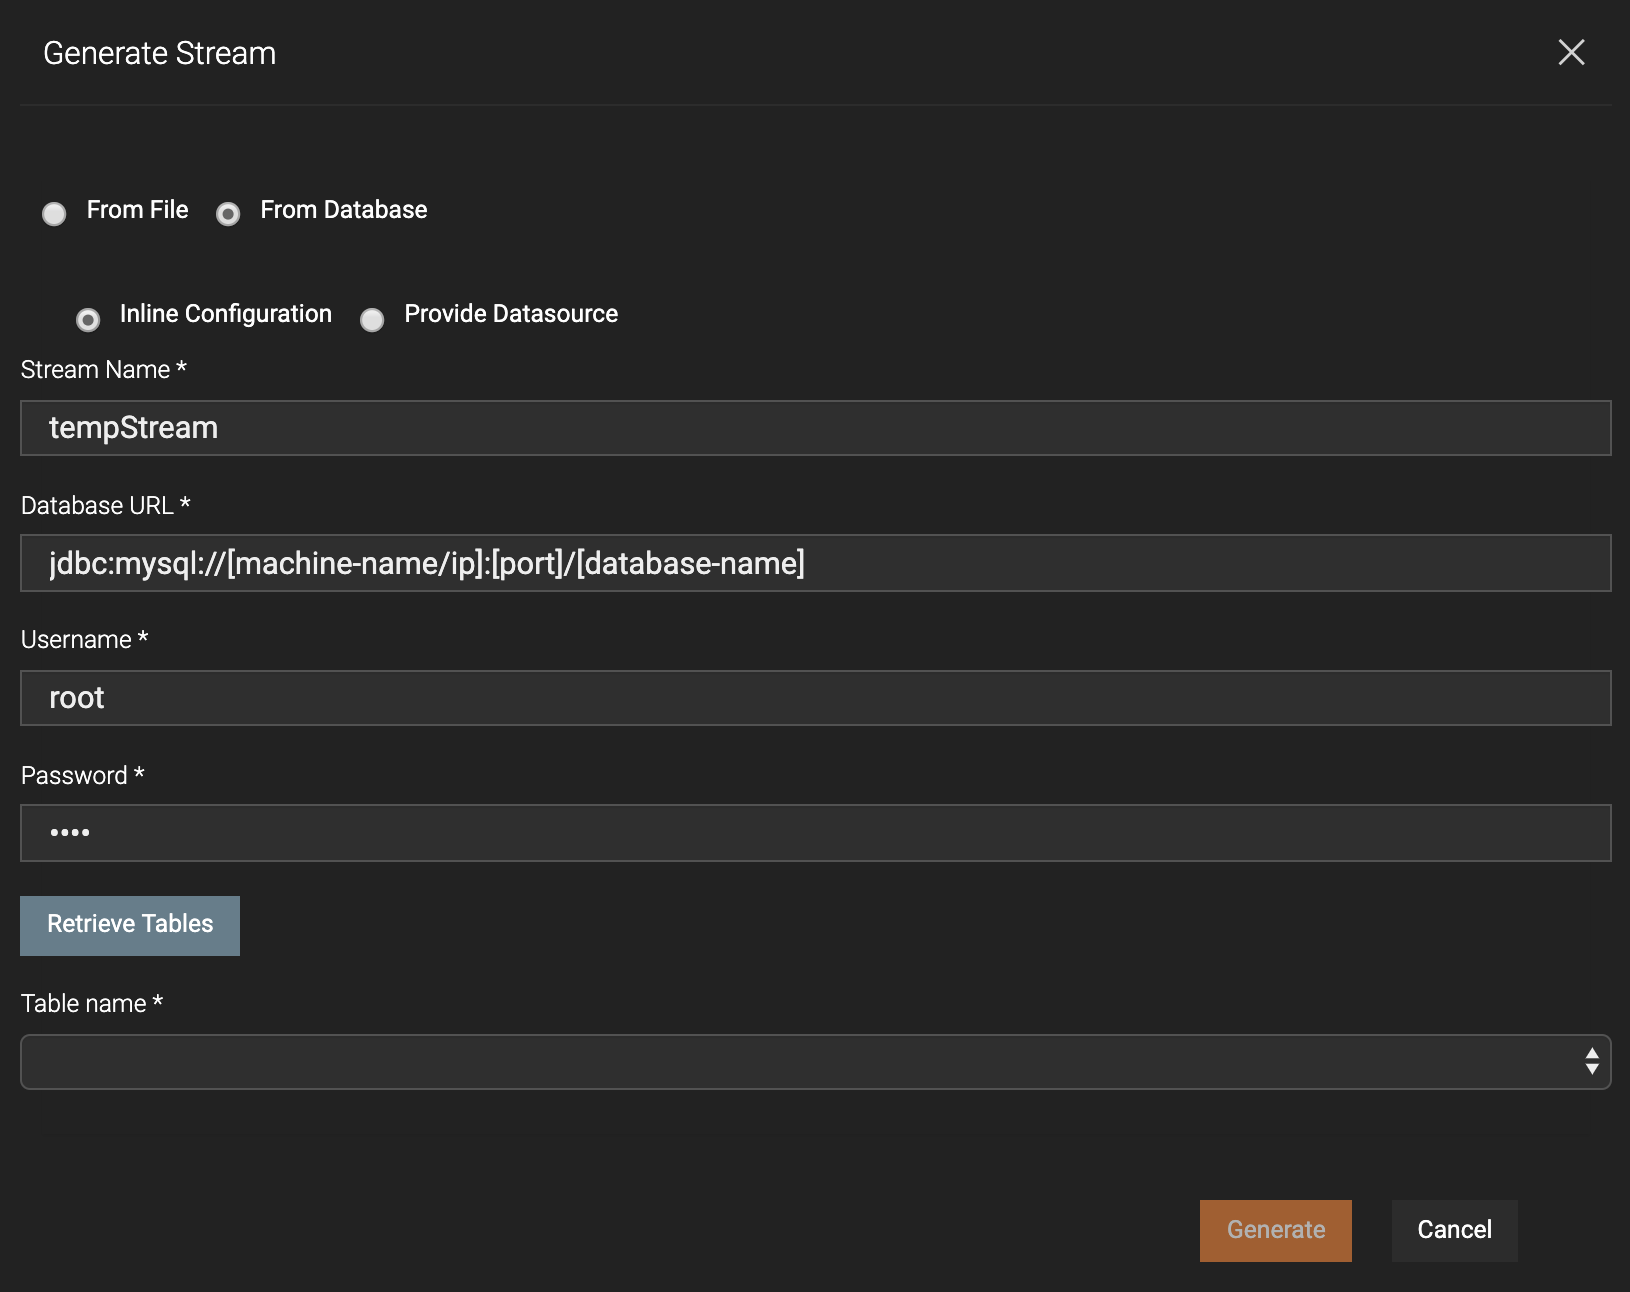
In the Generate Stream form, select From Database.
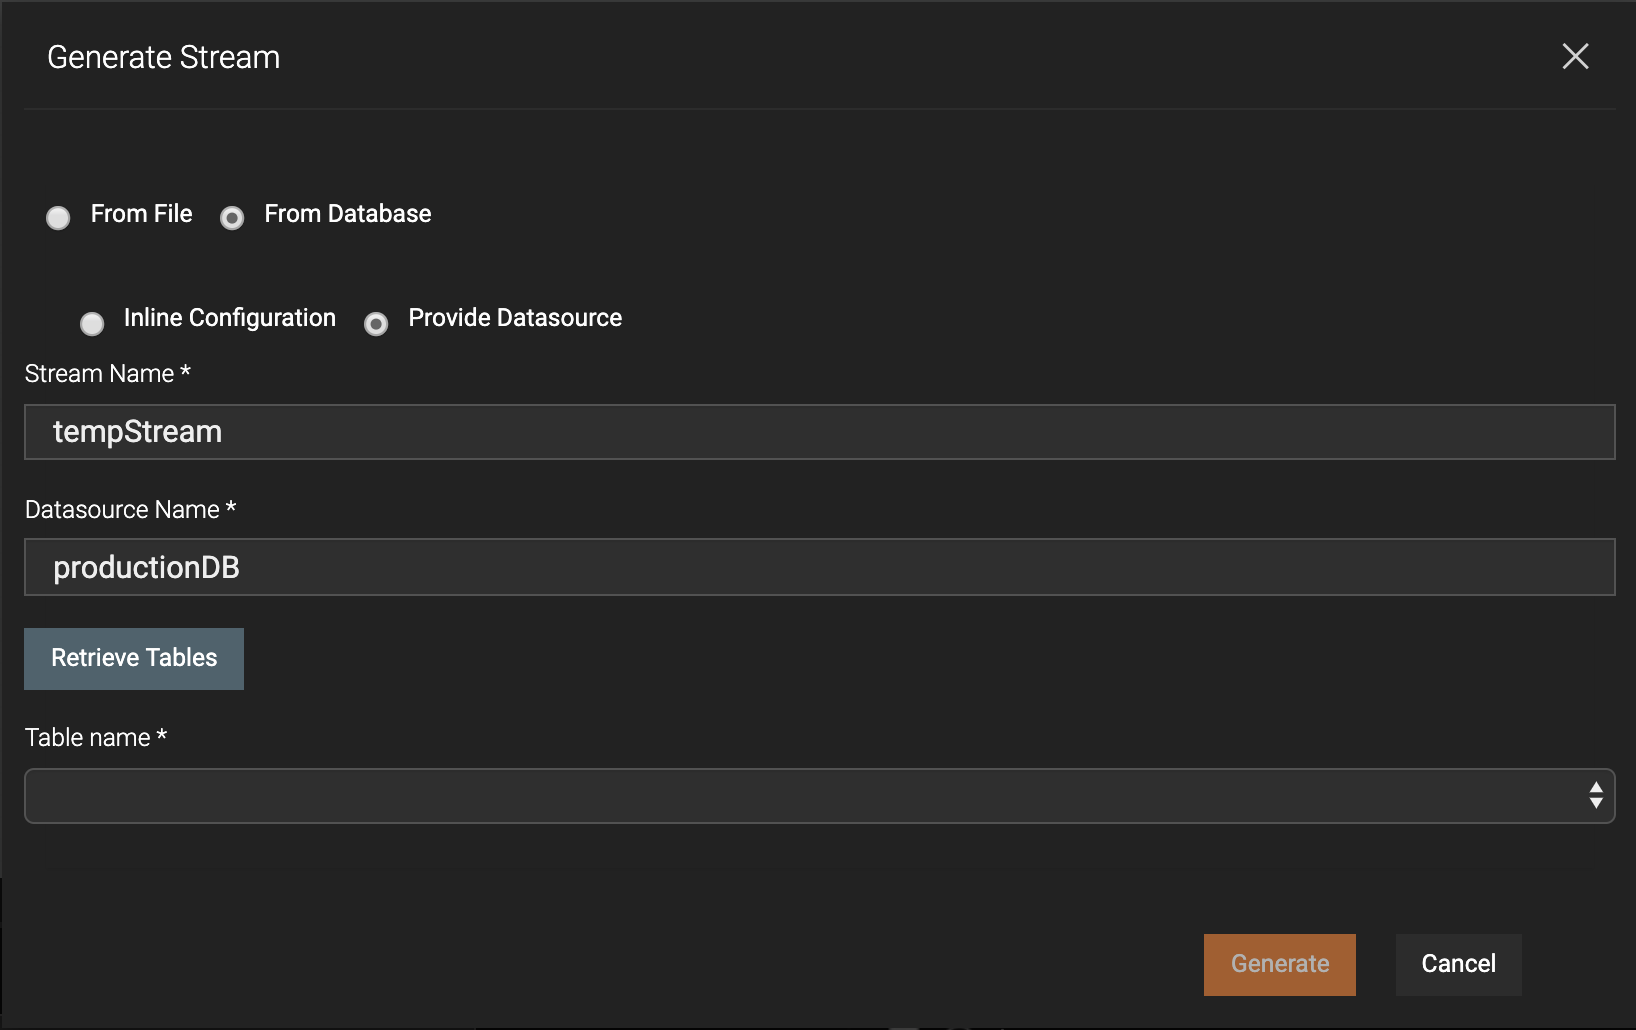
If you want to provide the data source definition inline, select Inline Configuration. If not, select Provide Datasource to select a data source that is already defined externally.
Enter details relating to the data source as follows.
If you are defining the data source configuration inline, enter information as follows:
Stream Name: A name for the stream that you are generating.
Database URL: The URL via which you can connect to the database.
Username: The username via which you access the database.
Password: The password via which you access the database.
Table Name: The name of the database table from which you are generating the stream. To make the available tables appear in this field as a list so that you can select one, enter the relevant information in the previous fields and click Retrieve Tables.
If the data source you are using is already defined externally, enter information as follows:
Stream Name: A name for the stream that you are generating.
Datasource Name: The name of the data source from which you are generating the stream.
Table Name: The name of the database table from which you are generating the stream. To make the available tables appear in this field as a list so that you can select one, enter the relevant data source in the Datasource Name field and click Retrieve Tables.
Click Generate to generate the stream.
Example
The details entered in the above form creates a stream configuration as follows:
define stream SweetProductionStream (amount double, name string);
A source receives events in the specified transport and in the specified format. For more information, see Siddhi Query Guide - Source.
Form
To configure the source, click the settings icon on the source component you added to the grid. This opens a form where you can enter the following information:
To access the form in which you can configure a source, you must first connect the source as the source (input) object to a stream component.
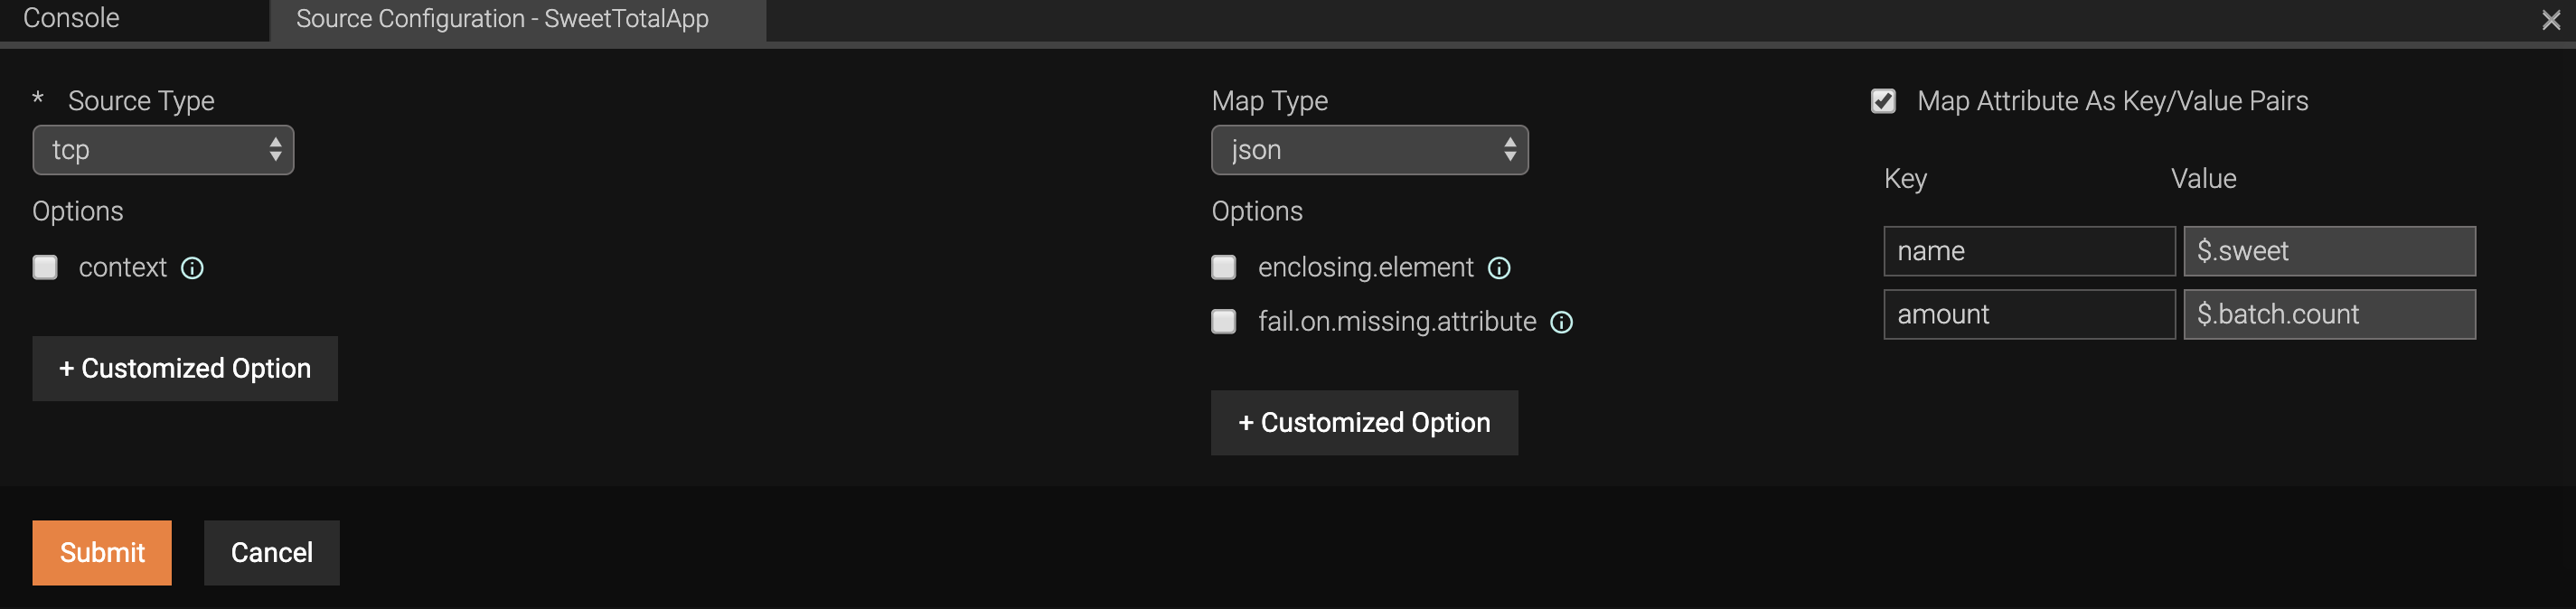
Source Type : This specifies the transport type via which the events are received. The value should be entered in lower case (e.g., tcp ). The other parameters displayed for the source depends on the source type selected.
Map Type : This specifies the format in which you want to receive the events (e.g., xml ). The other parameters displayed for the map depends on the map type selected. If you want to add more configurations to the mapping, click Customized Options and set the required properties and key value pairs.
Map Attribute as Key/Value Pairs : If this check box is selected, you can define custom mapping by entering key value pairs. You can add as many key value pairs as required under this check box.
Example
The details entered in the above form creates a source configuration as follows:
No connection can start from another Siddhi component and link to a source because a source is the point from which events selected into the event flow of the Siddhi application start.
A sink publishes events via the specified transport and in the specified format. For more information, see Siddhi Query Guide - Sink.
Form
To configure the sink, click the settings icon on the sink component you added to the grid.
!!! info To access the form in which you can configure a sink, you must first connect the sink as the target object to a stream component.
Sink Type : This specifies the transport via which the sink publishes processed events. The value should be entered in lower case (e.g., log ).
Map Type : This specifies the format in which you want to publish the events (e.g., passThrough ). The other parameters displayed for the map depends on the map type selected. If you want to add more configurations to the mapping, click Customized Options and set the required properties and key value pairs.
Map Attribute as Key/Value Pairs : If this check box is selected, you can define custom mapping by entering key value pairs. You can add as many key value pairs as required under this check box.
Example
The details entered in the above form creates a sink configuration as follows:
>@sink(type = 'log', prefix = "Sweet Totals:"
Source
Streams
Target
N/A
A sink cannot be followed by another Siddhi component because it represents the last stage of the event flow where the results of the processing carried out by the Siddhi application are communicated via the required interface.
A table is a stored version of an stream or a table of events. For more information, see Siddhi Query Guide - Table.
Form
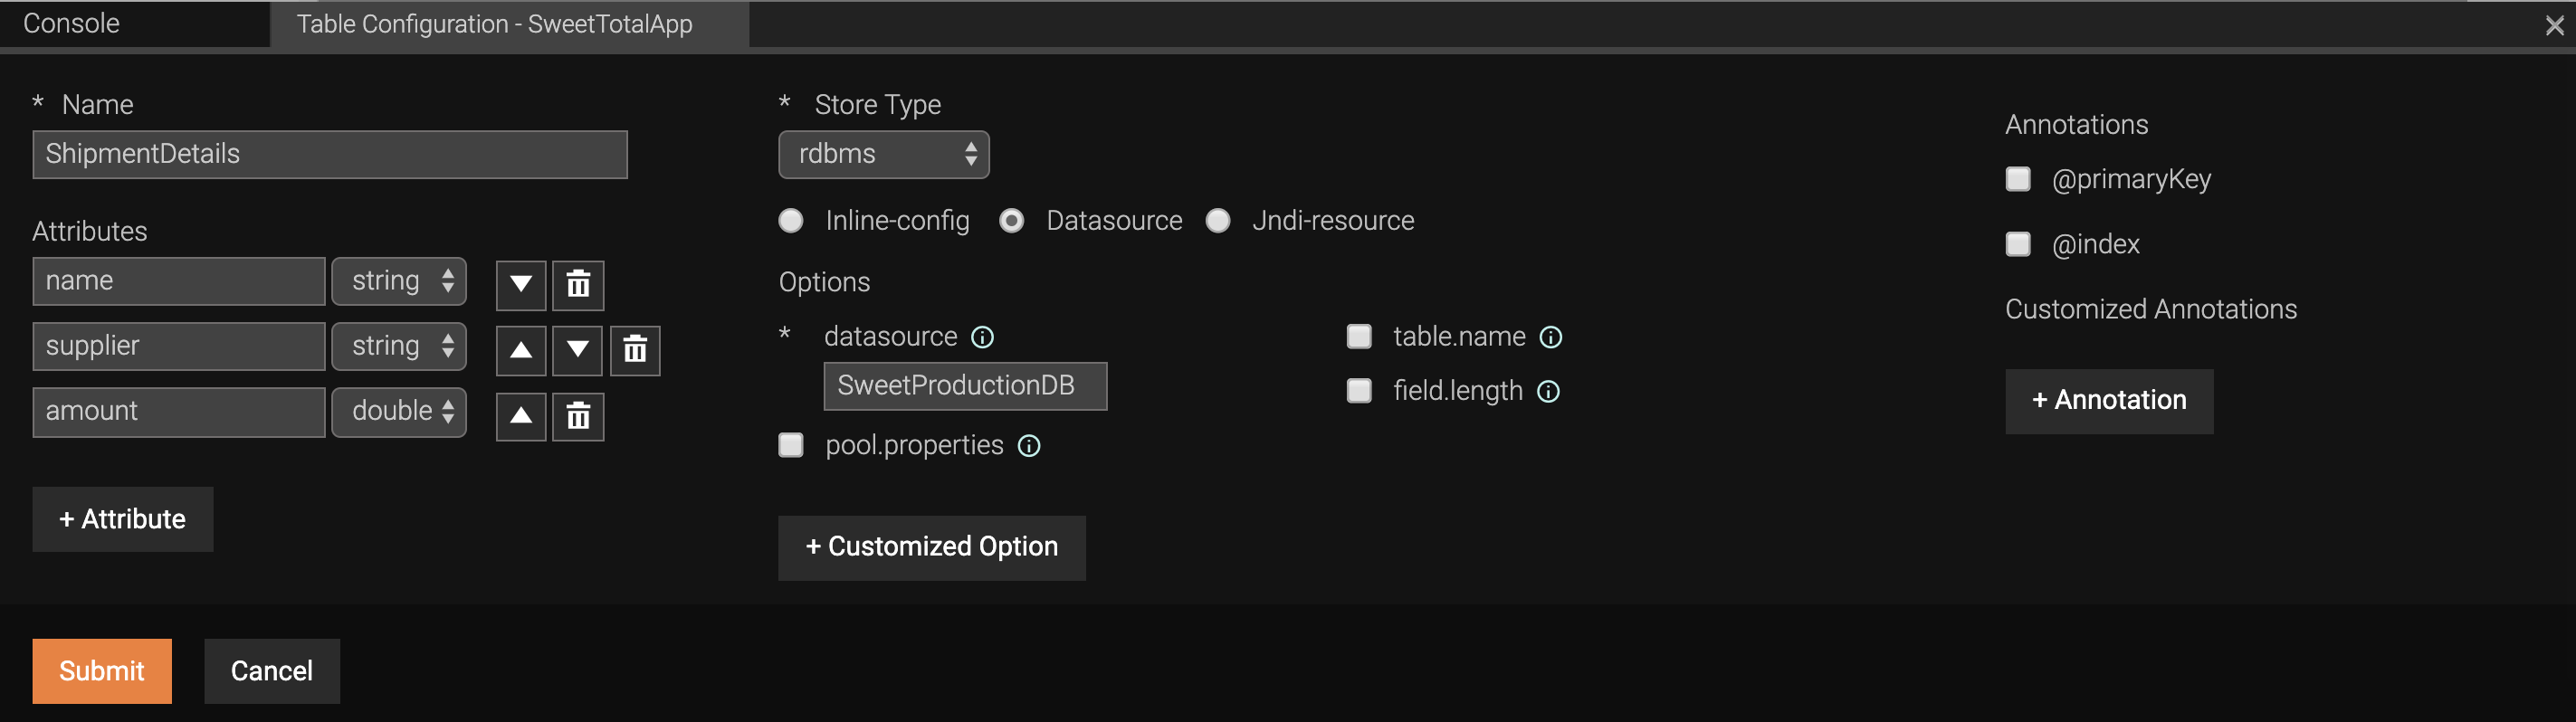
To configure the table, click the settings icon on the table component you added to the grid.
Name: This field specifies unique name for the table. This should be specified in title caps, and without spaces (e.g., ProductionDataTable ).
Attributes : Attributes of tables are specified as name and type pairs in the Attributes table. To add a new attribute, click +Attribute.
Store Type : This specifies the specific database type in which you want to stopre data or whether the data is to be stored in-memory. Once the store type is selected, select an option to indicate whether the datastore needs to be defined inline, whether you want to use a datasource defined in the <SP_HOME>/conf/worker/deployment.yaml file, or connected to a JNDI resource. For more information, see Defining Tables for Physical Stores. The other parameters configured under Store Type depend on the store type you select.
Annotations : This section allows you to specify the table attributes you want to use as the primary key and indexes via the @primarykey and @index annotations. For more information, see Defining Data Tables. If you want to add any other custom annotations to your table definition, click +Annotation to define them.
Example
The details entered in the above form creates a table definition as follows:
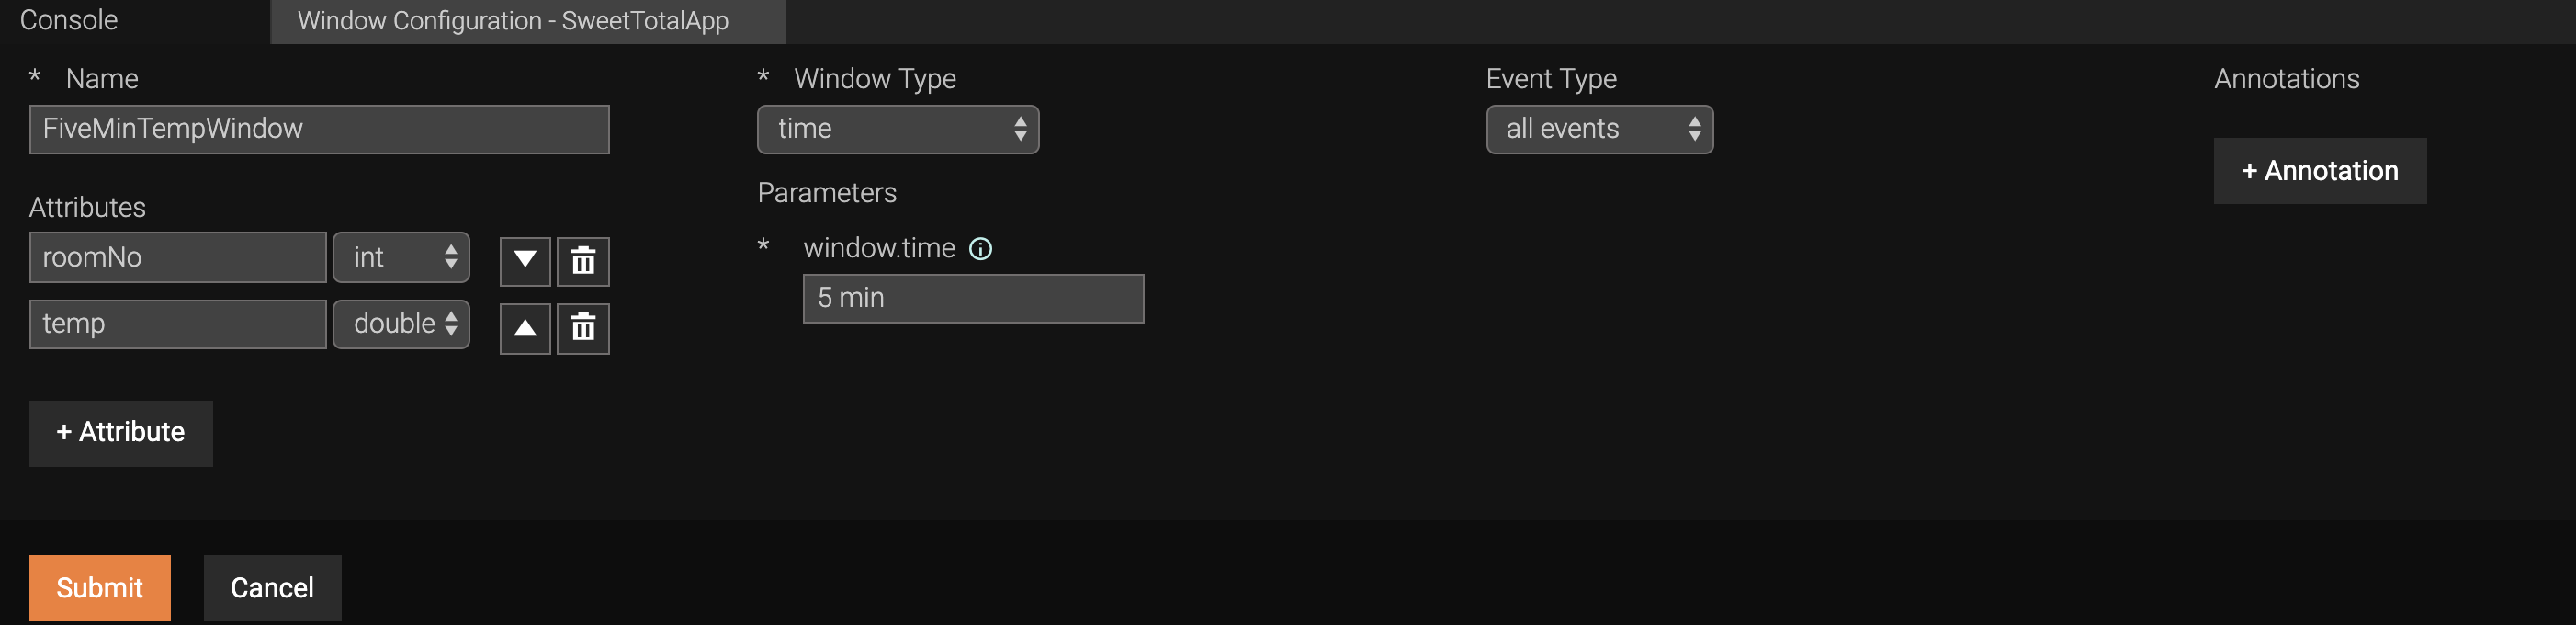
Parameters : This section allows you to define one or more parameters for the window definition based on the window type you entered in the Window Type field.
Annotations : If you want to add any other custom annotations to your window definition, click +Annotation to define them.
Example
The details entered in the above form creates a window definition as follows:
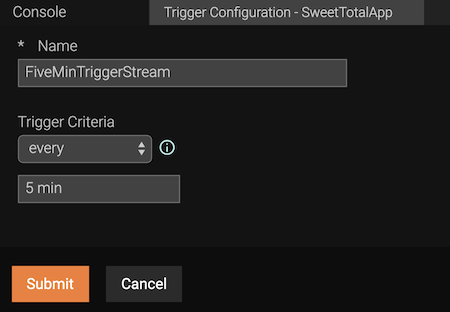
To configure the trigger, click the settings icon on the trigger component you added to the grid, and update the following information.
Name: A unique name for the trigger
Trigger Criteria : This specifies the criteria based on which the trigger is activated. Possible values are as follows:
start : Select this to trigger events when the Streaming Integrator server has started.
every : Select this to specify a time interval at which events should be triggered.
cron-expression : Select this to enter a cron expression based on which the events can be triggered. For more information about cron expressions, see the quartz-scheduler.
Example
The details entered in the above form creates a trigger definition as follows:
To configure the trigger, click the settings icon on the trigger component you added to the grid, and update the following information.
Name : A unique name for the trigger.
Trigger Criteria : This specifies the criteria based on which the trigger is activated. Possible values are as follows:
start : Select this to trigger events when the Streaming Integrator server has started.
every : Select this to specify a time interval at which events should be triggered.
cron-expression : Select this to enter a cron expression based on which the events can be triggered. For more information about cron expressions, see the
Example
The details entered in the above orm creates a trigger definition as follows:
Incremental aggregation allows you to obtain aggregates in an incremental manner for a specified set of time periods. For more information, see Siddhi Query Guide - Incremental Aggregation.
!!! tip
Before you add an aggregation, make sure that you have already added the stream with the events to which the aggregation is applied is already defined.
Form
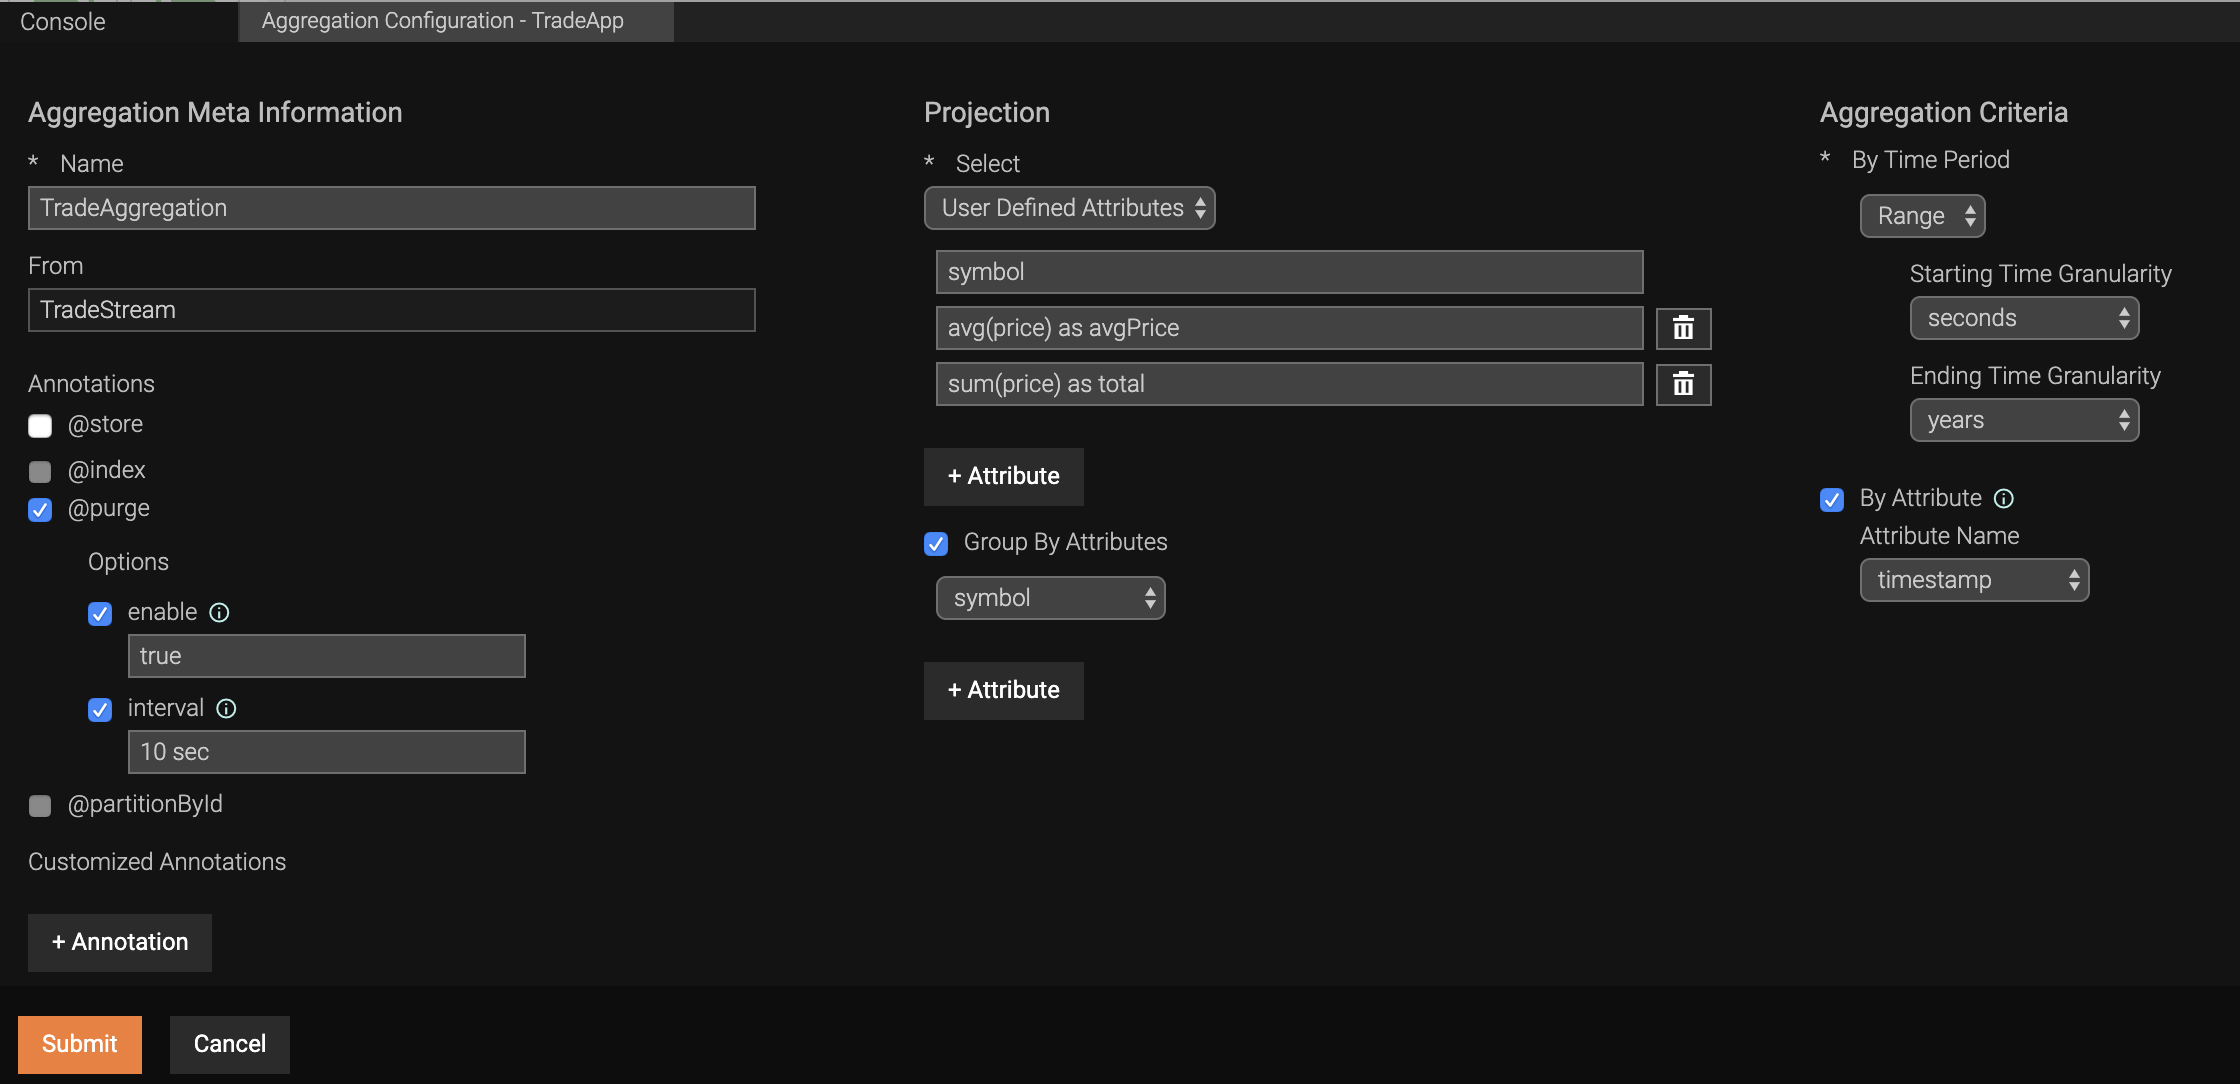
To configure the aggregation, click the settings icon on the aggregation component you added to the grid, and update the following information.
Aggregation Meta Information : In this section, define a unique name for the aggregation in the Name field, and specify the stream from which the input information is taken to perform the aggregations. You can also select the optional annotations you want to use in the aggregation definition by selecting the relevant check boxes. For more information about configuring the annotations once you select them, see Incremental Analysis.
Projection : This section specifies the attributes to be included in the aggregation query. In the Select field, you can select All attributes to perform the aggregation for all the attributes of the stream specified under Input , or select User Defined Attributes to select specific attributes. If you select User Defined Attributes , you can add attributes to be selected to be inserted into the output stream. Here, you can enter the names of specific attributes in the input stream, or enter expressions to convert input stream attribute values as required to generate output events. You can also specify the attribute(s) by which you want to group the output.
Aggregation Criteria : Here, you can specify the time values based on which the aggregates are calculated.
Example
The details entered in the above form creates an aggregation definition as follows:
define aggregation TradeAggregation
from TradeStream
select symbol, avg(price) as avgPrice, sum(price) as total
    group by symbol
    aggregateby timestamp every seconds...years;
The function icon represents Script in Siddhi Query Language. It allows you to write functions in other programming languages and execute them within Siddhi queries. A function component in a Siddhi application is not connected to ther Siddhi components in the design UI. However, the configuration of one or more Query components can include a reference to it.
Form
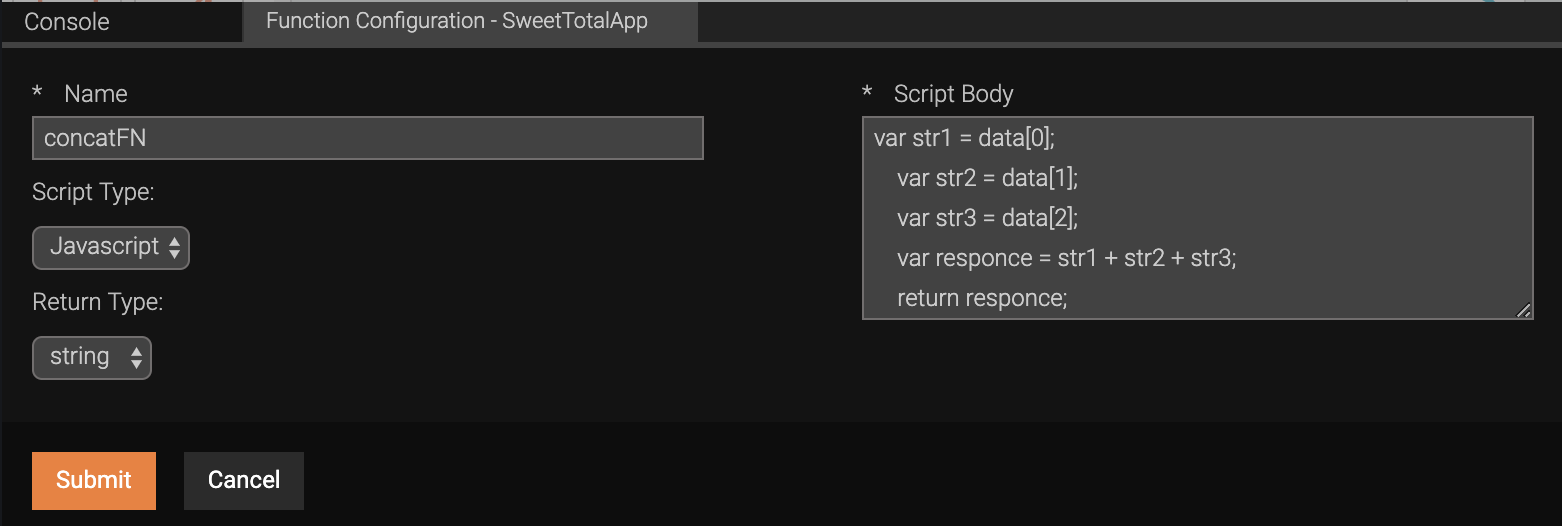
To configure the function, click the settings icon on the function component you added to the grid, and update the following information.
Name : A unique name for the function.
Script Type : The language in which the function is written.
Return Value : The data format of the value that is generated as the output via the function.
Script Body : This is a free text field to write the function in the specified script type.
Example
The details entered in the above form creates a function definition as follows:
define function concatFN[JAVASCRIPT] return string {
    var str1 = ata[0];
    var str2 = data[1];
    var str3= data[2];
    var responce = str1 + str2 + str3;
    return responce;
};
The input stream with the events to be processed by the query.
The output stream to which the events processed by the query are directed.
This icon represents a query to project the events in an input stream to an output stream. This invoves selectng the attributes to be included in the output, renaming attributes, introducing constant values, and using mathematical and/or logical expressions. For more information, see Siddhi Query Guide - Query Projection.
Form
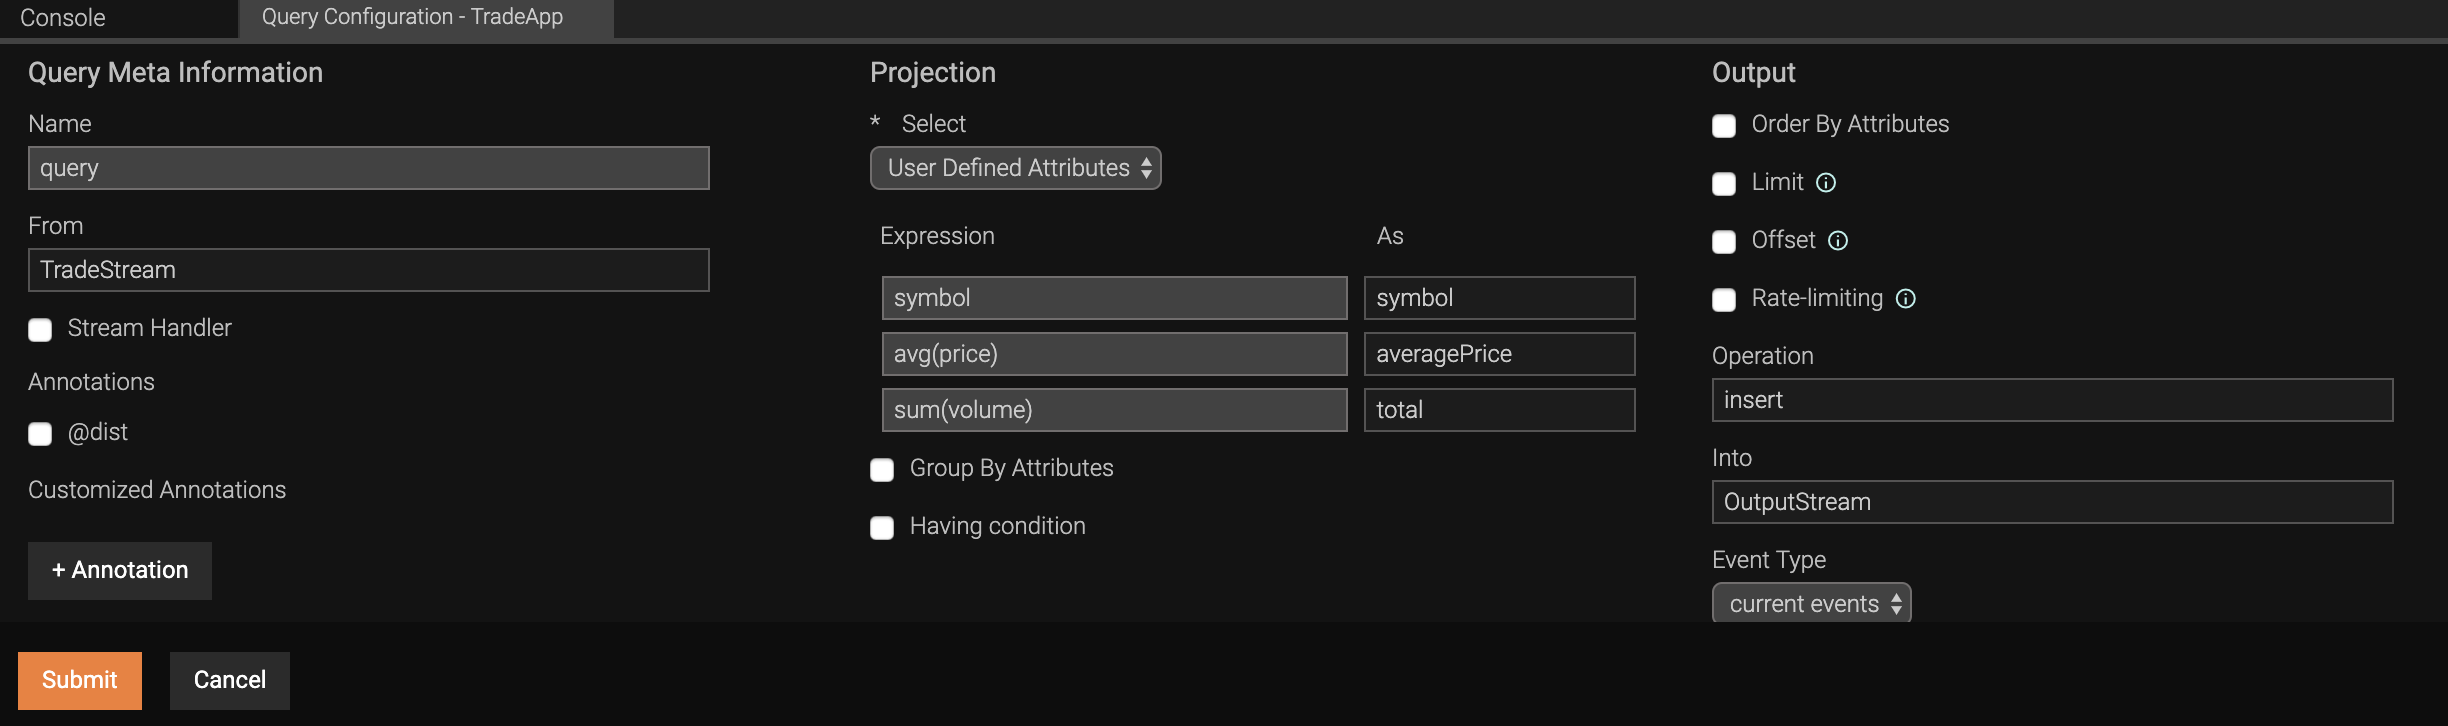
Once you connect the query to an input stream (source) and an output stream (target), you can configure it. To configure the projection query, click the settings icon on the projection query component you added to the grid, and update the following information.
Query Meta Information : This section specifies the stream to be considered as the input stream with the events to which the query needs to be applied. The input stream connected to the query as the source is automatically displayed.
Projection : This section specifies the attributes to be included in the output. In the Select field, you can select All Attributes to select all the attributes of the events, or select User Defined Attributes to select specific attributes from the input stream. If you select User Defined Attributes , you can add attributes to be selected to be inserted into the output stream. Here, you can enter the names of specific attributes in the input stream, or enter expressions to convert input stream attribute values as required to generate output events. You can also specify the attribute(s) by which you want to group the output.
Output : This section specifies the action to be performed on the output event. The fields to be configured in this section are as follows:
Operation : This field specifies the operation to be performed on the generated output event (e.g., Insert to insert events to a selected stream/table/window).
Into : This field specifies the stream/table/window in which the operation specified need to be performed.
Event Type This field specifies whether the operation needs to be performed for all output events, only current events or for only expired events.|
Example
The details entered in the above form creates a query as follows:
from TradeStream
select symbol, avg(price) as averagePrice, sum(volume) a total
insert all events into OutputStream;
The input stream with the events to be processed by the query.
The output stream to which the events processed by the query are directed.
A filter query filters information in an input stream based on a given condition. For more information, see Siddhi Query Guide - Filters.
Form
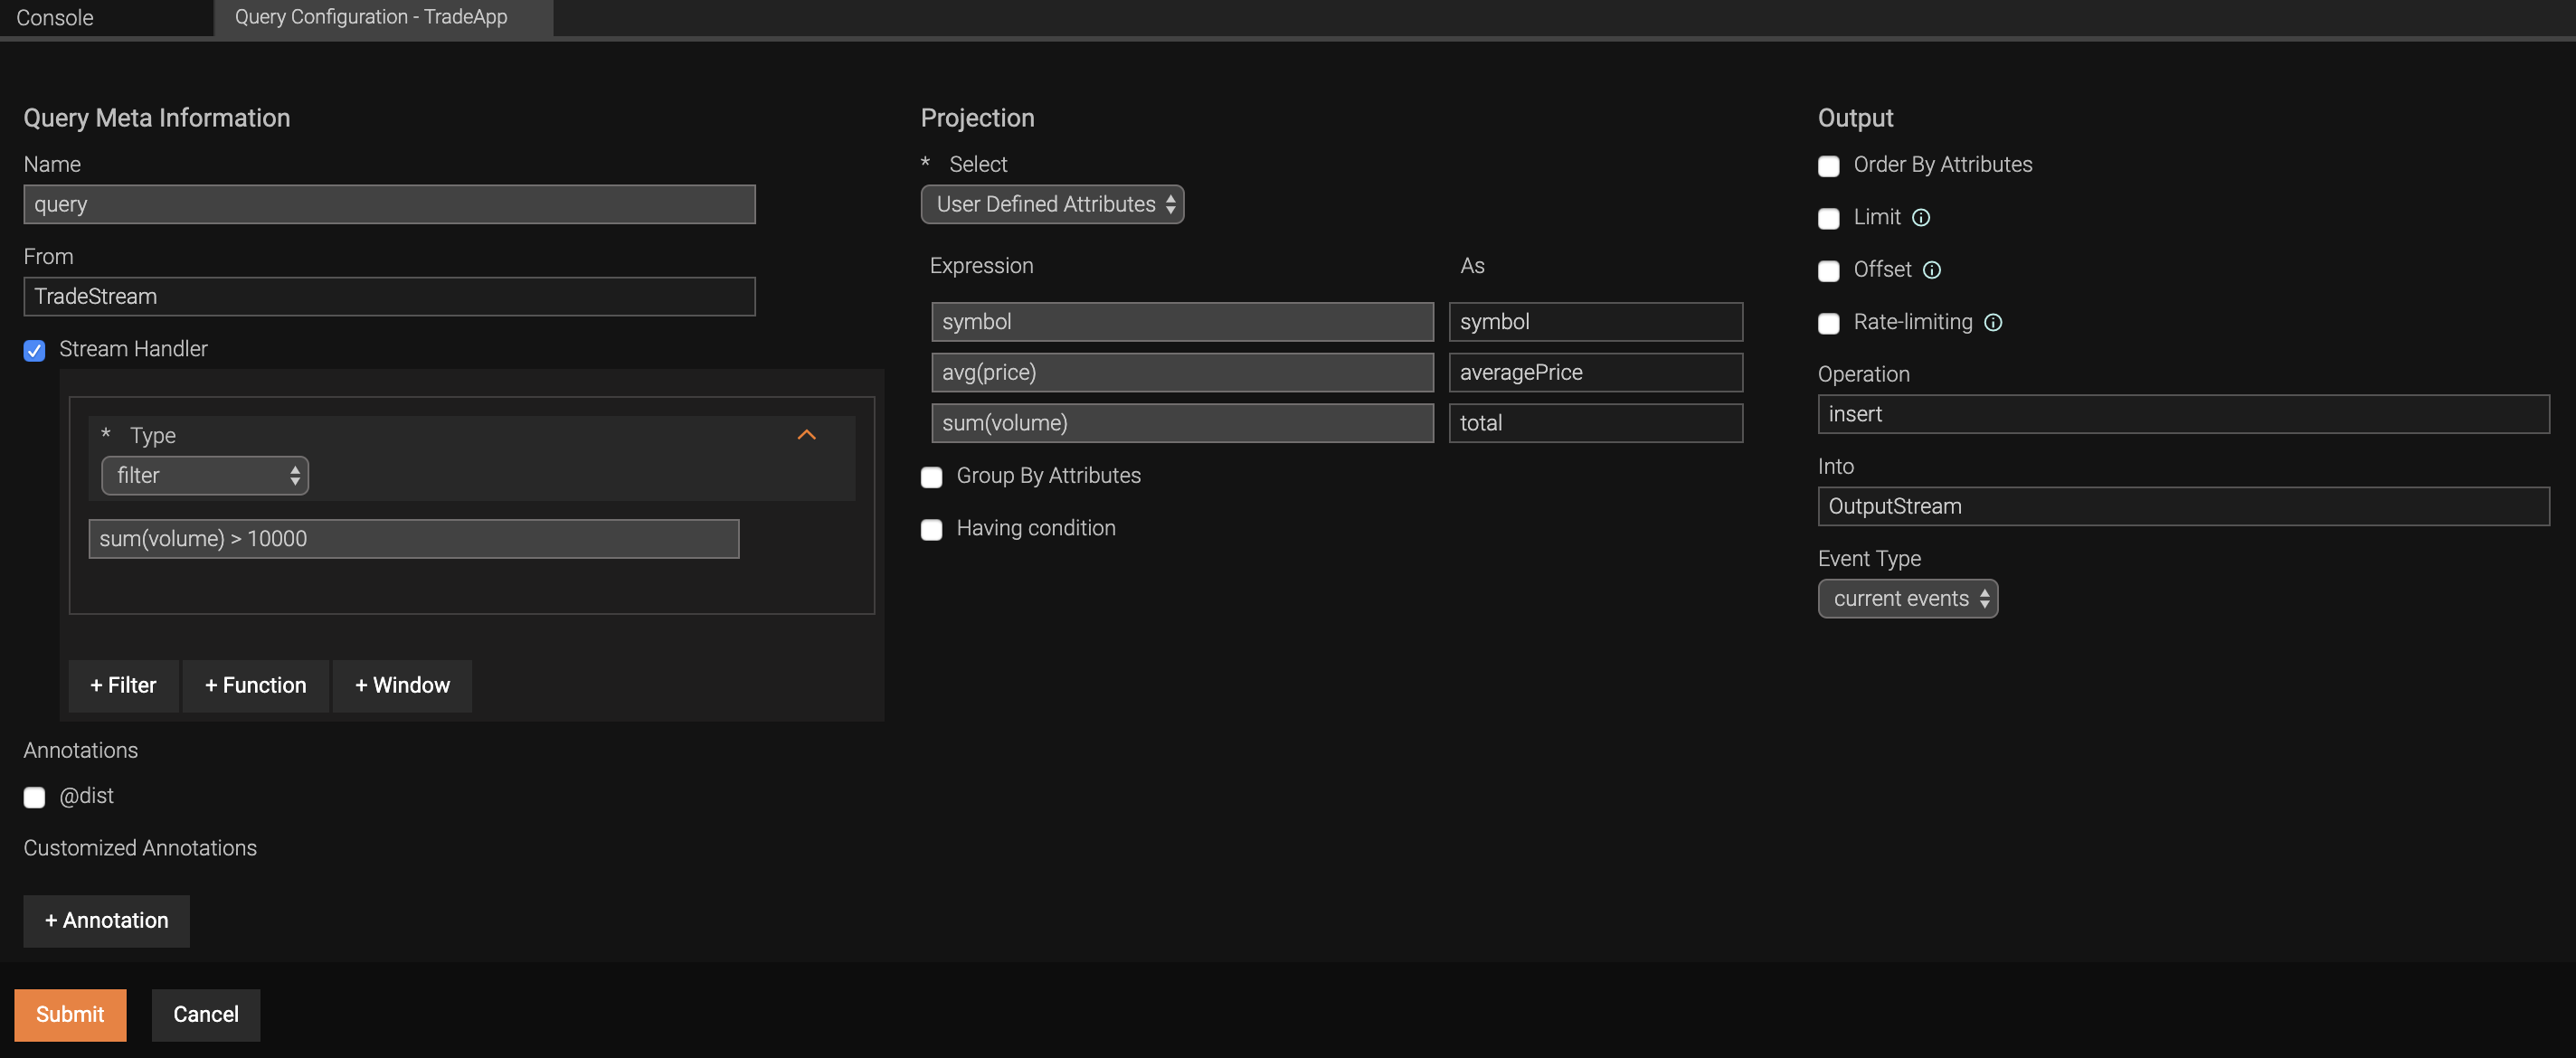
Once you connect the query to an input stream (source) and an output stream (target), you can configure it. To configure the filter query, click the settings icon on the filter query component you added to the grid, and update the following information.
By default, the Stream Handler check box is selected, and a stream handler of the filter type is available under it to indicate that the query is a filter. Expand this stream handler, and enter the condition based on which the information needs to be filtered.
!!! info
A Siddhi application can have multiple stream handlers. To add another stream handler, click the + Stream Handler. Multiple functions, filters and windows can be defined within the same form as stream handlers.
Projection : This section specifies the attributes to be included in the output. In the Select field, you can select All Attributes to select all the attributes of the events, or select User Defined Attributes to select specific attributes from the input stream. If you select User Defined Attributes , you can add attributes to be selected to be inserted into the output stream. Here, you can enter the names of specific attributes in the input stream, or enter expressions to convert input stream attribute values as required to generate output events. You can also specify the attribute(s) by which you want to group the output.
Output : This section specifies the action to be performed on the output event. The fields to be configured in this section are as follows:
Operation : This field specifies the operation to be performed on the generated output event (e.g., Insert to insert events to a selected stream/table/window).
Into : This field specifies the stream/table/window in which the operation specified need to be performed.
Event Type This field specifies whether the operation needs to be performed for all output events, only current events or for only expired events.
Example
The details entered in the above form creates a query with a filter as follows:
from TradeStream[sum(amount)> 10000]
select symbol, avg(price) as averagePrice, sum(amount) as total
insert all events into OutputStream;
The input stream with the events to be processed by the query.
The output stream to which the events processed by the query are directed.
Window queries include a window to select a subset of events to be processed based on a specific criterion. For more information, see Siddhi Query Guide - (Defined) Window.
Form
Once you connect the query to an input stream (source) and an output stream (target), you can configure it. To configure the window query, click the settings icon on the window query component you added to the grid, and update the following information.
By default, the Stream Handler check box is selected, and a stream handler of the window type is available under it to indicate that the query is a filter. Expand this stream handler, and enter details to determine the window including the window type and the basis on which the subset of events considered by the window is determined (i.e., based on the window type selected).
!!! info
A Siddhi application can have multiple stream handlers. To add another stream handler, click the + Stream Handler. Multiple functions, filters and windows can be defined within the same form as stream handlers.
Projection : This section specifies the attributes to be included in the output. In the Select field, you can select All Attributes to select all the attributes of the events, or select User Defined Attributes to select specific attributes from the input stream. If you select User Defined Attributes , you can add attributes to be selected to be inserted into the output stream. Here, you can enter the names of specific attributes in the input stream, or enter expressions to convert input stream attribute values as required to generate output events. You can also specify the attribute(s) by which you want to group the output.
Output : This section specifies the action to be performed on the output event. The fields to be configured in this section are as follows:
Operation : This field specifies the operation to be performed on the generated output event (e.g., Insert to insert events to a selected stream/table/window).
Into : This field specifies the stream/table/window in which the operation specified need to be performed.
Event Type This field specifies whether the operation needs to be performed for all output events, only current events or for only expired events.
Example
The details entered in the above Query Configuration form creates a query with a window as follows:
from TradeStream#window.time(1 month)
select symbol, avg(price) as averagePrice, sum(amount) as total
insert all events into OutputStream;
Source
!!! info
A window query can have only one source at a given time.
A join query derives a combined result from two streams in real-time based on a specified condition. For more information, see Siddhi Query Guide - Join.
Form
Once you connect two Siddhi components to the join query as sources and another Siddhi component as the target, you can configure the join query. To configure the join query, click the settings icon on the join query component you added to the grid and update the following information.
Query Meta Information : In this section, enter a unique name for the query and any annotations that you want to include in the query. The @dist annotation is supported by default to use the query in a fully distributed deployment if required (for more information, see Converting to a Distributed Streaming Application ). You can also add customized annotations.
Input : Here, you can specify the input sources, the references, the join type, join condition, and stream handlers for the left source and right source of the join. For a detailed explanation of the join concept, see Siddhi Query Guide - Joins.
Projection : This section specifies the attributes to be included in the output. In the Select field, you can select All Attributes to select all the attributes of the events, or select User Defined Attributes to select specific attributes from the input stream. If you select User Defined Attributes , you can add attributes to be selected to be inserted into the output stream. Here, you can enter the names of specific attributes in the input stream, or enter expressions to convert input stream attribute values as required to generate output events. You can also specify the attribute(s) by which you want to group the output.
Output : This section specifies the action to be performed on the output event. The fields to be configured in this section are as follows:
Operation : This field specifies the operation to be performed on the generated output event (e.g., Insert to insert events to a selected stream/table/window).
Into : This field specifies the stream/table/window in which the operation specified need to be performed.
Event Type This field specifies whether the operation needs to be performed for all output events, only current events or for only expired events.
Example
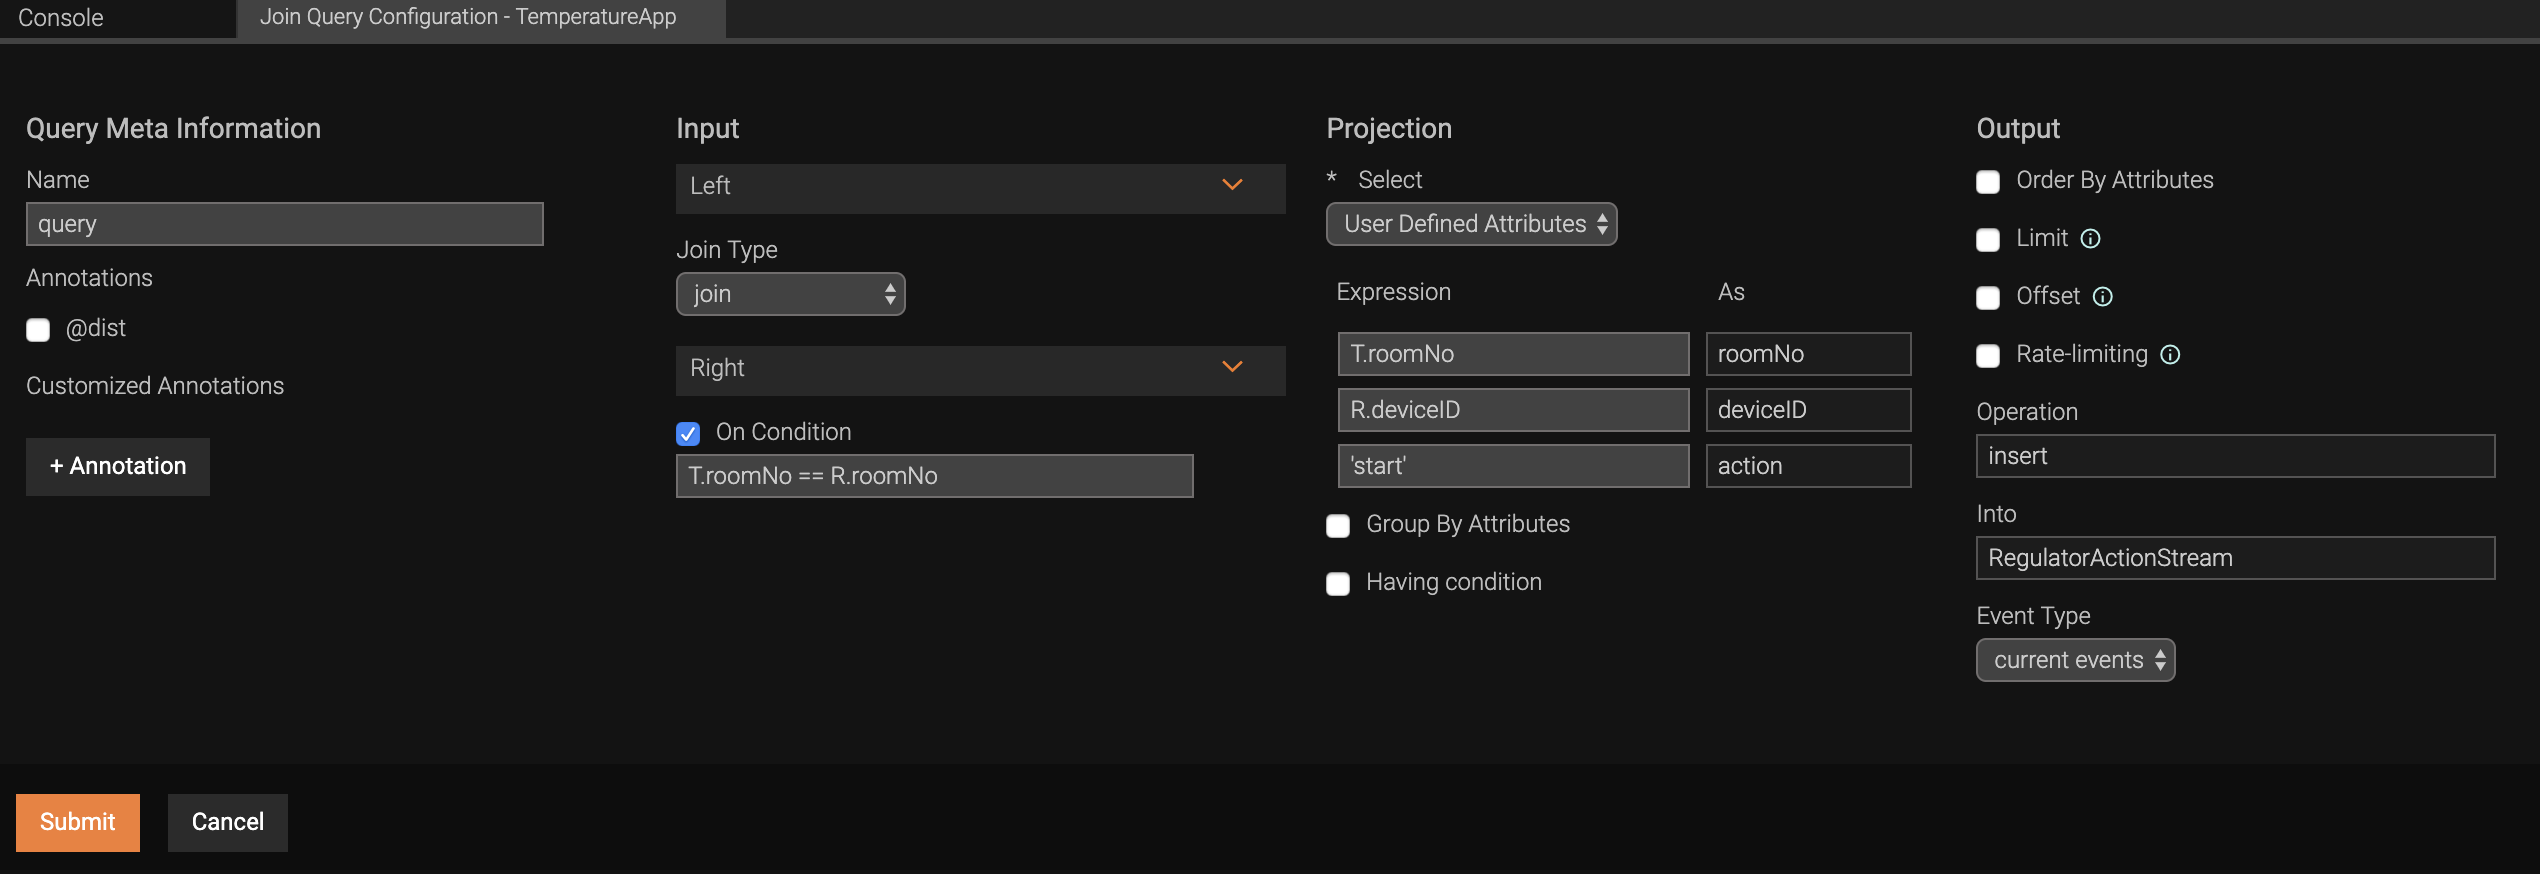
A join query is configured as follows:
The above configurations result in creating the following join query.
from TempStream[temp > 30.0]#window.time(1 min) as T
  join RegulatorStream[isOn == false]#window.length(1) as R
  on T.roomNo == R.roomNo
select T.roomNo, R.deviceID, 'start' as action
insert into RegulatorActionStream;
Source
!!! info
A join query must always be connected to two sources, and at least one of them must be a defined stream/trigger/window.
Streams
Tables
Aggregations
Windows
Target
!!! info
A join query must always be connected to a single target.
The input stream with the events to be processed by the query.
The output stream to which the events processed by the query are directed.
A pattern query detects patterns in events that arrive overtime. For more information, see Siddhi Query Guide - Patterns.
Form
Once you connect the query to an input stream (source) and an output stream (target), you can configure it. To configure the pattern query, click the settings icon on the pattern query component you added to the grid and update the following information.
Query Meta Information : In this section, enter a unique name for the query and any annotations that you want to include in the query. The @dist annotation is supported by default to use the query in a fully distributed deployment if required (for more information, see Converting to a Distributed Streaming Application ). You can also add customized annotations.
Input : This section defines the conditions based on which patterns are identified. This involves specifying a unique ID and the input stream considered for each condition. Multiple conditions can be added. Each condition is configured in a separate tab within this section. For more information about the Pattern concept, see Siddhi Query Guide - Patterns.
Projection : This section specifies the attributes to be included in the output. In the Select field, you can select All Attributes to select all the attributes of the events, or select User Defined Attributes to select specific attributes from the input stream. If you select User Defined Attributes , you can add attributes to be selected to be inserted into the output stream. Here, you can enter the names of specific attributes in the input stream, or enter expressions to convert input stream attribute values as required to generate output events. You can also specify the attribute(s) by which you want to group the output.
Output : This section specifies the action to be performed on the output event. The fields to be configured in this section are as follows:
Operation : This field specifies the operation to be performed on the generated output event (e.g., Insert to insert events to a selected stream/table/window).
Into : This field specifies the stream/table/window in which the operation specified need to be performed.
Event Type This field specifies whether the operation needs to be performed for all output events, only current events or for only expired events.
Example
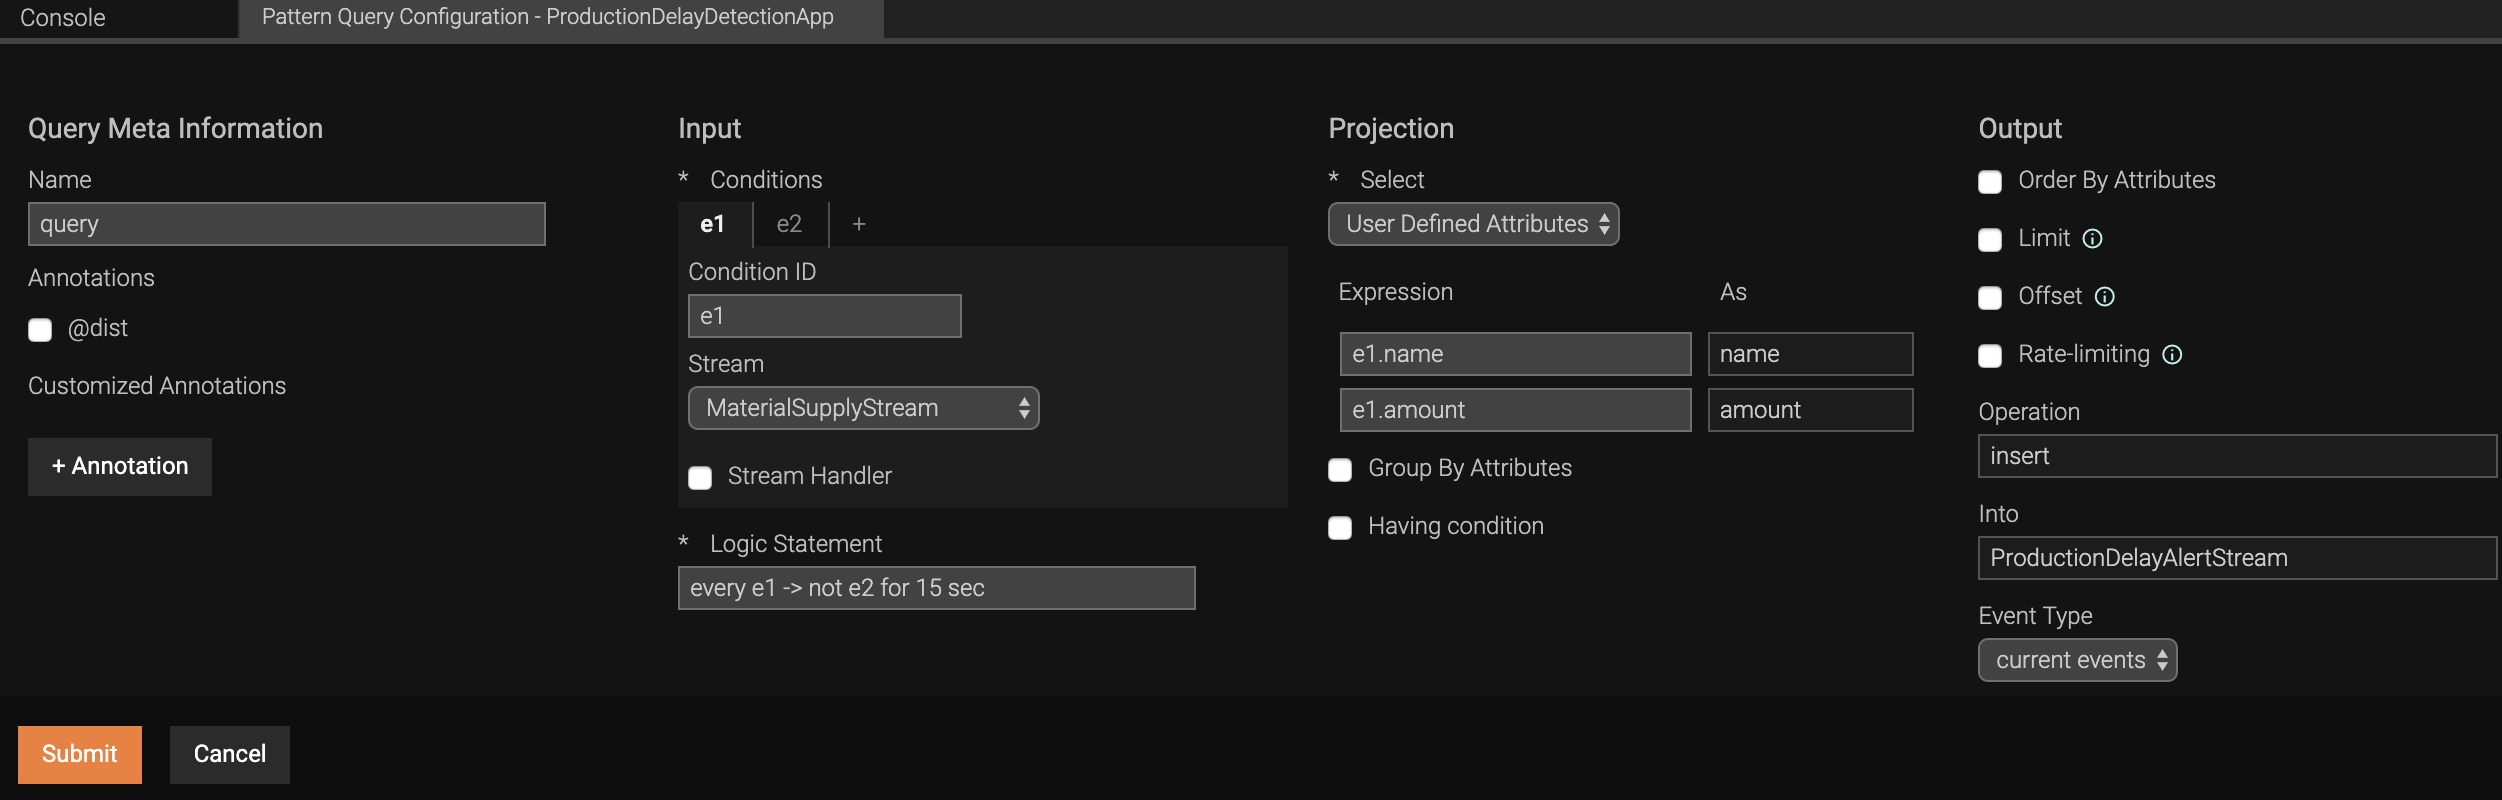
The above configuration results in creating the following query.
from every (e1=MaterialSupplyStream) -> not MaterialConsumptionStream[name == e1.name and amount == e1.amount]
    for 15 sec
select e1.name, e1.amount
insert into ProductionDelayAlertStream;
The input stream with the events to be processed by the query.
The output stream to which the events processed by the query are directed.
A sequence query detects sequences in event occurrences over time. For more information, see Siddhi Query Guide - Sequence.
Form
Once you connect the query to an input stream (source) and an output stream (target), you can configure it. To configure the sequence query, click the settings icon on the sequence query component you added to the grid and update the following information.
Query Meta Information : In this section, enter a unique name for the query and any annotations that you want to include in the query. The @dist annotation is supported by default to use the query in a fully distributed deployment if required (for more information, see Converting to a Distributed Streaming Application ). You can also add customized annotations.
Input : This section defines the conditions based on which sequences are identified. This involves specifying a unique ID and the input stream considered for each condition. Multiple conditions can be added. Each condition is configured in a separate tab within this section. For more information about the Sequence concept, see Siddhi Query Guide - Sequences.
Projection : This section specifies the attributes to be included in the output. In the Select field, you can select All Attributes to select all the attributes of the events, or select User Defined Attributes to select specific attributes from the input stream. If you select User Defined Attributes , you can add attributes to be selected to be inserted into the output stream. Here, you can enter the names of specific attributes in the input stream, or enter expressions to convert input stream attribute values as required to generate output events. You can also specify the attribute(s) by which you want to group the output.
Output : This section specifies the action to be performed on the output event. The fields to be configured in this section are as follows:
Operation : This field specifies the operation to be performed on the generated output event (e.g., Insert to insert events to a selected stream/table/window).
Into : This field specifies the stream/table/window in which the operation specified need to be performed.
Event Type This field specifies whether the operation needs to be performed for all output events, only current events or for only expired events.
Example
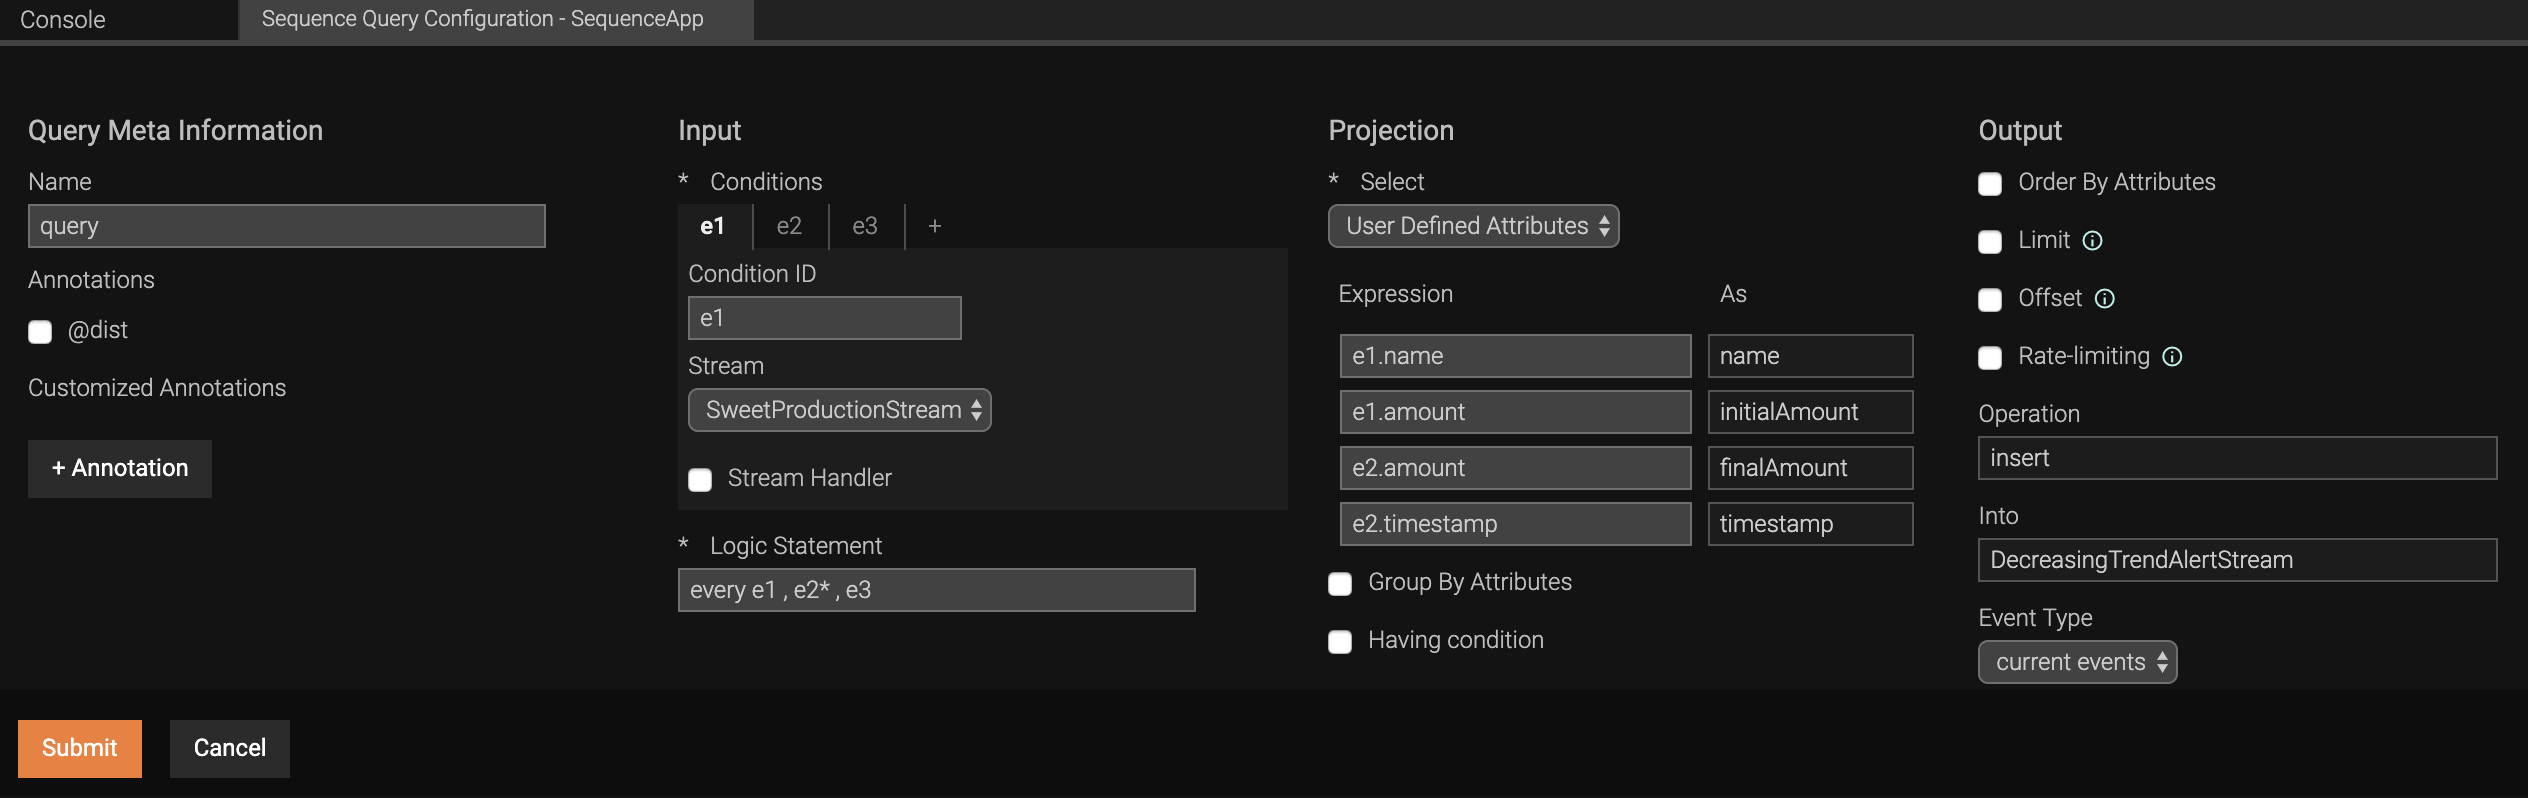
The above configuration results in creating the following query.
<from every e1=SweetProductionStream,
e2=SweetProductionStream[e1.amount > amount and (timestamp - e1.timestamp) < 10 * 6000]*,
e3=SweetProductionStream[timestamp - e1.timestam > <10 * 60000 and e1.amount > amount]
select e1.name, e1.amount as initialAmount, e2.amount as finalAmount, e2.timestamp
insert into DecreasingTrendAlertStream;
Partitions divide streams and queries into isolated groups in order to process them in parallel and in isolation. For more information, see Siddhi Query Guide - Partition.
Form
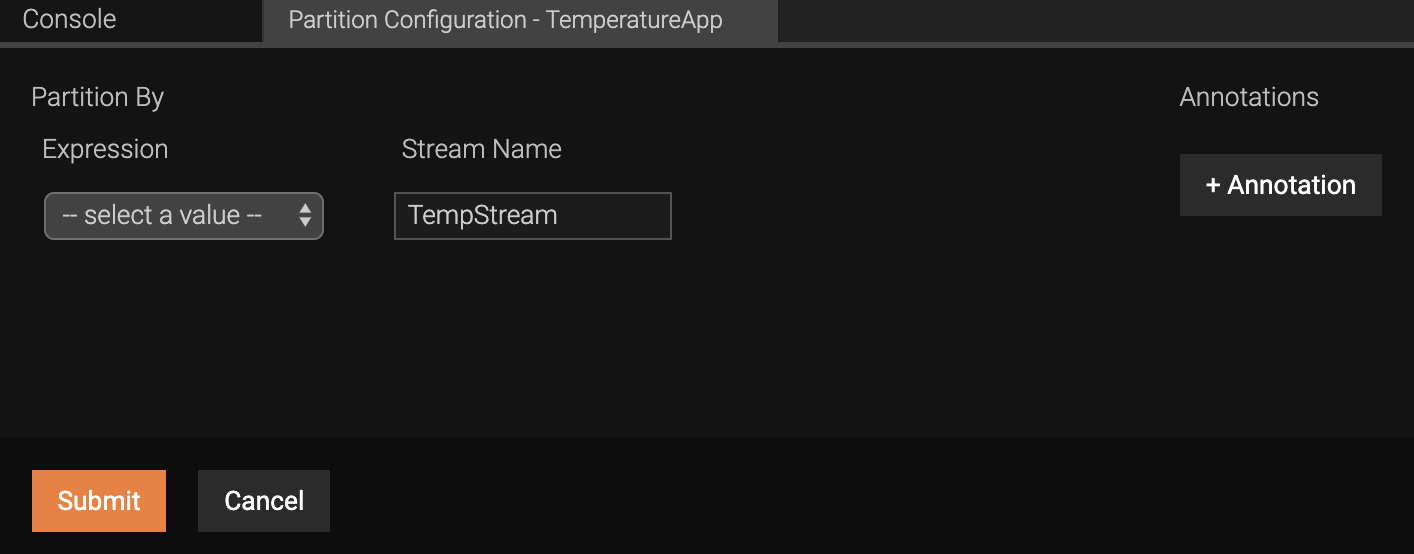
Once the stream to be partitioned is connected as a source to the partition, you can configure the partition. In order to do so, move the cursor over the partition and click the settings icon on the partition component. This opens the Partition Configuration form. In this form, you can enter expressions to convert the attributes of the stream that is selected to be partitioned.
Example
The above configuration creates the following partition query.
                 roomNo < <1030 and roomNo >= 330 as 'officeRoom' or
                 roomNo < 330 as 'lobby' of TempStream)
begin
    from TempStream#window.time(10 min)
    select roomNo, deviceID, avg(temp) as avgTemp
    insert into AreaTempStream
end
In order to define how the Siddhi components in a Siddhi application
interact with each other to process events, you need to define
connections between Siddhi components. A connection is defined by
drawing an arrow from one component to another by dragging the cursor as
demonstrated below.
To save a Siddhi application that you created in the design view, you need to switch to the source view. You also need to switch to the source view to run a Siddhi application. For more information, see Streaming Integrator Tiooling Overview.