Connecting to HornetQ
This section describes how to configure WSO2 WSO2 Micro Integrator to connect with HornetQ, which is an open source project to build a multi-protocol, asynchronous messaging system.
You can either use a standalone HornetQ server or the HornetQ embedded in a JBoss Enterprise Application Platform (JBoss EAP) server.
Configure with a standalone HornetQ server
Follow the instructions below to configure WSO2 Micro Integrator JMS transport with a a standalone HornetQ server.
- Download HornetQ from the HornetQ Downloads site.
- Download and install WSO2 Micro Integrator.
-
Create a sample queue by editing the
HORNET_HOME/config/stand-alone/non-clustered/hornetq-jms.xmlfile as follows:<queue name="wso2"> <entry name="/queue/mySampleQueue"/> </queue> -
Add the following two connection entries to the same file. These entries are required to enable WSO2 Micro Integrator to act as a JMS consumer.
<connection-factory name="QueueConnectionFactory"> <xa>false</xa> <connectors> <connector-ref connector-name="netty"/> </connectors> <entries> <entry name="/QueueConnectionFactory"/> </entries> </connection-factory> <connection-factory name="TopicConnectionFactory"> <xa>false</xa> <connectors> <connector-ref connector-name="netty"/> </connectors> <entries> <entry name="/TopicConnectionFactory"/> </entries> </connection-factory> -
If you have not already done so, download and install WSO2 Micro Integrator.
-
Download the hornet-all-new.jar file and copy it into the
MI_HOME/lib/directory.Info
If you are packing the JARs yourself, make sure you remove the javax.jms package from the assembled JAR to avoid the carbon runtime from picking this implementation of JMS over the bundled-in distribution.
-
If you want the Micro Integrator to receive messages from a HornetQ instance, or to send messages to a HornetQ instance, you need to update the deployment.toml file with the relevant connection parameters.
Info
For details on the JMS configuration parameters used in the code segments above, see JMS connection factory parameters.
-
Start HornetQ with the following command.
- On Windows:
HORNETQ_HOME\bin\run.bat --run - On Linux/Solaris:
sh HORNETQ_HOME/bin/run.sh
- On Windows:
Now you have configured WSO2 Micro Integrator with a standalone HornetQ server.
Testing the configuration
To test the configuration, create a proxy service named JMSPublisher that will publish messages from the Micro Integrator to a sample queue in HornetQ, and create the JMSListener queue to read messages from the HornetQ sample queue.
-
Create the
JMSPublisherproxy service with the following configuration:<proxy xmlns="http://ws.apache.org/ns/synapse" name="JMSPublisher" transports="https,http" statistics="enable" trace="enable" startOnLoad="true"> <target> <inSequence> <property name="FORCE_SC_ACCEPTED" value="true" scope="axis2"/> <property name="Accept-Encoding" scope="transport" action="remove"/> <property name="Content-Length" scope="transport" action="remove"/> <property name="Content-Type" scope="transport" action="remove"/> <property name="User-Agent" scope="transport" action="remove"/> <property name="OUT_ONLY" value="true"/> <log level="full"/> <send> <endpoint> <address uri="jms:/queue/mySampleQueue?transport.jms.ConnectionFactoryJNDIName=QueueConnectionFactory&java.naming.factory.initial=org.jnp.interfaces.NamingContextFactory&java.naming.provider.url=jnp://localhost:1099&transport.jms.DestinationType=queue"/> </endpoint> </send> </inSequence> </target> <publishWSDL uri="file:samples/service-bus/resources/proxy/sample_proxy_1.wsdl"/> <description>HornetQ-WSO2 ESB sample</description> </proxy>Info
- The
OUT_ONLYparameter is set totruesince this proxy service is created only for the purpose of publishing the messages from WSO2 Micro Integrator to themySampleQueuequeue specified in the address URI. - You may have to change the host name, port etc. of the JMS string based on your environment.
- The
-
Create the
JMSListenerproxy service with the following configuration:<proxy xmlns="http://ws.apache.org/ns/synapse" name="JMSListener" transports="jms" statistics="disable" trace="disable" startOnLoad="true"> <target> <inSequence> <log level="custom"> <property name="JMS LISTENER PROXY" value="LOCATED"/> </log> <log level="full"/> <drop/> </inSequence> </target> <parameter name="transport.jms.ContentType"> <rules> <jmsProperty>contentType</jmsProperty> <default>application/xml</default> </rules> </parameter> <parameter name="transport.jms.Destination">queue/mySampleQueue</parameter> <description/> </proxy> -
Send the following request:
<soapenv:Envelope xmlns:soapenv="http://schemas.xmlsoap.org/soap/envelope/" xmlns:ser="http://services.samples" xmlns:xsd="http://services.samples/xsd"> <soapenv:Header/> <soapenv:Body> <ser:placeOrder> <!--Optional:--> <ser:order> <!--Optional:--> <xsd:price>20</xsd:price> <!--Optional:--> <xsd:quantity>20</xsd:quantity> <!--Optional:--> <xsd:symbol>IBM</xsd:symbol> </ser:order> </ser:placeOrder> </soapenv:Body> </soapenv:Envelope> -
Check the log on your WSO2 Micro Integrator terminal. You will see the following log, which indicates that the request published in the queue is picked up by the
JMSListenerproxy.[<TIME Stamp>] INFO - LogMediator JMS LISTENER PROXY = LOCATED [<TIME Stamp>] INFO - LogMediator To: , WSAction: "urn:placeOrder", SOAPAction: "urn:placeOrder", MessageID: ID:be08707e-033d-11e4-8307-25263fbb9173, Direction: request, Envelope: <?xml version="1.0" encoding="utf-8"?><soapenv:Envelope xmlns:soapenv="http://schemas.xmlsoap.org/soap/envelope/"><soapenv:Body><soapenv:Envelope xmlns:xsd="http://services.samples/xsd" xmlns:ser="http://services.samples"><soapenv:Body> <ser:placeOrder> <!--Optional:--> <ser:order> <!--Optional:--> <xsd:price>20</xsd:price> <!--Optional:--> <xsd:quantity>20</xsd:quantity> <!--Optional:--> <xsd:symbol>IBM</xsd:symbol> </ser:order> </ser:placeOrder> </soapenv:Body></soapenv:Envelope></soapenv:Body></soapenv:Envelope>
Configure with HornetQ embedded in a JBoss EAP server
Follow the instructions below to configure WSO2 Micro Integrator JMS transport with HornetQ embedded in a JBoss EAP server.
Setting up JBoss EAP
Install JBoss EAP server and create a message queue within the server.
- Download JBoss EAP Server 7.0.0 from JBoss EAP Downloads and run the JBoss EAP installer as described here.
- Execute one of the following commands in command prompt to create a new application user.
- On Windows:
<EAP_HOME>\bin\add-user.bat -a -u 'SampleUser' -p 'SamplePwd1!' -g 'guest' - On Linux/Mac:
<EAP_HOME>/bin/add-user.sh -a -u 'SampleUser' -p 'SamplePwd1!' -g 'guest'
- On Windows:
-
Create a sample queue by editing the
<EAP_HOME>/standalone/configuration/standalone-full.xmlfile. Add the following content within the<hornetq-server>element:<jms-destinations> <jms-queue name="sampleQueue"> <entry name="queue/test"/> <entry name="java:jboss/exported/jms/queue/test"/> </jms-queue> </jms-destinations> -
Start the JBoss EAP server by executing one of the following commands in command prompt:
- On Windows:
<EAP_HOME>\bin\standalone.bat -c standalone-full.xml - On Linux/Mac:
<EAP_HOME>/bin/standalone.sh -c standalone-full.xml
- On Windows:
-
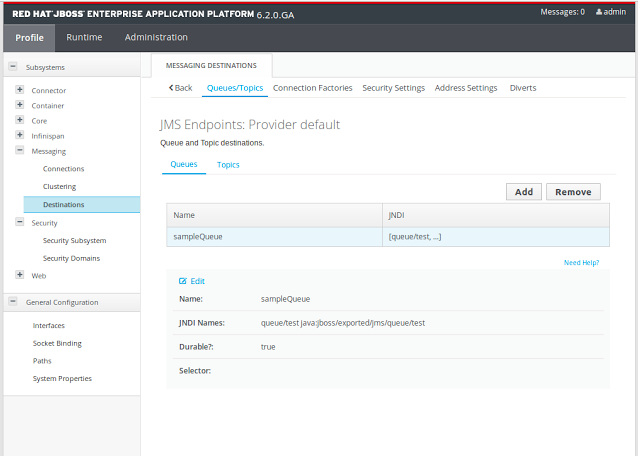
Acess the management console of the JBoss EAP server using the following URL:
http://127.0.0.1:9990 - Log in to the Management Console using admin as both the username and password. In the Profile menu, click Messaging ->
Destinations and you will be able to see the queue you added in Step 4 in the Queues/Topics section.
Now you have configured the JBoss EAP Server. The next section describes how to configure the Micro Integrator to listen and fetch messages from the queue that you created above.
Configuring WSO2 Micro Integrator
- Download and install WSO2 Micro Integrator.
-
If you want the Micro Integrator to receive messages from an HornetQ instance, or to send messages to an HornetQ instance, you need to update the deployment.toml file with the relevant connection parameters.
Info
The username and password created for the guest user in the above section are used in the configuration.
-
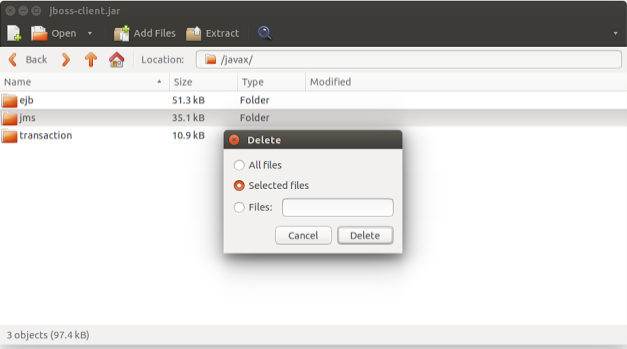
Copy the
jboss-client.jarfile from theEAP_HOME/bin/clientdirectory to theMI_HOME/libdirectory.Note
After copying the
jboss-client.jarfile from theEAP_HOME/bin/clientdirectory to theMI_HOME/libdirectory, be sure to remove thejavax.jmspackage from thejboss-client.jarfile.
Now you have configured WSO2 Micro Integrator with HornetQ embedded in a JBoss EAP server.
Testing the configuration
To test the configuration, create a proxy service named JMSPublisher that publishes messages from the Micro Integrator to the HornetQ sample queue, and create the JMSListener queue to read messages from the HornetQ sample queue.
-
Create the
JMSPublisherproxy service with the following configuration:<proxy xmlns="http://ws.apache.org/ns/synapse" name="JMSPublisher" transports="https,http" statistics="enable" trace="enable" startOnLoad="true"> <target> <inSequence> <property name="FORCE_SC_ACCEPTED" value="true" scope="axis2"/> <property name="Accept-Encoding" scope="transport" action="remove"/> <property name="Content-Length" scope="transport" action="remove"/> <property name="Content-Type" scope="transport" action="remove"/> <property name="User-Agent" scope="transport" action="remove"/> <property name="OUT_ONLY" value="true"/> <log level="full"/> <send> <endpoint> <address uri="jms:/jms/queue/test?transport.jms.ConnectionFactoryJNDIName=jms/RemoteConnectionFactory&java.naming.factory.initial=org.jboss.naming.remote.client.InitialContextFactory&java.naming.provider.url=remote://localhost:4447&transport.jms.DestinationType=queue&transport.jms.UserName=SampleUser&transport.jms.Password=SamplePwd1!&java.naming.security.principal=SampleUser&java.naming.security.credentials=SamplePwd1!"/> </endpoint> </send> </inSequence> </target> <publishWSDL uri="file:samples/service-bus/resources/proxy/sample_proxy_1.wsdl"/> <description>HornetQ-WSO2 ESB sample</description> </proxy>Info
- The
OUT_ONLYparameter is set totruesince this proxy service is created only for the purpose of publishing the messages to themySampleQueuequeue specified in the address URI. - You may have to change the host name, port etc. of the JMS string based on your environment.
- The
-
Create the
JMSListenerproxy service with the following configuration:<proxy xmlns="http://ws.apache.org/ns/synapse" name="JMSListener" transports="jms" statistics="disable" trace="disable" startOnLoad="true"> <target> <inSequence> <log level="custom"> <property name="JMS LISTENER PROXY" value="LOCATED"/> </log> <log level="full"/> <drop/> </inSequence> </target> <parameter name="transport.jms.ContentType"> <rules> <jmsProperty>contentType</jmsProperty> <default>text/plain</default> </rules> </parameter> <parameter name="transport.jms.ConnectionFactory">QueueConnectionFactory</parameter> <parameter name="transport.jms.Destination">jms/queue/test</parameter> <description/> </proxy> -
Send the following request to the Micro Integrator.
<soapenv:Envelope xmlns:soapenv="http://schemas.xmlsoap.org/soap/envelope/" xmlns:ser="http://services.samples" xmlns:xsd="http://services.samples/xsd"> <soapenv:Header/> <soapenv:Body> <ser:placeOrder> <!--Optional:--> <ser:order> <!--Optional:--> <xsd:price>20</xsd:price> <!--Optional:--> <xsd:quantity>20</xsd:quantity> <!--Optional:--> <xsd:symbol>IBM</xsd:symbol> </ser:order> </ser:placeOrder> </soapenv:Body> </soapenv:Envelope> -
Check the log on your WSO2 Micro Integrator terminal. You will see the following log, which indicates that the request published in the queue is picked up by the
JMSListenerproxy.[<TIME Stamp>] INFO - LogMediator JMS LISTENER PROXY = LOCATED [<TIME Stamp>] INFO - LogMediator To: , WSAction: "urn:placeOrder", SOAPAction: "urn:placeOrder", MessageID: ID:be08707e-033d-11e4-8307-25263fbb9173, Direction: request, Envelope: <?xml version="1.0" encoding="utf-8"?><soapenv:Envelope xmlns:soapenv="http://schemas.xmlsoap.org/soap/envelope/"><soapenv:Body><soapenv:Envelope xmlns:xsd="http://services.samples/xsd" xmlns:ser="http://services.samples"><soapenv:Body> <ser:placeOrder> <!--Optional:--> <ser:order> <!--Optional:--> <xsd:price>20</xsd:price> <!--Optional:--> <xsd:quantity>20</xsd:quantity> <!--Optional:--> <xsd:symbol>IBM</xsd:symbol> </ser:order> </ser:placeOrder> </soapenv:Body></soapenv:Envelope></soapenv:Body></soapenv:Envelope>