Data Mapper Mediator
Data Mapper mediator is a data mapping solution that can be integrated into a mediation sequence. It converts and transforms one data format to another, or changes the structure of the data in a message. It provides WSO2 Integration Studio with a graphical mapping configuration and generates the files required for executing this graphical mapping configuration through the WSO2 Data Mapper engine.
WSO2 Data Mapper is an independent component that does not depend on any other WSO2 product. However, other products can use the Data Mapper to achieve/offer data mapping capabilities. Data Mapper Mediator is the intermediate component, which gives the data mapping capability into WSO2 Micro Integrator.
Data Mapper mediator finds the configuration files from the Registry and configures the Data Mapper Engine with the input message type (XML/JSON/CSV) and output message type (XML/JSON/CSV). Then it takes the request message from the Micro Integrator message flow and uses the configured Data Mapper Engine to execute the transformation and adds the output message to the Micro Integrator message flow.
Info
The Data Mapper mediator is a content-aware mediator.
Syntax
<datamapper config="gov:datamapper/FoodMapping.dmc" inputSchema="gov:datamapper/FoodMapping_inputSchema.json" inputType="XML" outputSchema="gov:datamapper/FoodMapping_outputSchema.json" outputType="XML"/> Configuration
The parameters available for configuring the Data Mapper mediator are as follows.
| Parameter name | Description |
|---|---|
| Mapping Configuration | The file, which contains the script file that is used to execute the mapping. You need to create a mapping configuration file using WSO2 Integration Studio and store it either in the Configuration Registry or Governance Registry to select and upload it from here. |
| Input Schema | JSON schema, which represents the input message format. You need to create an input schema file using WSO2 Integration Studio and store it either in the Configuration Registry or Governance Registry to select and upload it from here. |
| Output Schema | JSON schema, which represents the output message format. You need to create an output schema file using the WSO2 Integration Studio plugin, and store it either in the Configuration Registry or Governance Registry to select and upload it from here. |
| Input Type | Expected input message type (XML/JSON/CSV)
Note By default, the Input type for the Data Mapper is XML regardless of the Input Schema Type. Therefore, based on your requirement, you may need to change the Input Type manually. |
| Output Type | Target output message type (XML/JSON/CSV)
Note By default, the Output Type for the Data Mapper is XML regardless of the Output Schema Type. Therefore, based on your requirement, you may need to change the Output Type manually. |
Components of Data Mapper
WSO2 Data Mapper consists of two components. They are Data Mapper Tooling and Data Mapper Engine.
Data Mapper Tooling
The Data Mapper Tooling component is the interface used to create configuration files that are required by the Data Mapper Engine to execute the mapping. Following three configuration files are needed by the Data Mapper engine.
- Input schema file
- Output schema file
- Mapping configuration file
These three files are generated by the Data Mapper Tool and saved in a Registry Resource project, which you deploy in WSO2 Micro Integrator as shown in the example below.

Info
The .datamapper and .datamapper_diagram files as shown in the example above contain meta data related to the Data Mapper diagram. They are ignored when you deploy the project to a server to be used by the Data Mapper Engine. Only the two schema files and the .dmc (Data Mapper Configuration) get deployed.
Input and output schema files
Input and output schema files are custom-defined JSON schemas that define the input/output format of input/output messages. The Data Mapper tool generates them when loading the input and output files as shown below.
Info
You can also create the input and output JSON Schemas manually using the Data Mapper Diagram Editor. For instructions, see Creating a JSON Schema Manually.
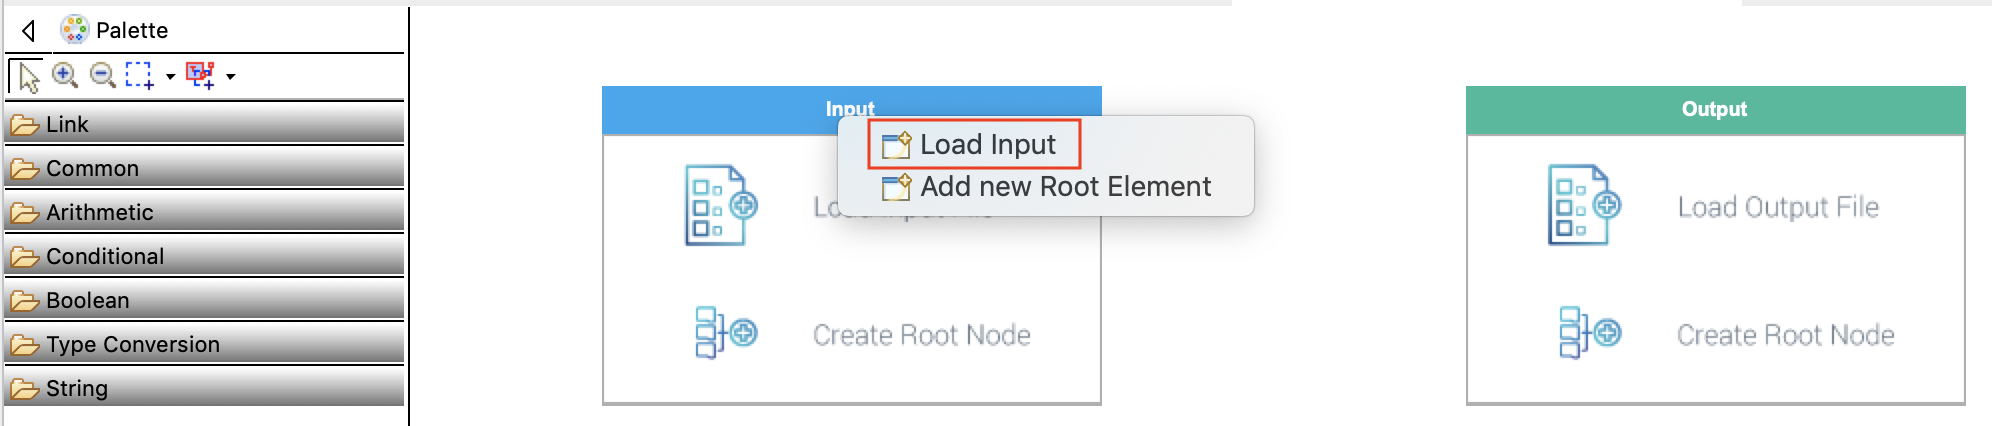
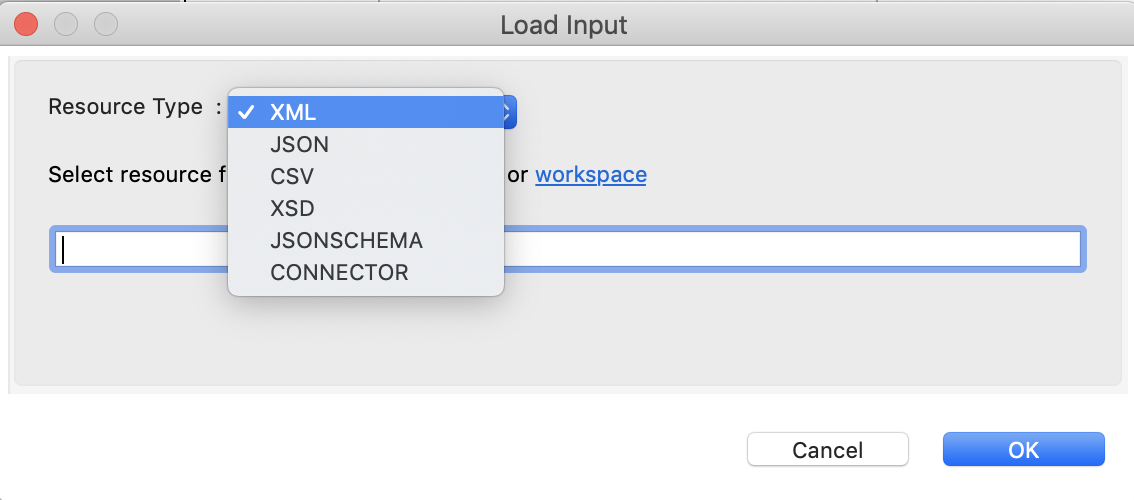
You can load the following input/output message formats:
Info
When loading a sample input XML file, you cannot have the default namespace (i.e. without a prefix in the namespace element). Also, you need to use the same prefix in all occurrences that refer to the same namespace within one XML file. For example, see the use of the prefix axis2ns11 in the example below.
Sample input XML file:
<?xml version="1.0" encoding="utf-8"?>
<soapenv:Envelope xmlns:soapenv="http://schemas.xmlsoap.org/soap/envelope/">
<soapenv:Header>
    <axis2ns11:LimitInfoHeader xmlns:axis2ns11="urn:partner.soap.sforce.com">
        <axis2ns11:limitInfo>
            <axis2ns11:current>42336</axis2ns11:current>
            <axis2ns11:limit>83000</axis2ns11:limit>
            <axis2ns11:type>API REQUESTS</axis2ns11:type>
        </axis2ns11:limitInfo>
    </axis2ns11:LimitInfoHeader>
</soapenv:Header>
<soapenv:Body>
    <axis2ns11:records xmlns:axis2ns11="urn:partner.soap.sforce.com" xmlns:xsi="http://www.w3.org/2001/XMLSchema-instance" xsi:type="sf:sObject">
    <sf:type xmlns:sf="urn:sobject.partner.soap.sforce.com">Account</sf:type>
    <sf:Id xmlns:sf="urn:sobject.partner.soap.sforce.com">001E0000002SFO2IAO</sf:Id>
    <sf:CreatedDate xmlns:sf="urn:sobject.partner.soap.sforce.com">2011-03-15T00:15:00.000Z</sf:CreatedDate>
    <sf:Id xmlns:sf="urn:sobject.partner.soap.sforce.com">001E0000002SFO2IAO</sf:Id>
    <sf:Name xmlns:sf="urn:sobject.partner.soap.sforce.com">WSO2</sf:Name>
</axis2ns11:records>
</soapenv:Body>
</soapenv:Envelope>- XML: to load a sample XML file
- JSON: to load a sample JSON file
- CSV: to load a sample CSV file with column names as the first record
- JSONSCHEMA: to load a WSO2 Data Mapper JSON schema
- CONNECTOR: to use Data Mapper with WSO2 EI Connectors. Connectors will contain JSON schemas for each operation that defines the message formats to which it will respond and expect. Therefore, when you integrate connectors in a project this Connector option searches through the workspace and find the available Connectors. Then, you can select the respective Connector in the operation, so that the related JSON schema will be loaded for the Data Mapper by the tool.
Mapping configuration file
This is a JavaScript file generated by looking at the diagram you draw in the Data Mapper Diagram Editor by connecting input elements to output elements. Every operation you define in the diagram gets converted to a JavaScript operation.
Data Mapper Engine
You need the following information to configure the Data Mapper Engine:
- Input message type
- Output message type
- Input schema Java Scripting API
- Output schema
- Mapping configuration
At the runtime, the Data Mapper Engine gets the input message and the runtime variable map object and outputs the transformed message. The Data Mapper Engine uses the Java Scripting API, to execute the mapping configuration. Therefore, if your runtime is JAVA 7, it uses the Rhino JS Engine and if your runtime is JAVA 8, it uses the Nashorn JS engine.
When you use JAVA 7, there are several limitations in the Rhino engine
that directly affects the Data mapper Engine. There are several
functions that Rhino does not support. F or example, String object
functions like startsWith() and
endsWith() . Therefore, the Rhino engine may have
limitations in executing those when using custom functions
and operators.
Using product-specific runtime variables
Also, the Data Mapper engine allows you to use runtime product-specific variables in the mapping. The intermediate component should construct a map object containing runtime product-specific variables and send it to the Data Mapper Engine, thereby, when the mapping happens in the Data Mapper Engine, these variables become available.
For example, the Data Mapper mediator provides properties like
axis2/transport/synapse/axis2client/operation/. . In
the Data Mapper diagram, you can use the Property operator and
define the scope and the property name and use it in the mapping. Then,
the Data Mapper mediator will identify the required properties to
execute the mapping and populate a map with the required properties and
will send it to the Data Mapper Engine.
Data Mapper element and attribute types
Following are the element and attribute types that are supported by the Data Mapper.
- {} - represents object elements
- [] - represents array elements
- \<> - represents primitive field values
- A - represents XML attribute values
Data Mapper operations
The operations palette placed in the left-hand side of the WSO2 Data Mapping Diagram Editor displays the operations that the Data Mapper supports as shown below .
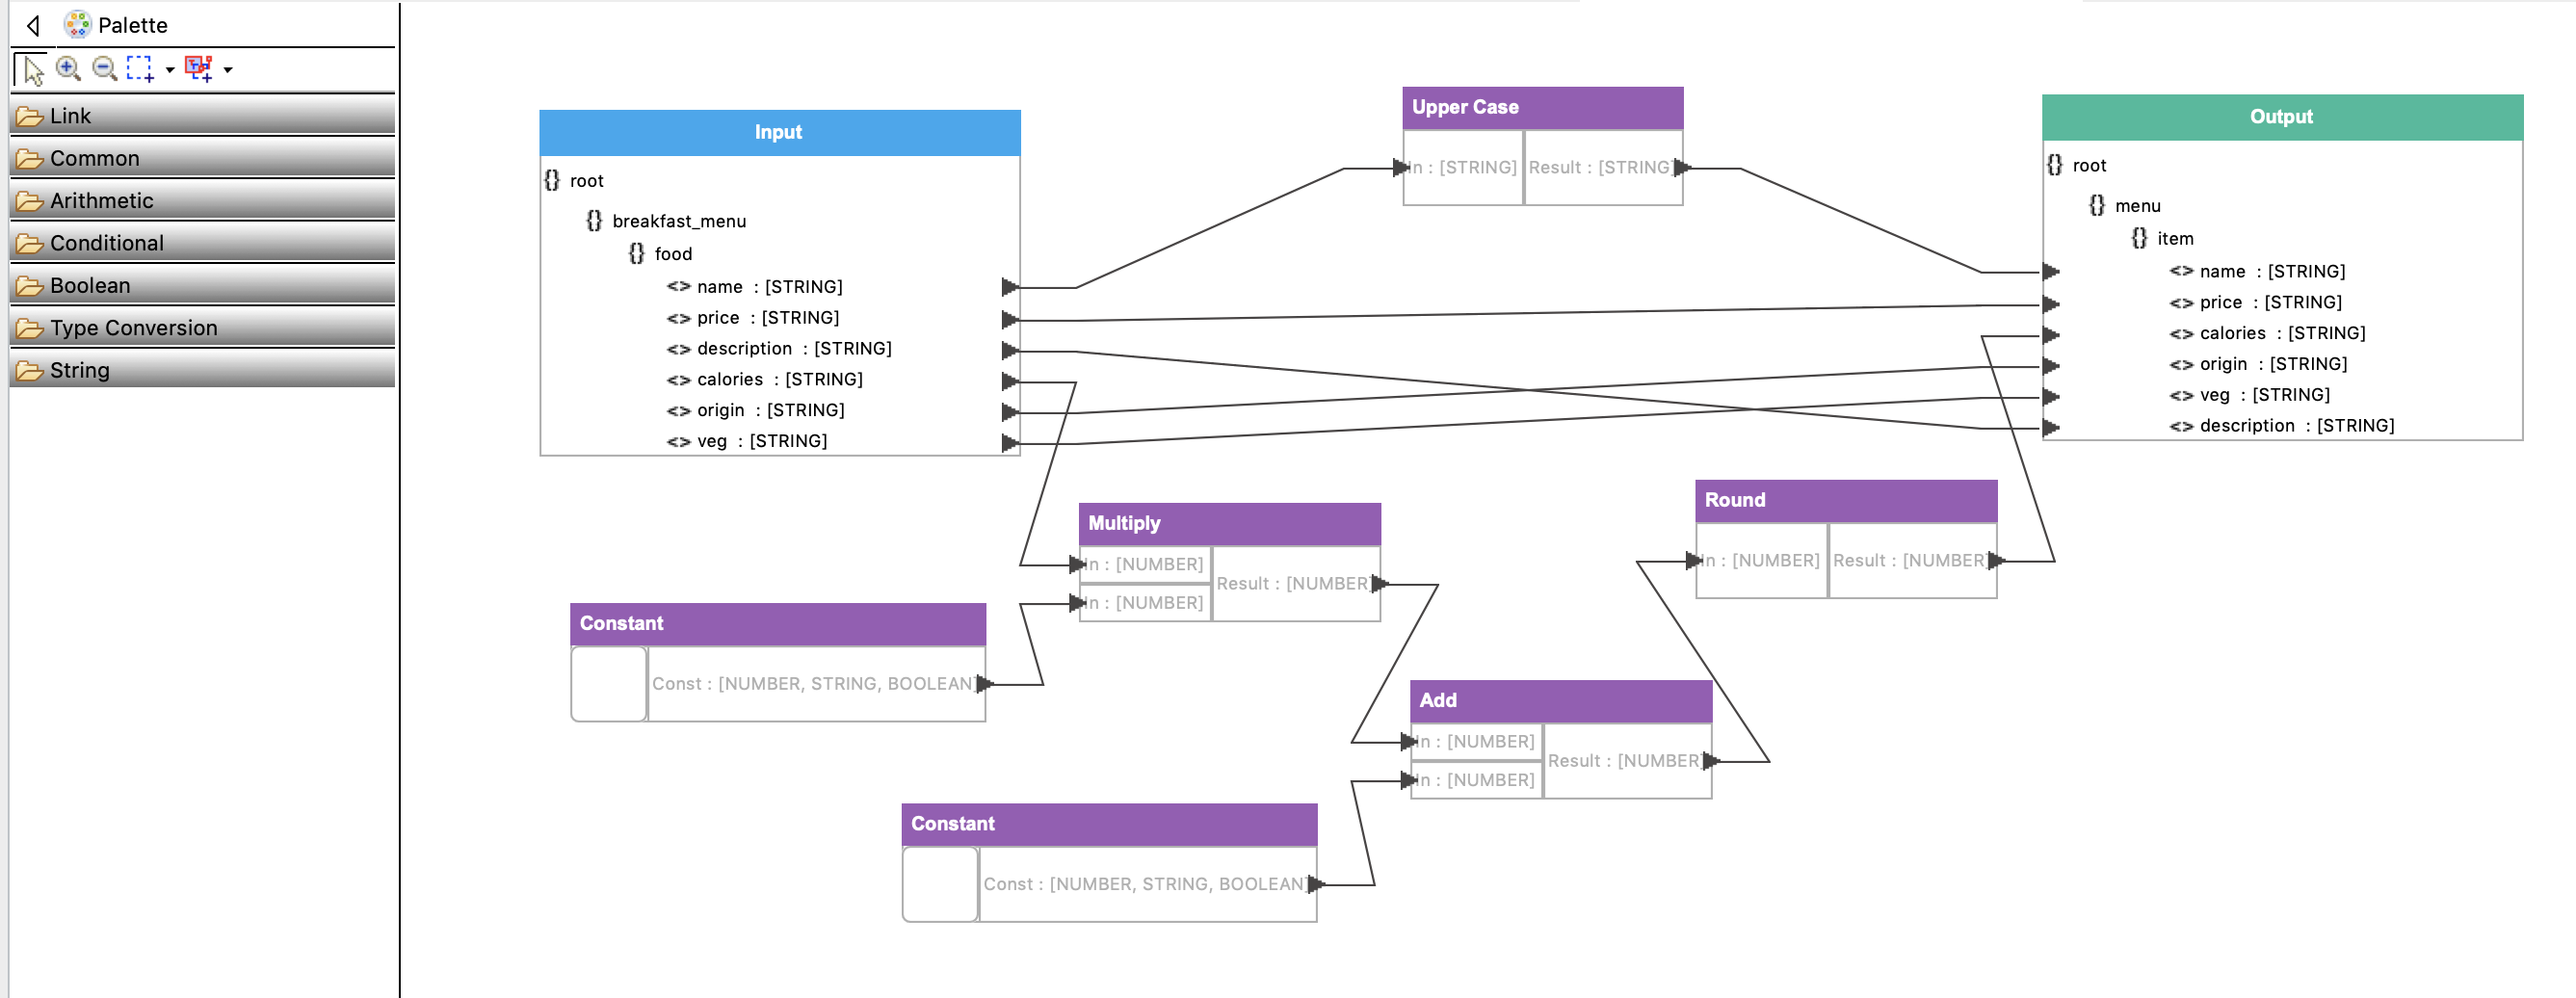
You can drag and drop these operations to the Editor area. There are six categories of operations as follows:
- Links
- Common
- Arithmetic
- Conditional
- Boolean
- Type Conversion
- String
Links

Data Mapping Link: maps elements with other operators and elements.
Common
 Constant:
defines String, number or boolean constant values.
Constant:
defines String, number or boolean constant values.
 Custom
Function: defines custom functions to use in the mapping.
Custom
Function: defines custom functions to use in the mapping.
 Properties:
uses product-specific runtime variables.
Properties:
uses product-specific runtime variables.
 Global
Variable: instantiates global variables that you can access from
anywhere.
Global
Variable: instantiates global variables that you can access from
anywhere.
 Compare:
compares two inputs in the mapping.
Compare:
compares two inputs in the mapping.
Arithmetic
 Add: adds two
numbers.
Add: adds two
numbers.
 Subtract:
subtracts two or more numbers.
Subtract:
subtracts two or more numbers.
 Multiply:
multiplies two or more numbers.
Multiply:
multiplies two or more numbers.
 Divide: divides
two numbers.
Divide: divides
two numbers.
 Ceiling:
derives the ceiling value of a number (closest larger integer value).
Ceiling:
derives the ceiling value of a number (closest larger integer value).
 Floor: derives
the floor value of a number (closest lower integer value).
Floor: derives
the floor value of a number (closest lower integer value).
 Round: derives
the nearest integer value.
Round: derives
the nearest integer value.
 Set Precision:
formats a number into a specified length.
Set Precision:
formats a number into a specified length.
 Absolute Value:
derives the absolute value of a rational number.
Absolute Value:
derives the absolute value of a rational number.
 Min: derives
the minimum number from given inputs
Min: derives
the minimum number from given inputs
 Max: derives
the maximum number from given inputs
Max: derives
the maximum number from given inputs
Conditional
 IfElse: uses a
condition and selects one input from given two.
IfElse: uses a
condition and selects one input from given two.
Boolean
 AND: performs
the boolean AND operation on inputs.
AND: performs
the boolean AND operation on inputs.
 OR: performs
the boolean OR operation on inputs.
OR: performs
the boolean OR operation on inputs.
 NOT: performs
the boolean NOT operation on inputs.
NOT: performs
the boolean NOT operation on inputs.
Type conversion
 StringToNumber:
converts a String value to number (“0” -> 0).
StringToNumber:
converts a String value to number (“0” -> 0).
 StringToBoolean: converts a String value to boolean (“true” ->
true).
StringToBoolean: converts a String value to boolean (“true” ->
true).
 ToString:
converts a number or a boolean value to String.
ToString:
converts a number or a boolean value to String.
String
 Concat:
concatenates two or more Strings.
Concat:
concatenates two or more Strings.
 Split: splits a
String by a matching String value.
Split: splits a
String by a matching String value.
 Uppercase:
converts a String to uppercase letters.
Uppercase:
converts a String to uppercase letters.
 Lowercase:
converts a String to lowercase letters.
Lowercase:
converts a String to lowercase letters.
 String Length:
gets the length of the String.
String Length:
gets the length of the String.
 StartsWith:
checks whether a String starts with a specific value. (This is not
supported in Java 7.)
StartsWith:
checks whether a String starts with a specific value. (This is not
supported in Java 7.)
 EndsWith:
checks whether String ends with a specific value. (This is not supported
in Java 7.)
EndsWith:
checks whether String ends with a specific value. (This is not supported
in Java 7.)
 Substring:
extracts a part of the String value.
Substring:
extracts a part of the String value.
 Trim: removes
white spaces from the beginning and end of a String.
Trim: removes
white spaces from the beginning and end of a String.
 Replace:
replaces the first occurrence of a target String with another.
Replace:
replaces the first occurrence of a target String with another.
 Match – check
whether the input match with a (JS) Regular Expression
Match – check
whether the input match with a (JS) Regular Expression
AI Data Mapper
WSO2 Integration Studio allows you to seamlessly generate the input-output mapping using its sophisticated AI Data Mapping generator. You simply have to load the input and output to the relevant sections as shown below and click Apply. Alternatively, you can manually create the mapping using the graphical drag-and-drop tool.
Important
The AI Data Mapping generator uploads the data to an internal WSO2 server for processing. However, your data is not stored by WSO2.

Examples
Example 1 - Creating a SOAP payload with namespaces
This example creates a Salesforce login SOAP payload using a JSON payload. The login payload consists of XML namespaces. Even though the JSON payload does not contain any namespace information, the output JSON schema will be generated with XML namespace information using the provided SOAP payload.

The sample input JSON payload is as follows.
{
   "name":"Watson",
   "password":"watson@123"
}
The sample output XML is as follows.
<soapenv:Envelope xmlns:urn="urn:enterprise.soap.sforce.com" xmlns:soapenv="http://www.w3.org/2003/05/soap-envelope/">
<soapenv:Body>
<urn:login>
<urn:username><b>[email protected]</b></urn:username>
<urn:password><b>secret</b></urn:password>
</urn:login>
</soapenv:Body>
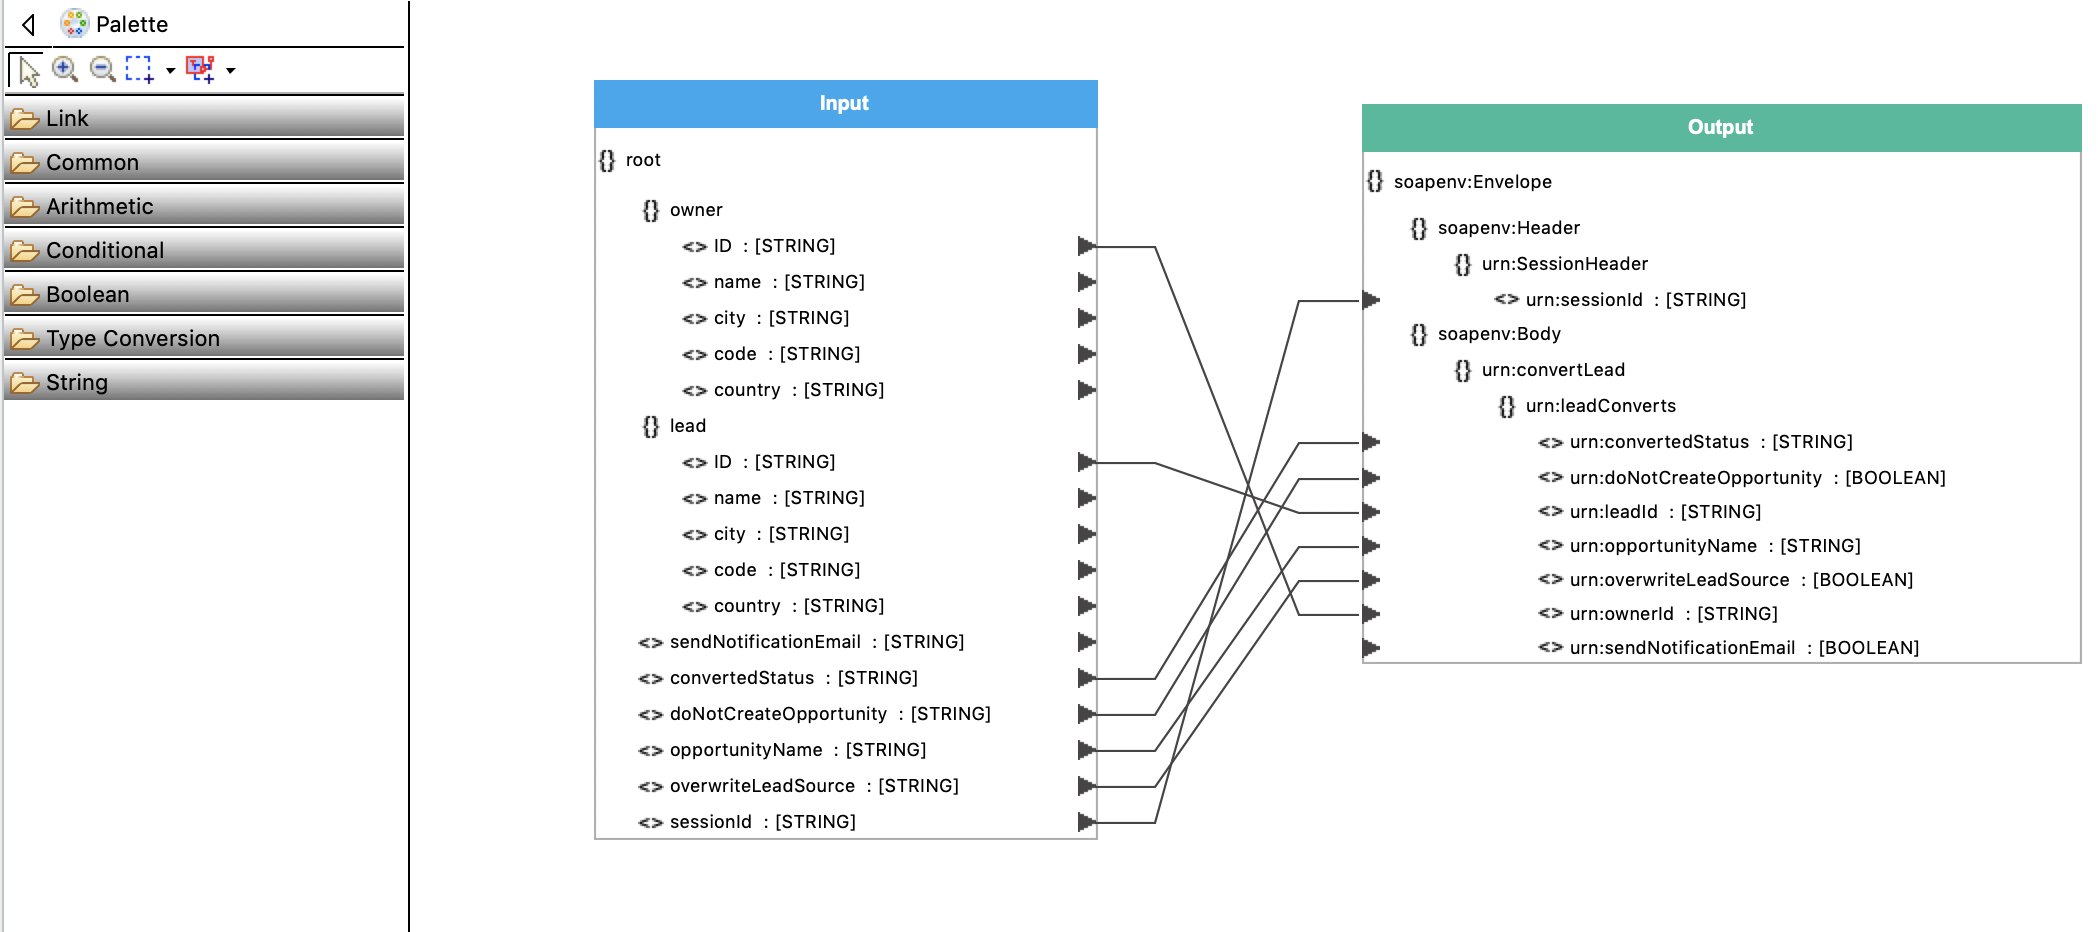
</soapenv:Envelope>Example 2 - Mapping SOAP header elements
This example demonstrates how to map SOAP header elements along with
SOAP body elements to create a certain SOAP payload, by creating a
Salesforce convertLead SOAP payload using a JSON payload. The Convert
Lead SOAP payload needs mapping SOAP header information.
E.g. <urn:sessionId>QwWsHJyTPW.1pd0_jXlNKOSU</urn:sessionId>
The sample input JSON payload is as follows.
{
   "owner":{
      "ID":"005D0000000nVYVIA2",
      "name":"Smith",
      "city":"CA",
      "code":"94041",
      "country":"US"
   },
   "lead":{
      "ID":"00QD000000FP14JMAT",
      "name":"Carl",
      "city":"NC",
      "code":"97788",
      "country":"US"
   },
   "sendNotificationEmail":"true",
   "convertedStatus":"Qualified",
   "doNotCreateOpportunity":"true",
   "opportunityName":"Partner Opportunity",
   "overwriteLeadSource":"true",
   "sessionId":"QwWsHJyTPW.1pd0_jXlNKOSU"
}
The sample o utput XML is as follows.
<?xml version="1.0" encoding="utf-8"?>
<soapenv:Envelope xmlns:urn="urn:enterprise.soap.sforce.com" xmlns:soapenv="http://www.w3.org/2003/05/soap-envelope/">
  <soapenv:Header>
     <urn:SessionHeader>
        <urn:sessionId>QwWsHJyTPW.1pd0_jXlNKOSU</urn:sessionId>
     </urn:SessionHeader>
     </soapenv:Header>
     <soapenv:Body>
     <urn:convertLead >
        <urn:leadConverts> <!-- Zero or more repetitions -->
           <urn:convertedStatus>Qualified</urn:convertedStatus>
           <urn:doNotCreateOpportunity>false</urn:doNotCreateOpportunity>
           <urn:leadId>00QD000000FP14JMAT</urn:leadId>
           <urn:opportunityName>Partner Opportunity</urn:opportunityName>
           <urn:overwriteLeadSource>true</urn:overwriteLeadSource>
           <urn:ownerId>005D0000000nVYVIA2</urn:ownerId>
           <urn:sendNotificationEmail>true</urn:sendNotificationEmail>
        </urn:leadConverts>
     </urn:convertLead>
</soapenv:Body>
</soapenv:Envelope>
Example 3 - Mapping primitive types
This example demonstrates how you can map an XML payload with integer, boolean etc. values into a JSON payload with required primitive types, by specifying the required primitive type in the JSON schema.
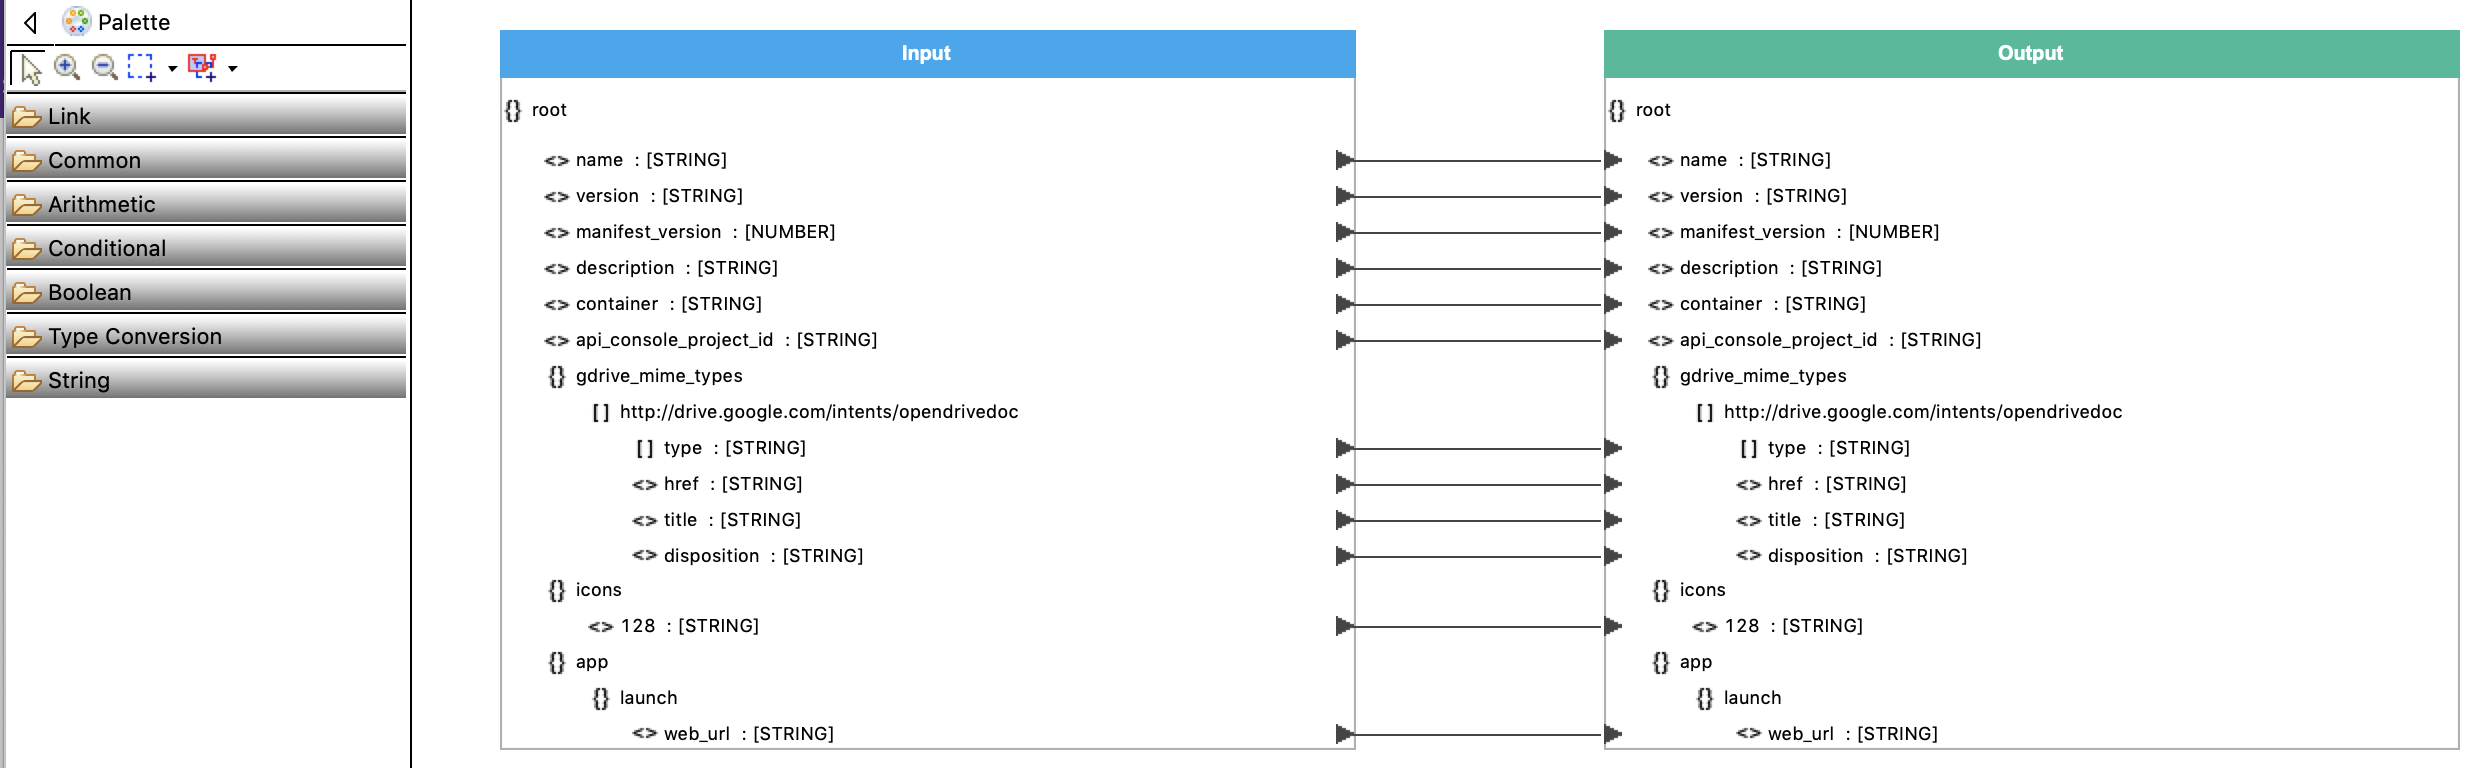
The sample input XML payload is as follows.
<?xml version="1.0" encoding="UTF-8" ?>
    <name>app_name</name>
    <version>version</version>
    <manifest_version>2</manifest_version>
    <description>description_text</description>
    <container>GOOGLE_DRIVE</container>
    <api_console_project_id>YOUR_APP_ID</api_console_project_id>
    <gdrive_mime_types>
        <http://drive.google.com/intents/opendrivedoc>
            <type>image/png</type>
            <type>image/jpeg</type>
            <type>image/gif</type>
            <type>application/vnd.google.drive.ext-type.png</type>
            <type>application/vnd.google.drive.ext-type.jpg</type>
            <type>application/vnd.google.drive.ext-type.gif</type>
            <href>http://your_web_url/</href>
            <title>Open</title>
            <disposition>window</disposition>
        </http://drive.google.com/intents/opendrivedoc>
    </gdrive_mime_types>
    <icons>
        <128>icon_128.png</128>
    </icons>
    <app>
        <launch>
            <web_url>http://yoursite.com</web_url>
        </launch>
    </app>
The sample output JSON is as follows.
{
"name" : "app_name",
"version" : "version",
"manifest_version" : 2,
"description" : "description_text",
"container" : "GOOGLE_DRIVE",
"api_console_project_id" : "YOUR_APP_ID",
"gdrive_mime_types": {
  "http://drive.google.com/intents/opendrivedoc": [
    {
      "type": ["image/png", "image/jpeg", "image/gif", "application/vnd.google.drive.ext-type.png",
      "application/vnd.google.drive.ext-type.jpg","application/vnd.google.drive.ext-type.gif"],
      "href": "http://your_web_url/",
      "title" : "Open",
      "disposition" : "window"
    }
  ]
},
"icons": {
  "128": "icon_128.png"
},
"app" : {
  "launch" : {
  "web_url" : "http://yoursite.com"
  }
}
}
Example 4 - Mapping XML to CSV
This example demonstrates how you can map an XML payload to CSV format.
Info
If you specify special characters (e.g., & ,
& ) within the <text>
tag w hen converting from CSV to CSV , they will be displayed as follows
by default.
- & -> &
- & -> &amp;
- < -> <
- < -> <lt;
To avoid this and to display the exact special characters as text in the returned output, add the following properties in the Synapse configuration.
<property name="messageType" value="text/plain" scope="axis2"/>
<property name="ContentType" value="text/plain" scope="axis2"/>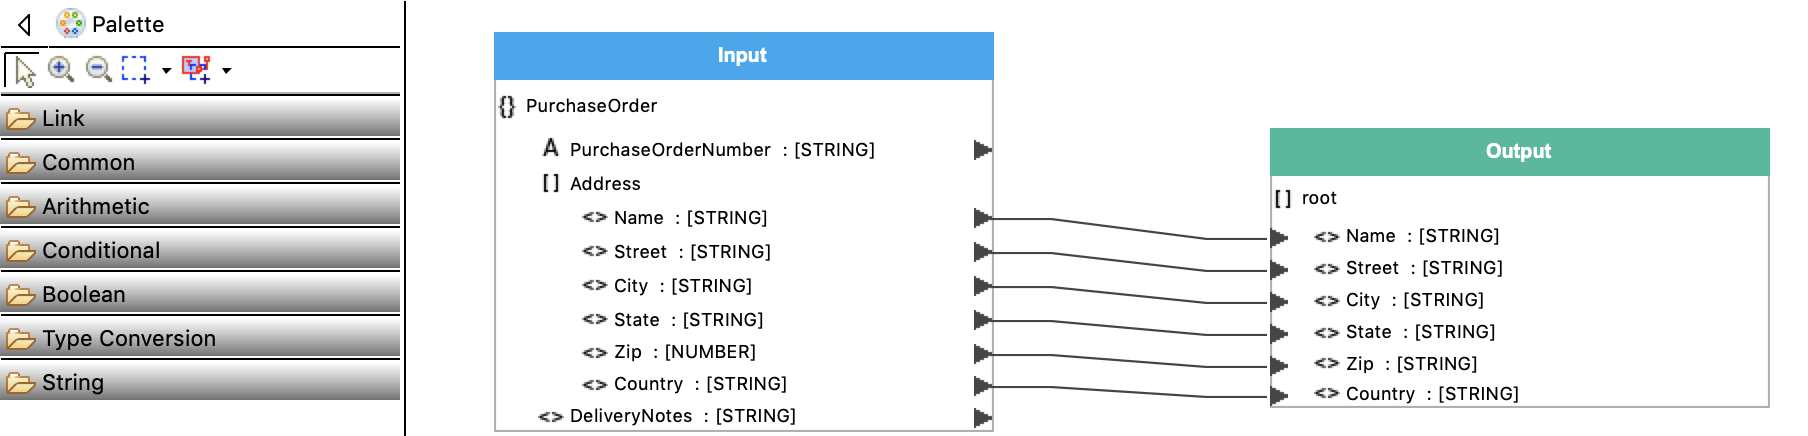
The sample in put XML payload is as follows.
<?xml version="1.0"?>
<PurchaseOrder PurchaseOrderNumber="001">
<Address>
    <Name>James Yee</Name>
    <Street>Downtown Bartow</Street>
    <City>Old Town</City>
    <State>PA</State>
    <Zip>95819</Zip>
    <Country>USA</Country>
</Address>
<Address>
    <Name>Elen Smith</Name>
    <Street>123 Maple Street</Street>
    <City>Mill Valley</City>
    <State>CA</State>
    <Zip>10999</Zip>
    <Country>USA</Country>
</Address>
 <DeliveryNotes>Please leave packages in shed by driveway.</DeliveryNotes>
</PurchaseOrder>
The sample out put CSV is as follows.
Name,Street,City,State,Zip,Country
James Yee,Downtown Bartow,Old Town,PA,95819,USA
Ellen Smith,123 Maple Street,Mill Valley,CA,10999,USA
Example 5 - Mapping XSD to JSON
This example demonstrates how you can map an XSD payload to JSON format.
The sample in put XSD payload is as follows.
<xs:schema attributeFormDefault="unqualified" elementFormDefault="qualified" xmlns:xs="http://www.w3.org/2001/XMLSchema">
  <xs:element name="books">
    <xs:complexType>
      <xs:sequence>
        <xs:element name="book">
          <xs:complexType>
            <xs:sequence>
              <xs:element type="xs:string" name="id"/>
              <xs:element type="xs:string" name="author"/>
              <xs:element type="xs:string" name="title"/>
              <xs:element type="xs:float" name="price"/>
            </xs:sequence>
          </xs:complexType>
        </xs:element>
      </xs:sequence>
    </xs:complexType>
  </xs:element>
</xs:schema>
The sample out put JSON is as follows.
{
  "books": {
    "book": {
      "id": "001",
      "author": "Writer",
      "title": "Great book on nature",
      "price": "44.95"
    }
  }
}