Using Docker Secrets in Synapse Configurations
WSO2 Micro Integrator comes with a built-in secret repository as a part of its secure vault implementation by default. In addition to this, the Micro Integrator also provides built-in support for Docker secrets and Kubernetes secrets for your containerized deployments.
Managing sensitive information in a Docker environment can be achieved using two simple steps:
- Adding the secret to your Docker environment.
- Accessing the secret from within your synapse configurations.
There are two ways to add secrets to a Docker environment: Creating the Docker secret directly inside the environment, or storing the secrets in a flat file and adding the file to the environment.
Creating a secret in the Docker environment
Follow the steps given below to directly add the required secrets to the Docker environment.
Step 1: Creating Docker secrets
You can create a Docker secret in the Docker environment by using the following command:
Tip
To use Docker secrets, you must have the swarm mode enabled in your environment. If it is not already enabled, you can enable it by using the docker swarm init command.
You can use the docker secret create command as given below to create a secret in your docker environment.
echo "dockersecret123456" | docker secret create testdockersecret -testdockersecret in your Docker environment.
Step 2: Using Docker secrets in Synapse configurations
Secret can be accessed from the integration artifacts by using the wso2:vault-lookup function in the following format.
wso2:vault-lookup('<alias>', '<type>', '<isEncrypted>')Specify values for the following three parameters:
<alias>: Name of the secret.<type>: Set this toDOCKER<isEncrypted>: Set this totrueorfalseto specify whether the secret is encrypted.
Given below is a sample synapse configuration that accesses and prints the Docker secret we declared in the previous step.
<property expression="wso2:vault-lookup('testdockersecret', 'DOCKER', 'false')" name="secret"/>Adding a secret from a flat file
Instead of creating Docker secrets directly in the Docker environment, you can add secrets to the Docker environment by adding a flat file that contains the secrets.
Step 1: Adding the flat file
Follow the steps given below.
- Create a flat file with the secret. Note that the file name is the alias (e.g.
testsecret) of the secret and the file content should be the secret itself. - Add the created file to the Resources folder in your Docker Exporter module inside the integration project.
- Add the following line to the Dockerfile in your Docker Exporter module. This copies the secret file to the
<MI_HOME>directory so that it will be available in your Docker Image.
COPY Resources/FLAT_FILE_NAME ${WSO2_SERVER_HOME}/Step 2: Using file secrets in Synapse configurations
Secret can be accessed from the integration artifacts by using the wso2:vault-lookup function in the following format.
wso2:vault-lookup('<alias>', '<type>', '<isEncrypted>')Specify values for the following three parameters:
<alias>: Name of the file.<type>: Set this toFILE<isEncrypted>: Set this totrueorfalseto specify whether the secret is encrypted.
Given below is a sample synapse configuration that accesses and prints the file secret we declared in the previous step.
<property expression="wso2:vault-lookup('testsecret', 'FILE', 'false')" name="secret"/>Enabling secrets in the environment
Once the secrets are added to the environment, you need to enable secure vault in the environment. In a Docker environment, you don't need to manually run the Cipher tool. Follow the steps given below.
- Open your Integration Project in WSO2 Integration Studio, which contains all the integration artifacts and the Docker Exporter.
-
Open the
pom.xmlof the Docker Exporter module and select the Enable Cipher Tool check box as shown below.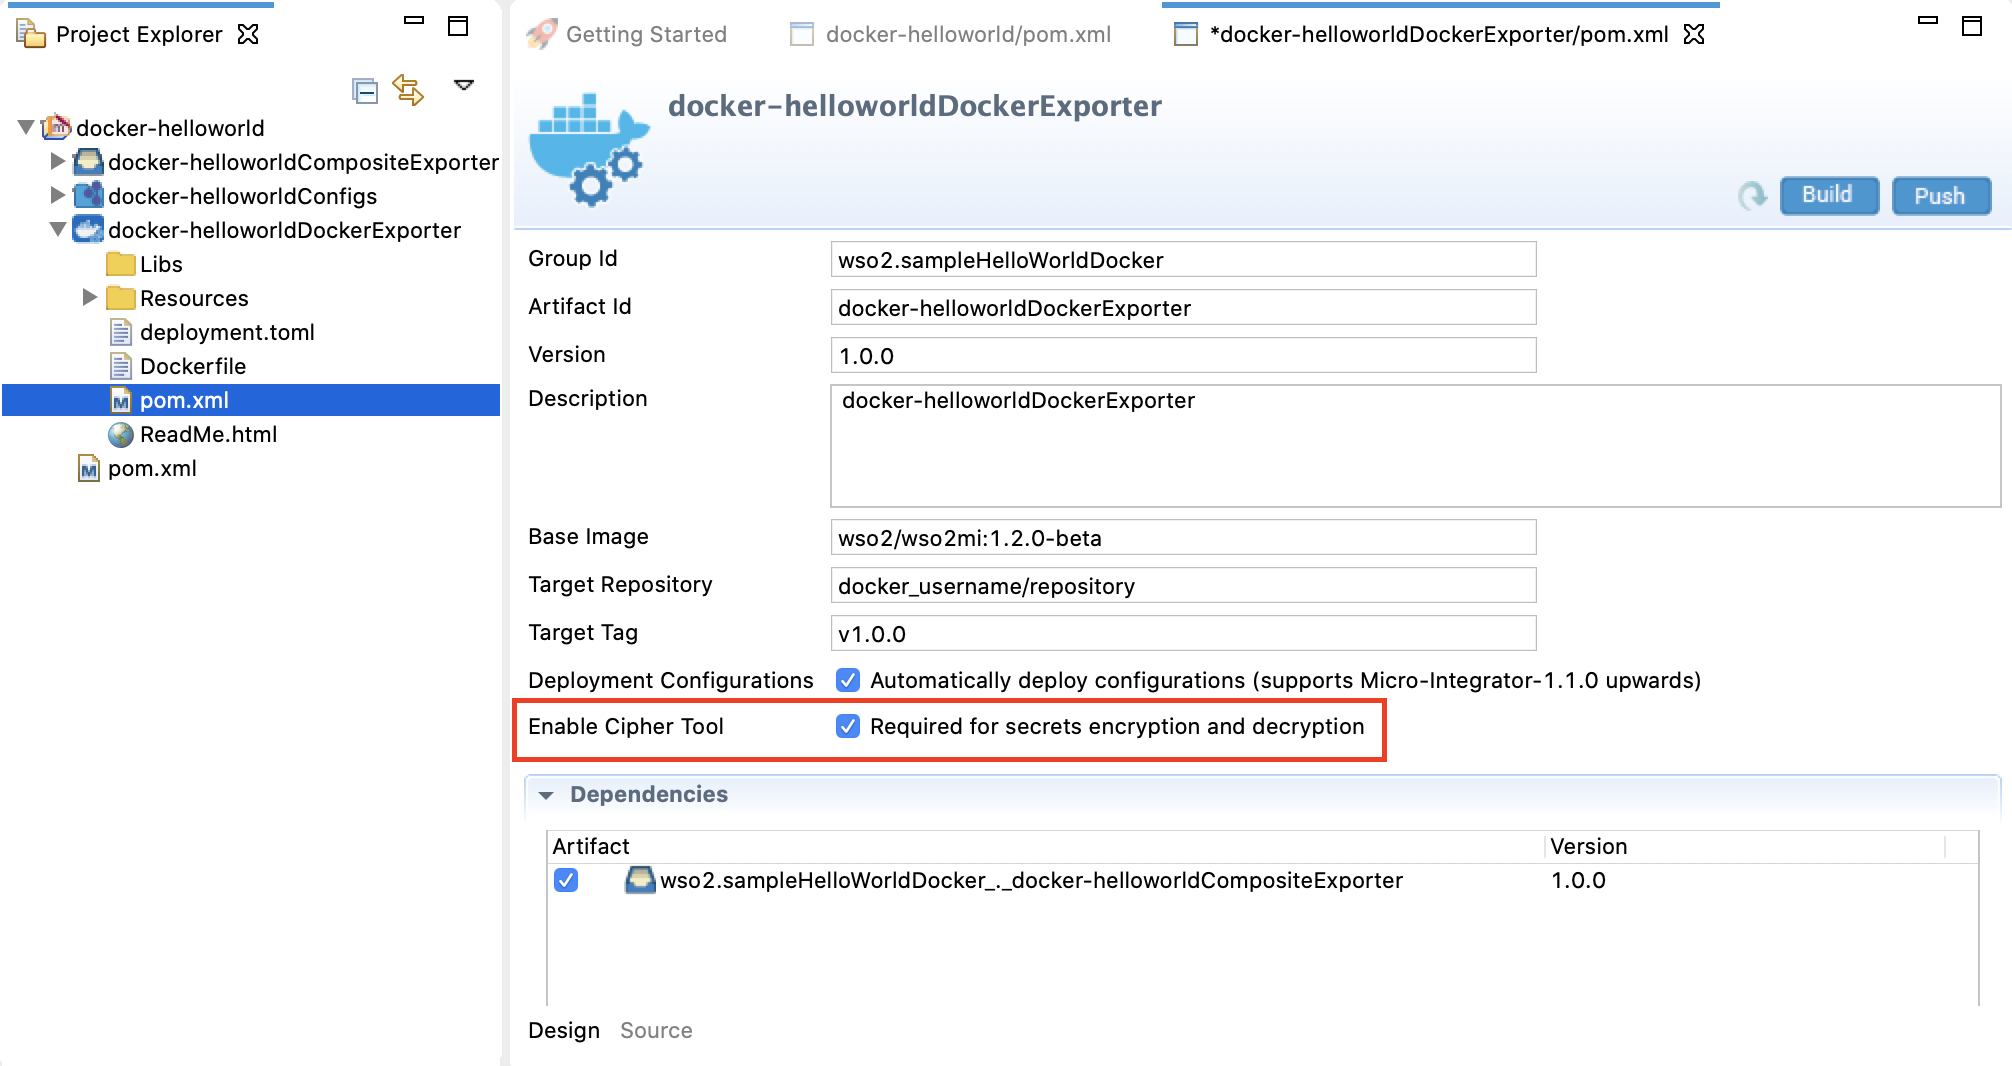
-
When you build the Docker image from your Docker Exporter, the secrets will get enabled in the environment.
Tip
For Docker secrets to be effective, you can create a docker service that includes the image you created in the above step. This can be done by creating a docker-compose.yml file and deploying it to the docker swarm.
Given below is a sample docker-compose.yml file that can be used to create a simple docker service orchestration.
version: '3.3'
services:
  wso2mi:
    image: wso2/wso2mi:latest
    ports:
      - 8290:8290
      - 8253:8253
    secrets:
      - testdockersecret
secrets:
  testdockersecret:
    external: true
Upon creating the docker-compose.yml file, you can deploy the services using the docker stack deploy command as follows:
docker stack deploy -c <PATH_TO_DOCKER_COMPOSE_FILE> <STACK_NAME>See the Docker guide for more information on defining and using Docker secrets.
Configuring the secrets' location
The Docker secrets and file secrets are stored in default locations in the container environment. The Docker secrets can be found in the following location:
- On Linux:
/run/secrets/<secret_name> - On Windows:
C:\ProgramData\Docker\secrets
The default location for the file secret is the <MI-HOME>/ directory. Therefore, by default, the server will search for aliases in these directories.
However, if you are storing your secrets in a different directory location in the container, you should configure the server to search the secrets in those custom directories by using the following system properties.
- Configuring the custom directory path storing the Docker secret:
-Dei.secret.docker.root.dir=<CUSTOM_DOCKER_SECRET_LOCATION>- Configuring the custom directory path storing the flat file secrets:
-Dei.secret.file.root.dir=<CUSTOM_FILE_SECRET_LOCATION>